Build a small business around profitable Cricut projects, with creative products for schools, weddings, independent retailers and other paying customers.
Running a small business often means paying attention to details that customers notice, from the packaging a product arrives in to the information included with an order.
A handmade jewellery seller, for example, needs display cards for earrings, while a florist may need branded flower-care instructions to accompany bouquets.
Wedding planners, clothing businesses and independent retailers also have their own requirements for customised stationery and printed materials.
Ordering these items in large quantities is not always practical, particularly for businesses that are still growing or only need a small batch at a time.
This creates an opportunity for home-based makers who can produce customised items in manageable quantities.
A Cricut cutting machine can help meet some of these needs by cutting cardstock, vinyl and other compatible materials, as well as supporting printed-and-cut designs on compatible machines.
This makes it possible to produce a range of items, from business packaging accessories and event stationery to educational resources and professional information cards.
The important part is choosing products with identifiable buyers, manageable production requirements and costs that leave room for profit.
Below, we’ll look at 35 profitable Cricut projects you can make from home, who might buy them and what to consider before adding them to your product range.
Some affordable Cricut creations can become popular products. See these 33 Cricut Projects That Actually Sell Well.
What Makes These Cricut Products Commercially Worthwhile?
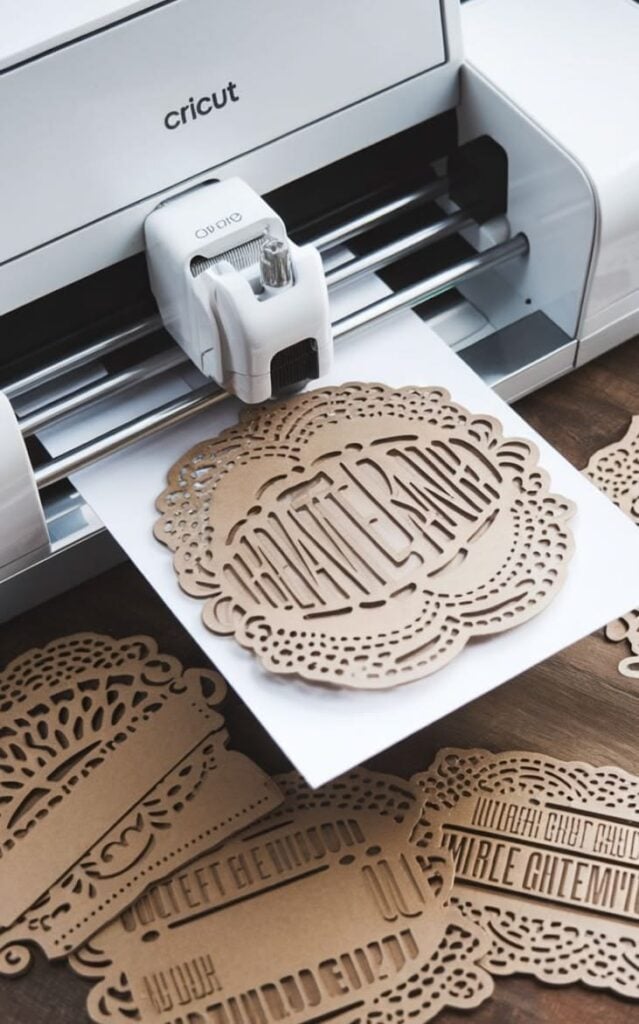
The commercial value of these Cricut products depends on understanding who will buy them, how much work each order involves and whether production can be managed efficiently.
-
Look at the Customer Before Choosing the Product
Different customers have different needs. A florist may order 100 care cards with the same branding, while a couple may need 80 place cards, each bearing a different guest’s name.
These orders show why it helps to understand a particular customer group. One business may need several related items, giving you an opportunity to offer complementary products instead of constantly searching for unrelated buyers.
For example, a florist who orders care cards may also need bouquet tags and branded packaging accessories.
-
Calculate the Production Cost, Not Just the Material Cost
The amount spent on cardstock or vinyl is only part of the cost of making an item.
Your calculation should also account for blanks, ink, adhesive, transfer tape, packaging, material waste and failed cuts or prints. Include the time spent designing, cutting, weeding, assembling and packing each order.
You should also factor in marketplace fees, payment processing and delivery expenses where applicable. A realistic price must cover these costs and leave room for profit.
-
Identify Products That Can Be Produced in Batches
Batch production can make a noticeable difference to the time spent fulfilling orders.
Cutting 50 identical florist care cards in one session is generally more efficient than designing and producing 50 completely different cards for separate customers.
Standard sizes, reusable design templates and clearly defined customisation options can reduce repeated work.
You can still offer personalisation, but avoid making every order a completely new design unless the price accounts for the extra time involved.
-
Give Customers a Reason to Order from a Home-Based Maker
Small businesses and event organisers may prefer a maker who accepts smaller orders, adds individual names or business details, and produces coordinated items in quantities that suit their needs.
Consistent quality and the ability to reorder an existing design can also make your service more convenient. These are the advantages you can build into your offer when developing profitable Cricut projects.
They do not guarantee sales, but they give customers clear reasons to consider your products and give you a more realistic basis for building a small production business.
Find more product ideas with these 33 Best Cricut Projects to Make and Sell Online.
Profitable Cricut Projects
1. Custom Product Packaging Belly Bands
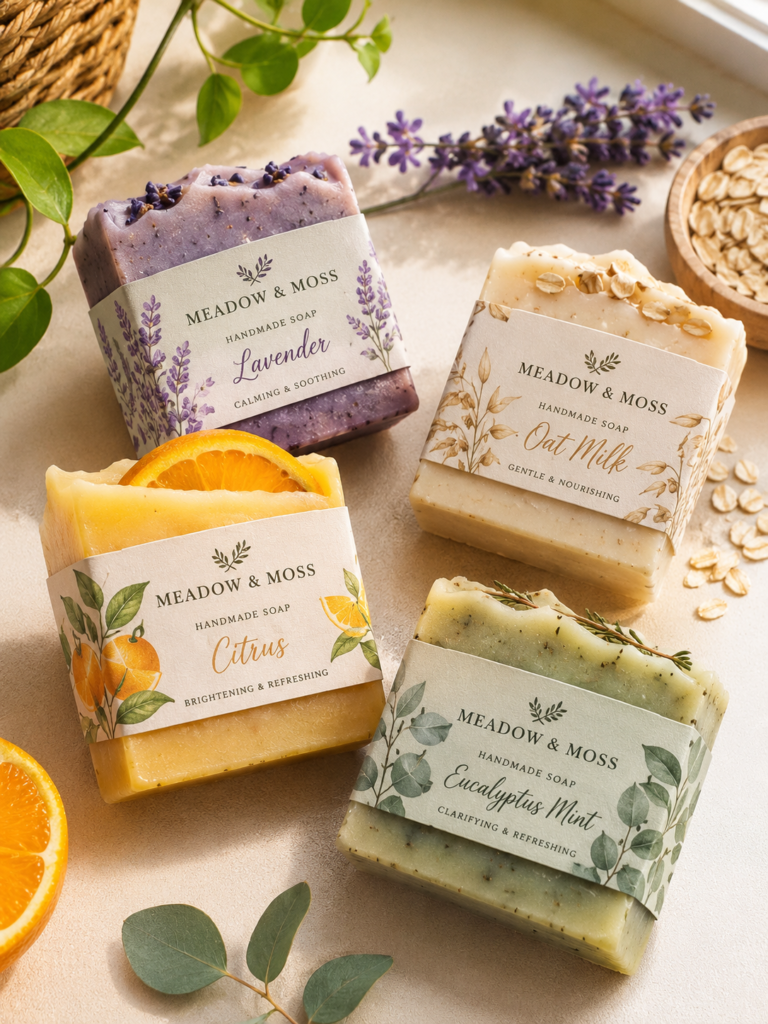
Small businesses that sell handmade soaps, candles, stationery and other packaged goods often want their products to look recognisable without investing in fully customised boxes.
One way to achieve this is with a packaging belly band, a strip of printed or decorative paper that wraps around a product or its existing packaging and holds the presentation together.
With a Cricut machine, you can cut these bands to different lengths and widths, add business names, product details or simple decorative designs, and create matching sets for different product ranges.
For example, a soap maker could use different band colours and labels to distinguish individual soap varieties while maintaining consistent branding.
Offer sizes that fit specific packaging dimensions, and use suitable cardstock or paper that folds neatly without cracking.
This gives small producers a flexible packaging option, particularly when they need smaller quantities or want to update their branding without replacing their existing boxes.
2. Custom Folding Product Sleeves
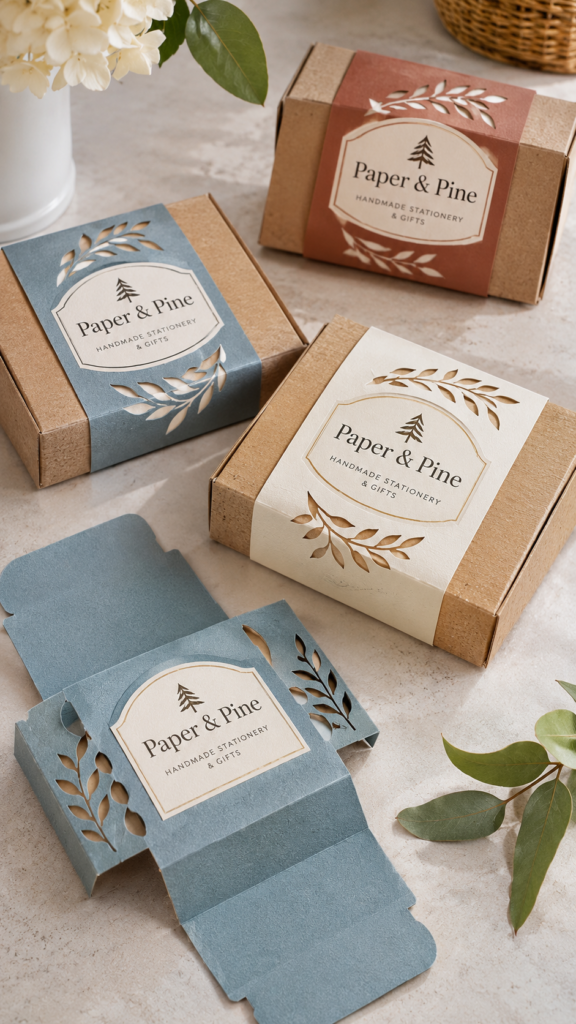
Some small businesses use plain jars, boxes, bottles or containers because ordering fully printed packaging can be expensive, especially when they need only a limited quantity.
A folding product sleeve offers another option. It is a shaped piece of cardstock that wraps around an existing package, leaving the original container in place while providing space for a product name, brand details or other printed information.
With a Cricut machine, you can cut the sleeve template and add score lines to make folding easier.
The important part is measuring the actual container, including its circumference and the areas where the sleeve needs to overlap or close.
You should also test the finished sleeve before producing a batch to ensure it fits securely without slipping or obstructing the product information already on the packaging.
Turn simple materials into extra income with these 31 Easy Cricut Projects to Make and Sell for Extra Money.
3. Branded Earring Display Cards
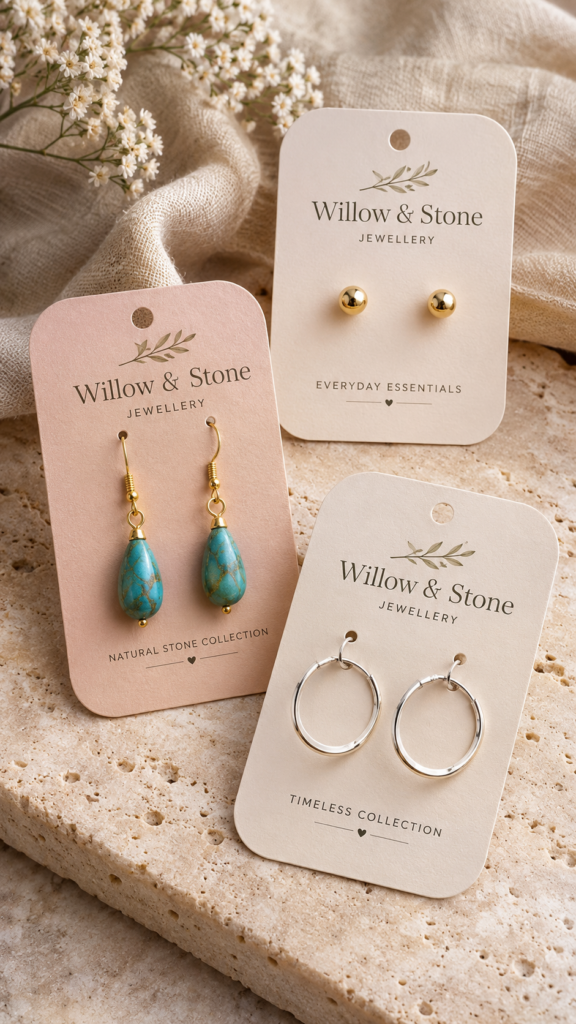
Jewellery makers need a way to present earrings neatly while keeping pairs together during storage, photography and retail display.
Earring display cards serve this purpose by providing a firm backing with holes or slots for attaching the jewellery.
You can make these cards from suitable cardstock, cut them into different shapes and add the jewellery maker’s business name, logo or contact details.
Hole placement is particularly important: the openings must match the type of earrings being displayed, whether they have posts, hooks or other fittings.
For a more useful service, offer standard card sizes for studs and drop earrings rather than assuming one design will accommodate every style.
The cards can also be supplied in batches, making them relevant to independent jewellery makers who regularly prepare pieces for sale.
4. Clothing Brand Hang Tags
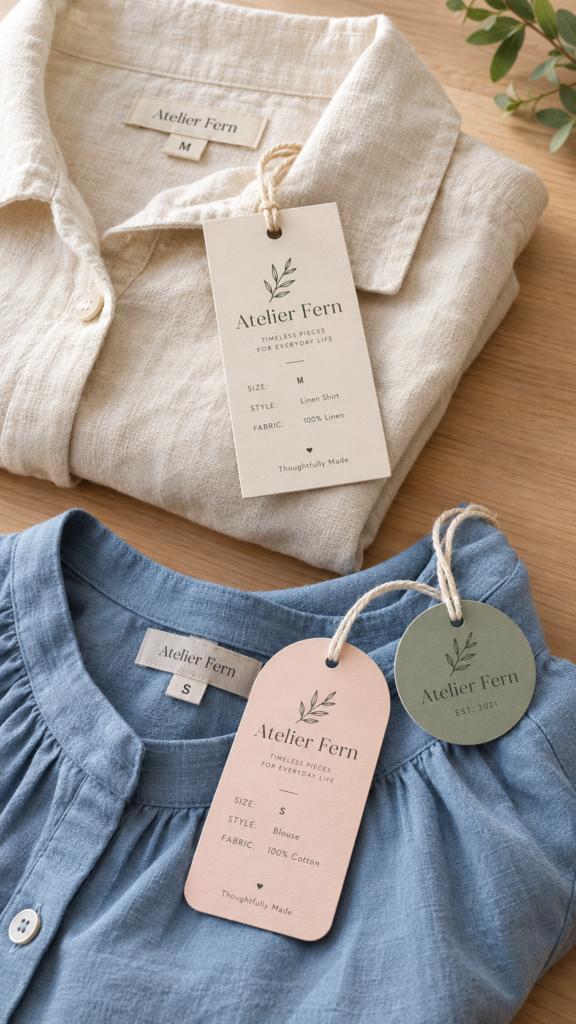
When clothing businesses sell garments, they often need individual tags to display information that is not printed directly on the clothing.
Hang tags provide space for the brand name, garment size, price, product description or website.
You can produce these using cardstock cut into rectangles, circles or other simple shapes, then add printed or cut details and a hole for attaching a string or tag fastener.
The information should be arranged carefully so that the tag remains readable at its finished size.
It is also important to distinguish hang tags from legally required garment labels: a decorative brand tag does not replace mandatory fibre-content, care or country-of-origin information where these are required by the market in which the clothing is sold.
Create useful labels and storage accessories with these 27 Easy Cricut Projects for Organizing Your Home.
5. Garment Care Instruction Cards
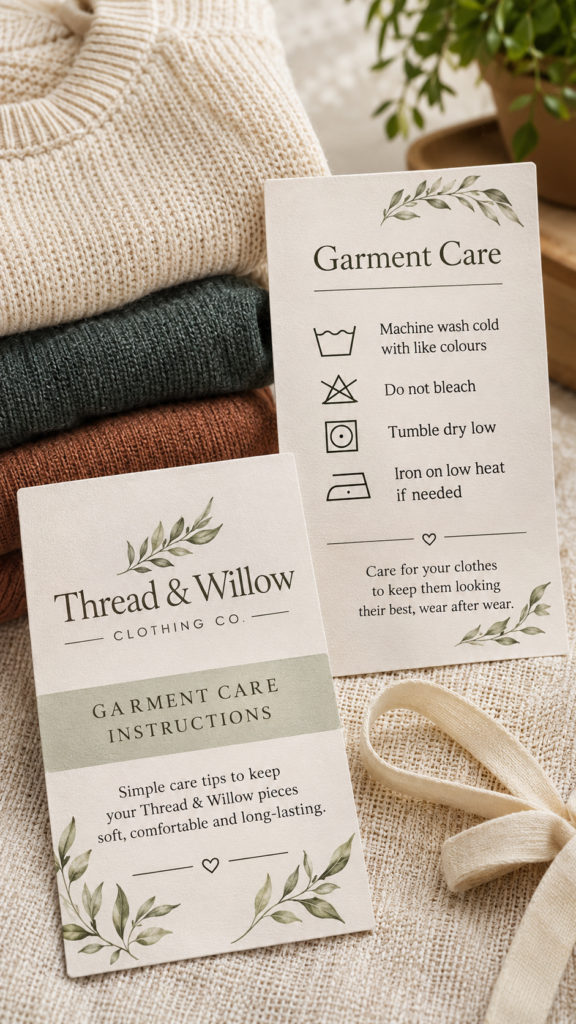
Customers do not always know how to care for unfamiliar fabrics or specially finished garments, and incorrect washing or ironing can damage clothing.
Independent clothing brands can include care instruction cards with orders to explain how particular garments should be maintained.
Using a Cricut machine, you can cut these cards to a consistent size and combine printed text with simple decorative details or brand information.
The care instructions should come from the garment maker or reliable fabric-care guidance rather than being copied from a generic template.
For example, washing temperature, drying method and ironing restrictions can differ between cotton, wool, polyester and blended fabrics.
Offer clothing businesses a layout they can update for different garment types instead of printing identical instructions for every item.
6. Candle Dust Covers
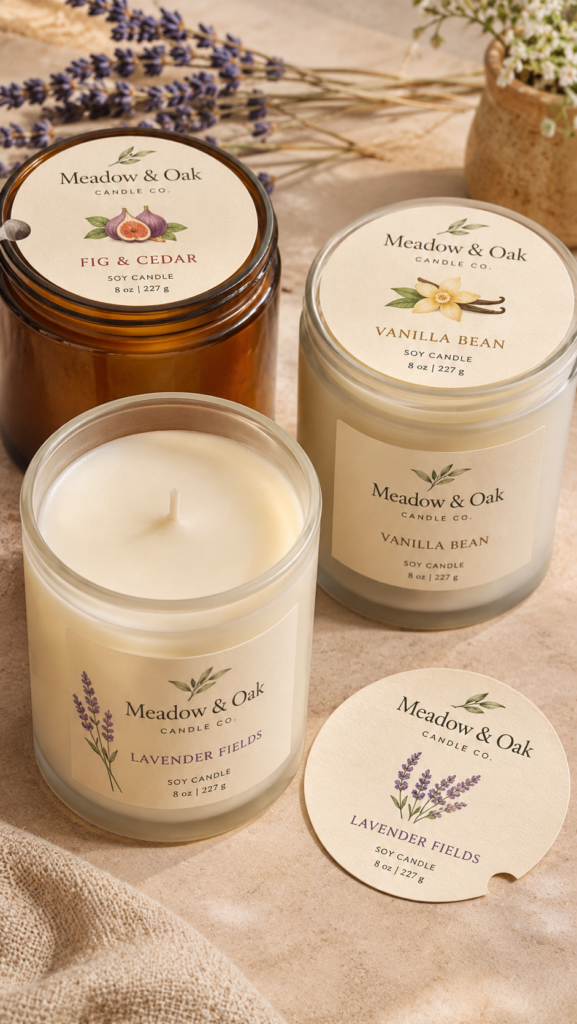
Candles displayed or stored without packaging can collect dust, fibres and other particles on their exposed wax surfaces.
Candle dust covers are paper or cardstock inserts designed to sit over the opening of a candle container while the candle is not in use.
You can cut them to fit different container openings and add the candle brand, fragrance name or a short product description.
Accurate sizing is important because a cover that is too small may fall into the container, while one that is too large may not sit properly.
Use suitable paper that does not shed fibres onto the wax, and make it clear that these are storage and display accessories, not lids for use while a candle is burning. They must be removed before lighting.
Add personalised details to everyday kitchen items with these 25 Easy Cricut Projects for Your Kitchen.
7. Reusable Packaging Branding Stencils
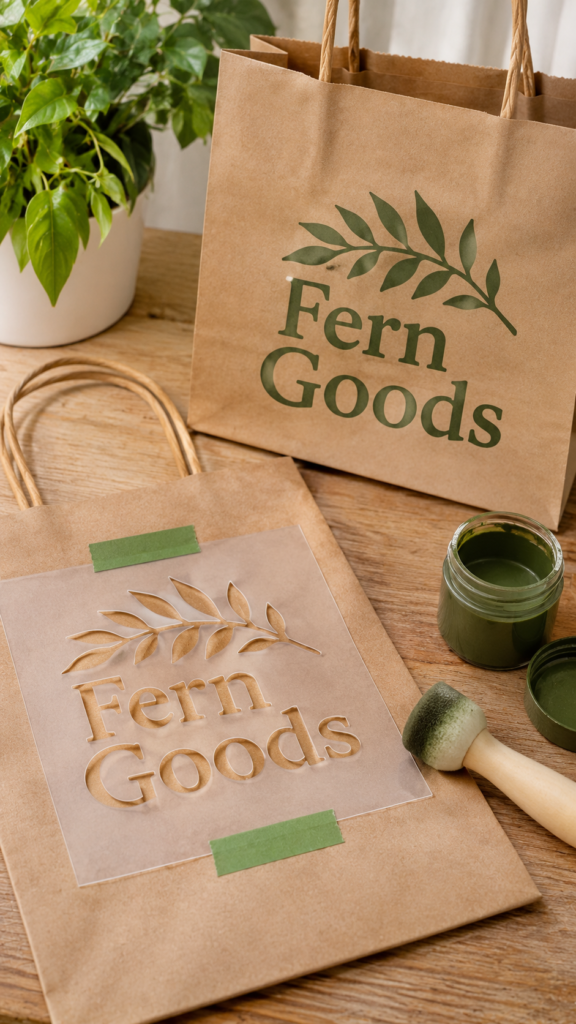
Small businesses that pack orders in plain kraft paper bags, cardboard boxes or suitable paper packaging may want to add their branding without purchasing pre-printed packaging.
A reusable stencil provides a way to apply the same design repeatedly using suitable paint or ink.
With a Cricut machine, you can cut stencil designs from compatible stencil film or other appropriate reusable materials.
The artwork needs careful preparation because enclosed areas in letters such as A, O and R require connecting sections to keep the inner pieces in place.
The stencil should also be sized for the packaging surface and tested with the chosen paint or ink to check for bleeding around the edges.
This option is particularly useful for businesses that want to brand small batches of packaging themselves, although the finish will depend on the stencil material, application method and surface being used.
8. Layered Wedding Invitation Suites
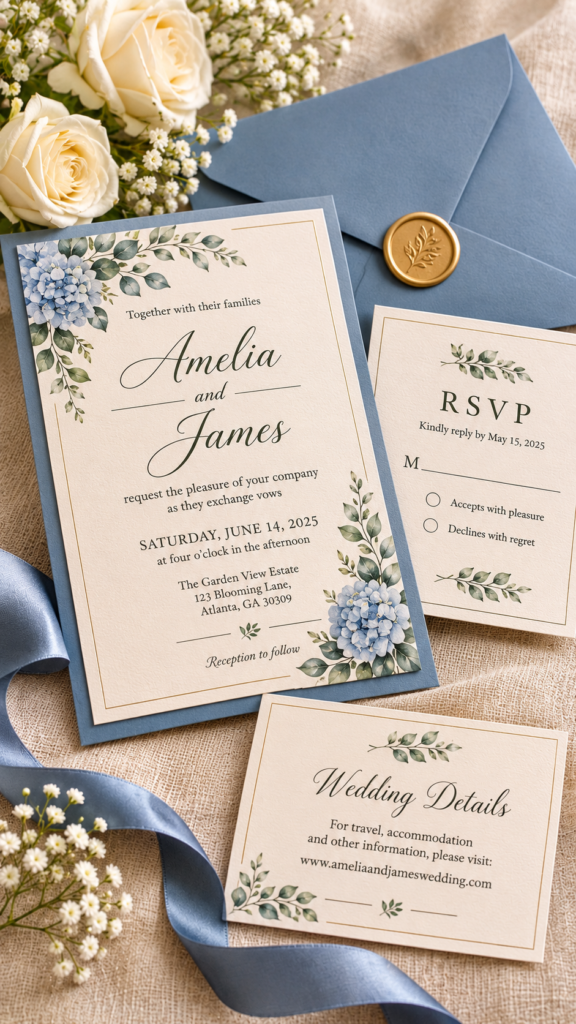
Wedding invitations often contain more information than the ceremony date, venue and names of the couple.
Guests may also need RSVP instructions, accommodation details, directions or information about the reception.
A layered invitation suite brings these details together in separate but coordinated cards, making the information easier to organise without overcrowding the main invitation.
This is an opportunity to offer profitable Cricut projects to couples who want a coordinated stationery design but do not need commercially printed quantities.
You can cut the invitation cards, information inserts and decorative backing layers from suitable cardstock, then use scoring tools for folded sections.
The important part is planning the dimensions of every insert around the envelope size so the finished set fits without excessive bulk.
Not every couple needs a large suite, so offer a basic invitation and RSVP combination alongside optional information cards and decorative layers.
Put leftover craft supplies to good use with these 23 Cricut Projects You Can Make with Scrap Materials.
9. Custom Envelope Liners
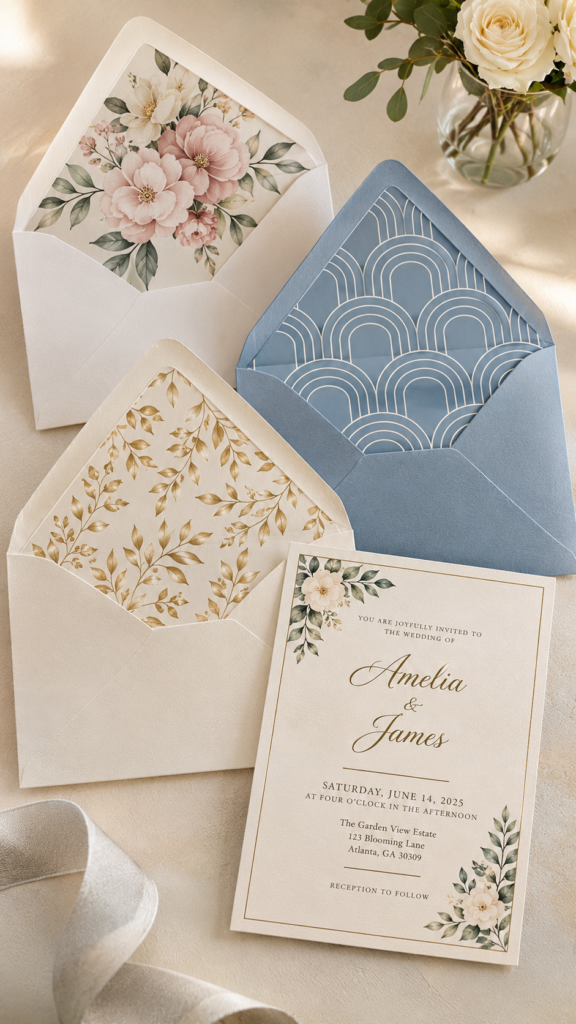
An envelope can be part of the overall wedding stationery presentation, particularly when couples want the invitation to look coordinated before the recipient even reads it.
n envelope liner is a shaped piece of paper fitted inside the envelope, usually following the outline of its flap.
You can create liners using printed patterns, floral designs, monograms or colours that match the invitation.
With a Cricut machine, the paper can be cut to the required shape, but the template must match the particular envelope rather than relying on one universal size.
Account for the envelope flap, fold and adhesive area so the liner does not interfere with closing the envelope.
Offering liners separately also gives couples who already have their invitations a way to personalise plain envelopes without replacing the entire stationery set.
10. Wedding Escort Cards
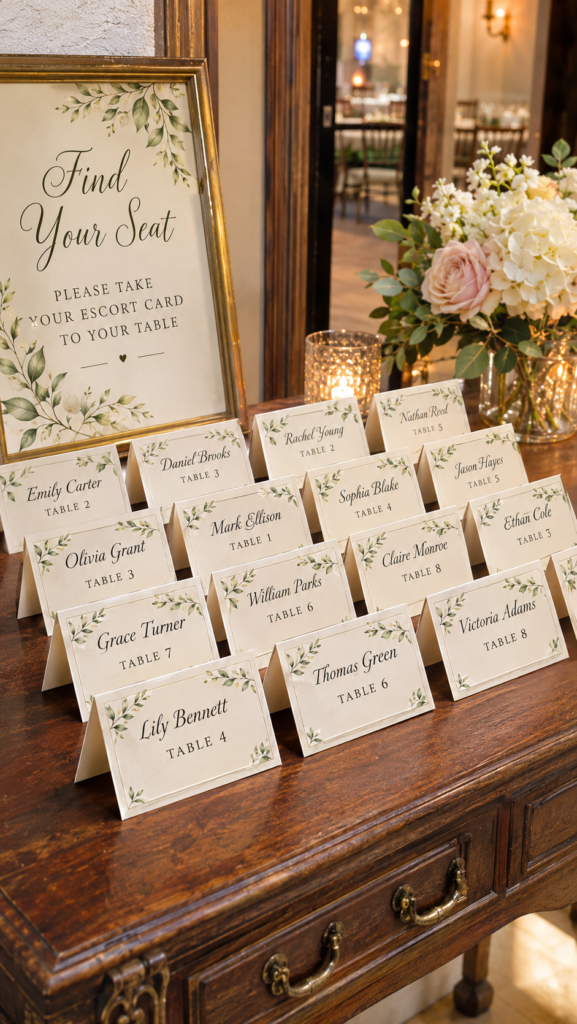
At a wedding reception with assigned seating, guests need to know which table they have been allocated before finding their seats.
Escort cards provide this information by displaying each guest’s name alongside their assigned table number.
They are usually arranged at an entrance or designated display area for guests to collect before proceeding to the reception tables.
A Cricut machine can cut individual cards in coordinated shapes and styles, with names and table assignments added through printing or compatible cutting techniques.
Accuracy is especially important because names and seating arrangements can change during the final stages of wedding planning.
Request an approved guest list and table allocation before production, and agree on a deadline for changes.
Unlike a generic decorative card, each escort card must communicate the correct seating information.
Make affordable party decorations and accessories with these 20 Easy Cricut Projects for Birthdays and Parties.
11. Personalised Wedding Place Cards
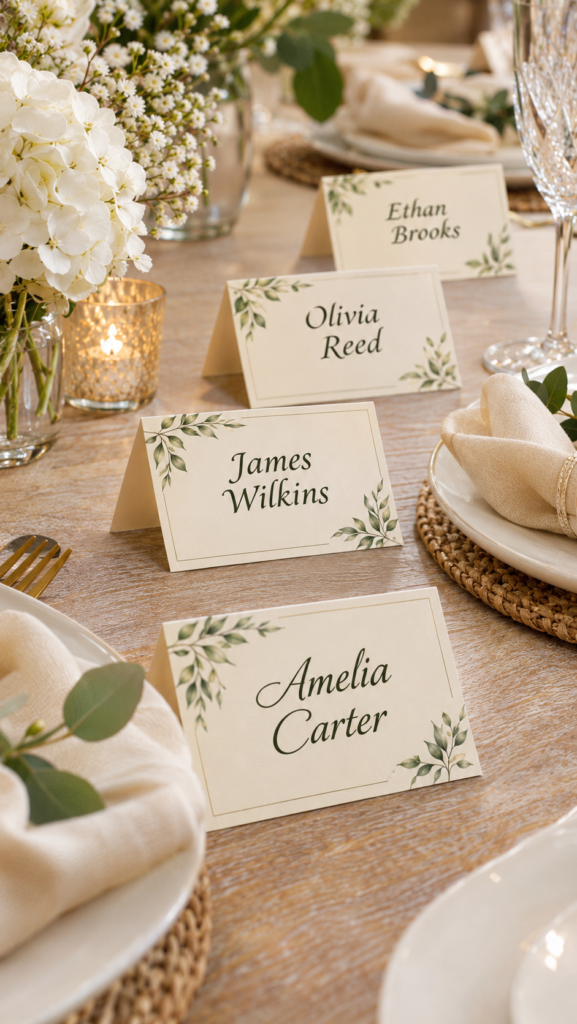
While escort cards direct guests to their assigned tables, place cards identify where each person should sit at the table.
Couples may use them for formal dinners, arranged seating or receptions where guests have specific seats. You can make flat cards that stand in small holders or folded tent-style cards that sit directly on the table.
Each card needs a clearly readable guest name, with optional table or meal information where the couple requires it.
A useful consideration when producing these profitable Cricut projects is the final guest count: place cards are generally needed for individual guests rather than one per household.
Leave enough space for longer names, check spellings against the approved guest list and test that folded cards stand securely before making the full batch.
12. Wedding Table Number Card Sets
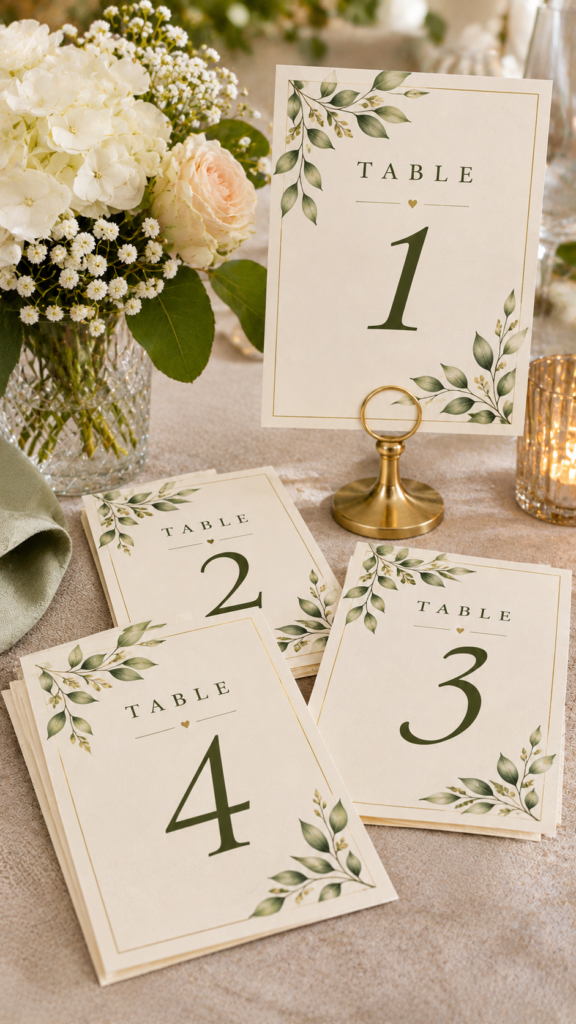
Guests often rely on table numbers to find their assigned seating, while venue staff use them to organise the reception layout.
Table number cards make this process easier by giving each table a visible identifier that corresponds with the couple’s seating plan.
You can cut matching numbers from cardstock, create layered designs or make folded standing cards that can be placed in suitable holders.
The size and construction should suit the table arrangement: a card that is too small may be difficult to read across a large reception space, while an elaborate design may take attention away from the number itself.
Offer coordinated sets with clearly numbered cards and confirm the final number of reception tables before production. Including a spare card can also be useful when the seating arrangement changes.
Personalised handmade items can make thoughtful presents. Try these 31 Easy Cricut Projects for Gifts.
13. Wedding Ceremony Program Fans
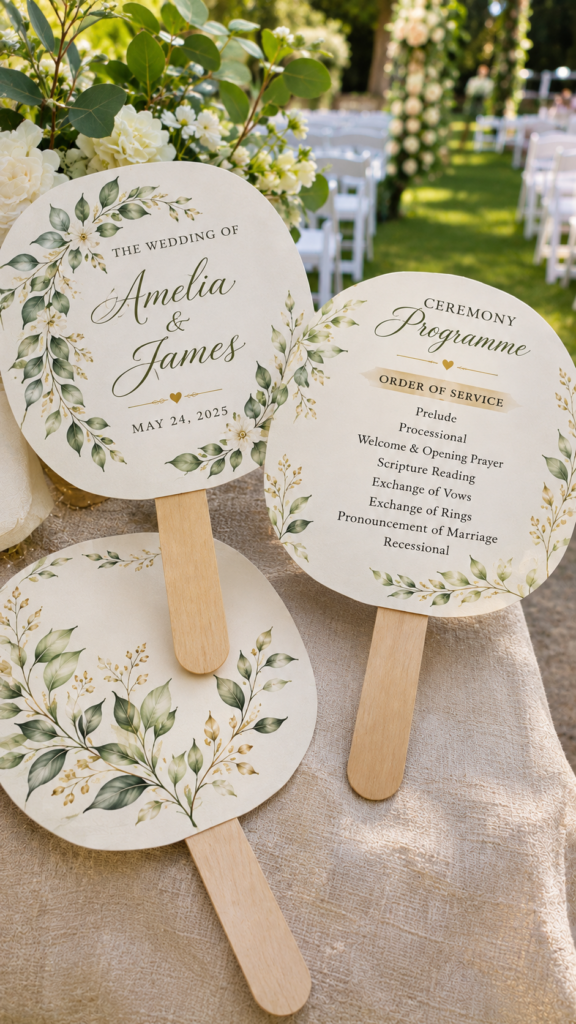
Outdoor ceremonies and warm-weather weddings can make handheld programmes particularly useful because guests can read the ceremony information while also using the fan to create airflow.
A programme fan combines a printed or decorated cardstock sheet with a suitable handle.
The content might include the order of the ceremony, names of the wedding party, readings, music selections and acknowledgements supplied by the couple.
You can cut the cardstock into a fan shape, print the information and assemble it with an appropriate handle and secure attachment.
Pay attention to the weight of the cardstock and the balance of the handle so the finished fan is comfortable to hold.
This is also a project where a printed proof matters: check the ceremony sequence and names with the couple before producing the complete order.
14. Memorial Service Order-of-Service Covers
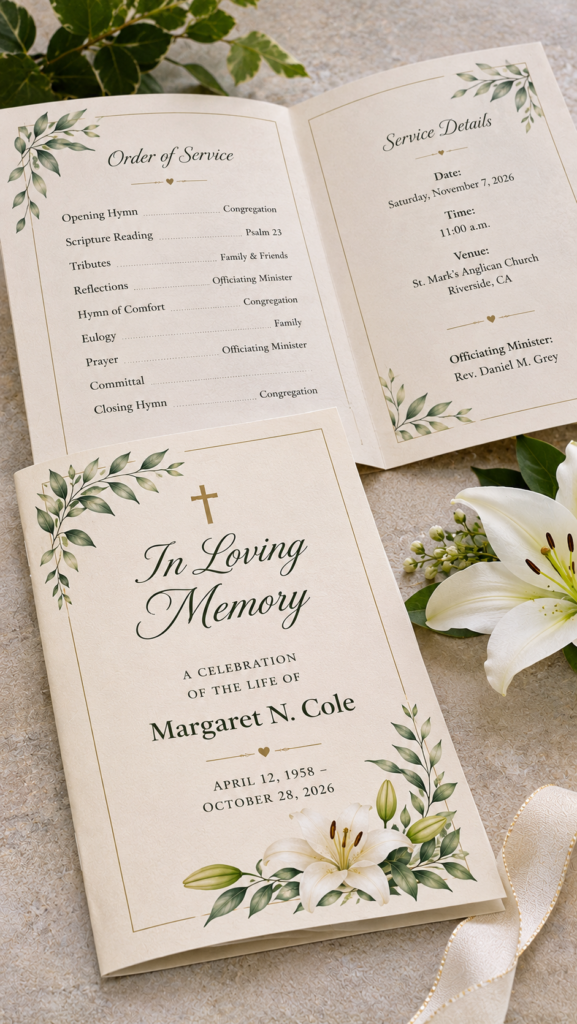
Families arranging a funeral or memorial service often need printed programmes that help attendees follow the proceedings and keep a copy as a remembrance.
The cover commonly includes the person’s name, photograph, dates and a service title, while the inside pages contain the order of service, readings, hymns, tributes or other details provided by the family.
You can use a Cricut machine to cut and personalise suitable cardstock covers, add decorative borders and prepare folded or layered presentation pieces. The inner pages can be printed separately and assembled with the cover.
Accuracy and sensitivity are particularly important for this type of order.
Confirm names, dates, photographs and the final programme with the family before printing, and avoid making unapproved changes to personal or service information.
Find creative projects suited to older children with these 30 Cute Cricut Projects for Teen Girls.
15. Beauty Salon Service Menu Cards
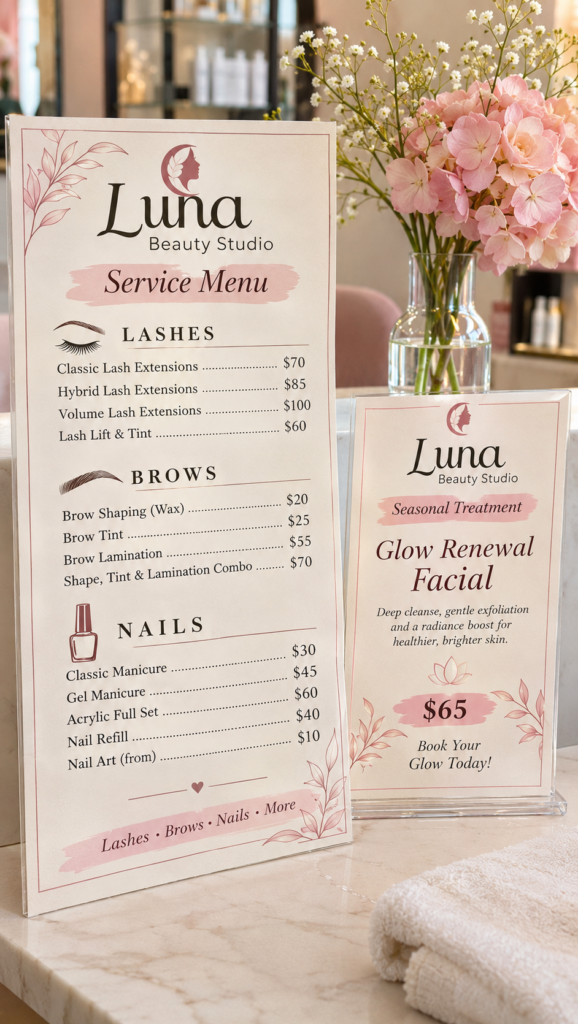
A beauty salon may offer several services with different prices, appointment durations and treatment options.
When this information is displayed only through social media posts or handwritten notices, customers visiting the salon may have difficulty comparing available services.
A printed service menu gives them something clear to consult while making enquiries or waiting for an appointment.
You can design and cut compact menu cards for hairdressers, nail technicians, barbers and independent beauty professionals, using printed text for service descriptions, prices and booking information.
Consider creating a layout that allows the business to update prices without replacing the entire design, particularly where service charges change frequently.
For example, a salon could use a main menu with separate inserts for seasonal treatments or newly introduced services. This makes the finished stationery more useful beyond its appearance.
16. Nail and Beauty Aftercare Cards
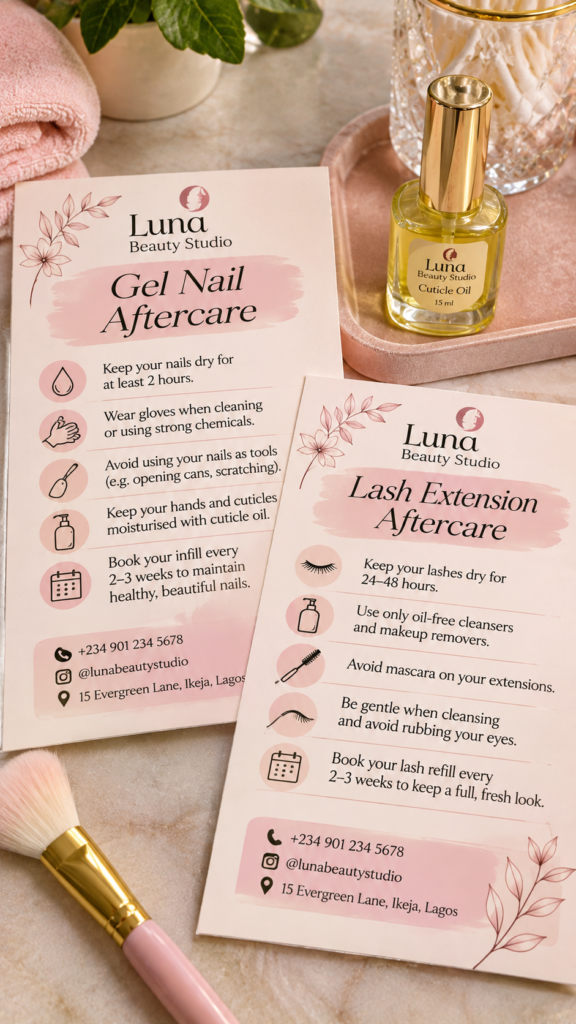
A treatment does not always end when a customer leaves the salon. Depending on the service, clients may need to follow specific aftercare instructions to maintain their results or avoid problems.
Nail technicians, lash artists and other beauty professionals can give customers small printed cards explaining the care required after an appointment.
You can create branded cards with sections for aftercare instructions, recommended products, contact details and follow-up appointments.
However, the instructions must match the actual treatment. Advice for gel nails, acrylic extensions, lash extensions and other beauty services is not interchangeable.
Ask the professional to supply and approve the wording rather than writing treatment recommendations yourself.
This gives you an opportunity to produce repeat batches of branded aftercare stationery for beauty businesses.
Give ordinary spaces a fresh look with these 29 Easy Cricut Projects for Home Decor.
17. Florist Flower-Care Instruction Cards
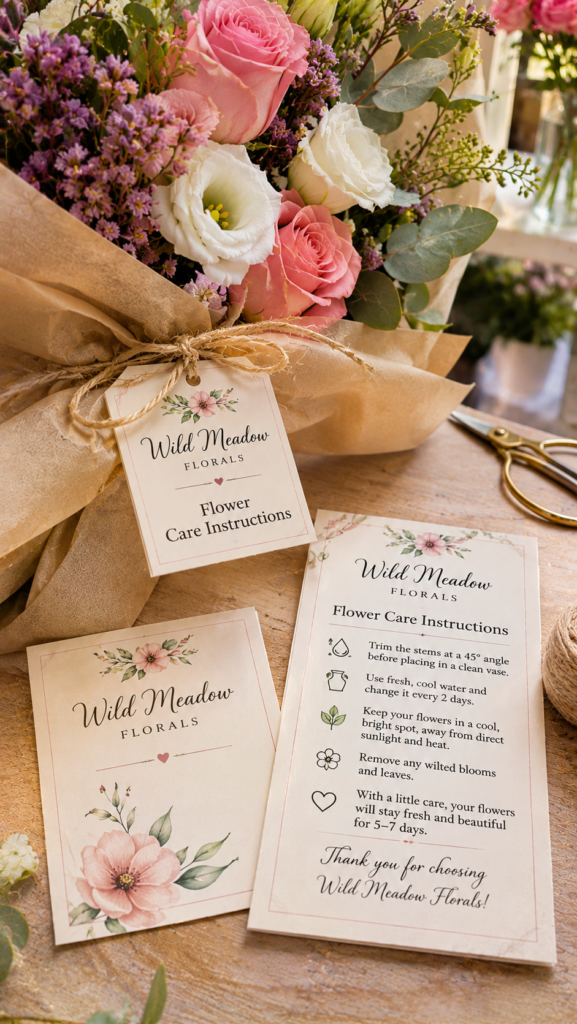
A bouquet may look beautiful when purchased, but customers also need to know how to care for the flowers once they take them home.
Florists can include care cards explaining basic handling instructions, such as using a clean vase, adding fresh water, trimming stems appropriately and removing foliage that would sit below the waterline.
You can design these cards with the florist’s branding, contact details and a small section for the bouquet or flower variety.
The information should reflect the flowers being sold because care requirements are not identical for every variety.
For example, some flowers are sensitive to ethylene, while others have different water and conditioning requirements.
A general care card can cover basic bouquet maintenance, with additional instructions supplied for particular flowers where necessary.
18. Plant Nursery Care Markers
Garden centres, plant nurseries and independent plant sellers need ways to identify different plants and communicate basic growing information to customers.
Plant markers can display the plant’s name, variety, planting date or a short growing instruction.
You can produce these using suitable cuttable materials, adding printed or vinyl lettering to compatible blanks.
For a more specialised order, create coordinated marker sets for herb seedlings, vegetable varieties, indoor plants or nursery collections. Material selection deserves particular attention here
. Ordinary cardstock and standard paper labels are not suitable for prolonged outdoor exposure, where rain and sunlight can damage them.
Choose materials intended for outdoor use, test the finished markers in actual growing conditions and be clear about their expected durability. Accurate plant names and growing instructions should also be checked before production.
Explore paper-based crafts with these 27 Easy Cricut Projects Using Cardstock.
19. Mobile Pet Grooming Report Cards
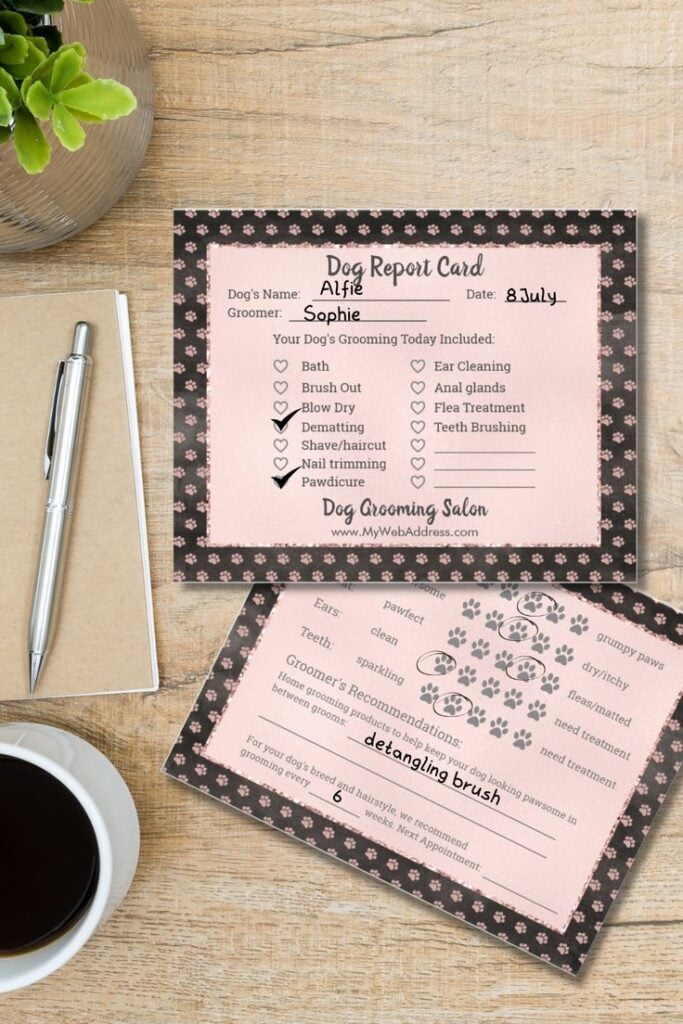
After grooming appointments, pet owners may appreciate a written record of the service their animals received.
Mobile groomers can use report cards to communicate the completed services, any coat-care observations and recommendations for the next appointment.
You can design branded cards with sections for the pet’s name, appointment date, grooming services performed, groomer’s notes and suggested follow-up date.
Leave sufficient writing space so the groomer can complete the card by hand rather than squeezing information into decorative layouts.
Importantly, the card should record observations, not make veterinary diagnoses.
For example, a groomer can document a coat concern noticed during the appointment and recommend that the owner consult a veterinarian where appropriate.
This gives grooming businesses a useful customer communication tool that can accompany their service invoices or receipts.
20. Dog-Walking Visit Report Cards
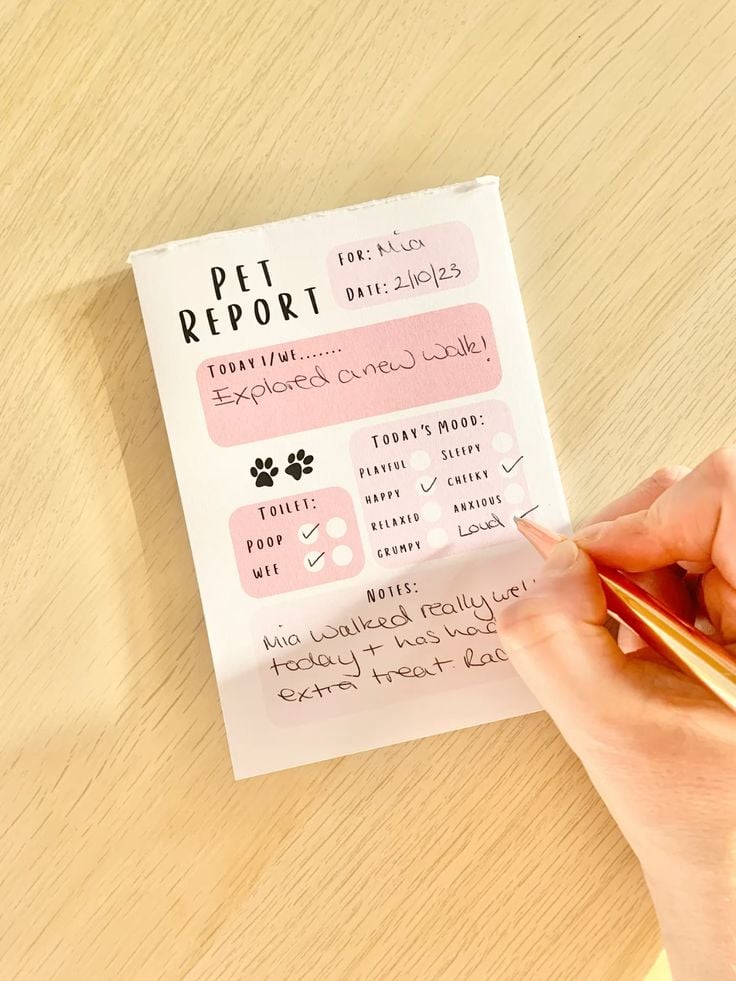
People who hire dog walkers or pet sitters may want to know what happened while they were away.
A visit report card gives the service provider a simple way to communicate the activities completed during each visit.
It can include the dog’s name, arrival and departure times, walk duration, feeding information where authorised, water replenishment, toilet breaks and a short note about the visit.
With a Cricut machine, you can create printed cards in a consistent branded format for individual pet-care businesses.
Unlike grooming reports, these cards should focus on activities carried out during the visit rather than appearance or coat condition.
Keep the fields relevant to the service being provided so the walker does not have to complete unnecessary sections.
Different versions can be designed for dog walking, home visits and pet sitting, since each service involves different responsibilities.
Try projects that use Infusible Ink with these 25 Easy Cricut Projects Using Cricut Infusible Ink.
21. Vehicle Service Reminder Hang Tags
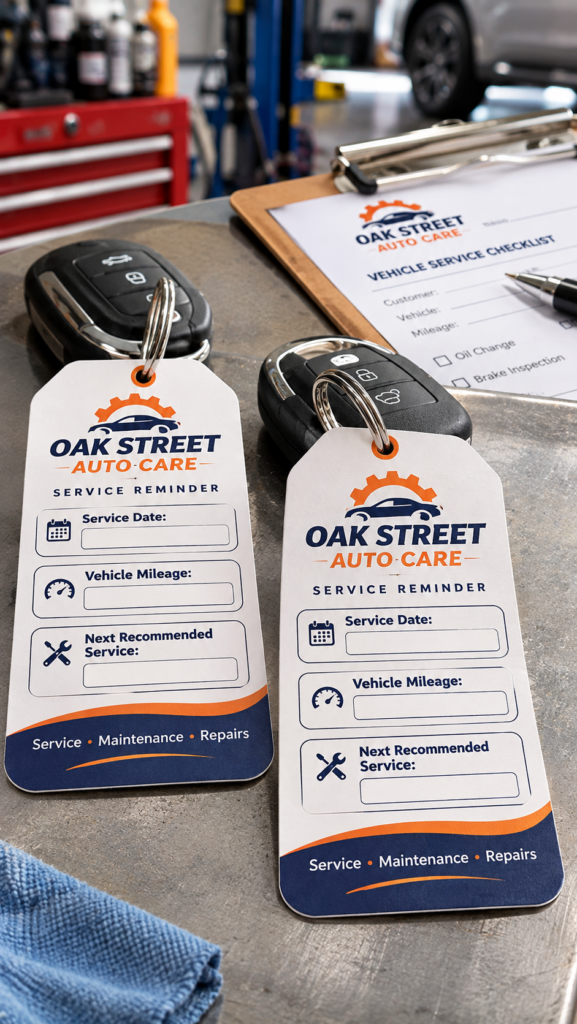
Independent vehicle workshops can use service reminder tags to help customers keep track of maintenance appointments after a repair or routine service.
These tags can include the workshop’s contact details, the service performed, the vehicle registration or identification details, and spaces for the recorded mileage and suggested next service date.
You can produce branded cardstock tags with a hole for attaching them to a key ring or including them with the customer’s service paperwork.
The workshop should determine the next service recommendation using the vehicle manufacturer’s maintenance schedule and the work actually completed, rather than applying one mileage interval to every vehicle.
Some vehicles use time-based maintenance schedules or onboard reminder systems as well as mileage-based intervals.
If a tag is designed to hang inside a vehicle, it must never obstruct the driver’s view; a key-ring or paperwork version is a safer alternative.
22. Phonics Learning Card Decks
Early reading practice involves more than recognising the alphabet.
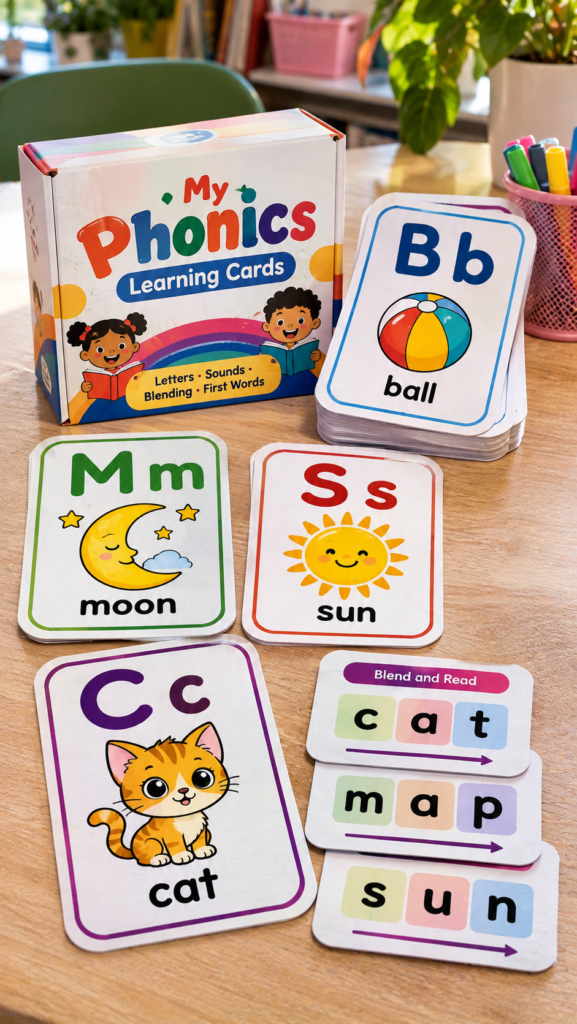
Children also need opportunities to connect letters with their sounds, identify beginning and ending sounds in words, and practise blending sounds to read simple words.
A phonics card deck can bring these activities together in a format that parents, tutors and early-learning centres can use during short lessons.
Create separate groups of cards for letter recognition, individual sounds, picture-word matching, rhyming words and simple blending exercises.
For example, a card might show the letter B, its corresponding sound and a picture of a ball.
Keep the examples consistent with the phonics approach and age group the customer teaches; letter names and letter sounds should not be presented as though they are the same thing.
You can use your Cricut to cut uniform cards, rounded corners and coloured category markers, while the text and illustrations can be printed separately.
This gives you room to offer beginner, intermediate and themed decks as profitable Cricut projects for different stages of early reading.
Vinyl offers plenty of options for beginner-friendly crafts. See these 23 Cricut Projects for Beginners Using Vinyl.
23. Fraction Learning Manipulatives
Fractions can be difficult for children to understand when they only encounter them as numbers on a worksheet.
Physical fraction models give learners something they can compare, arrange and fit together.
This makes fraction circles, fraction strips and comparison cards useful resources for primary school teachers, tutors and homeschool families.
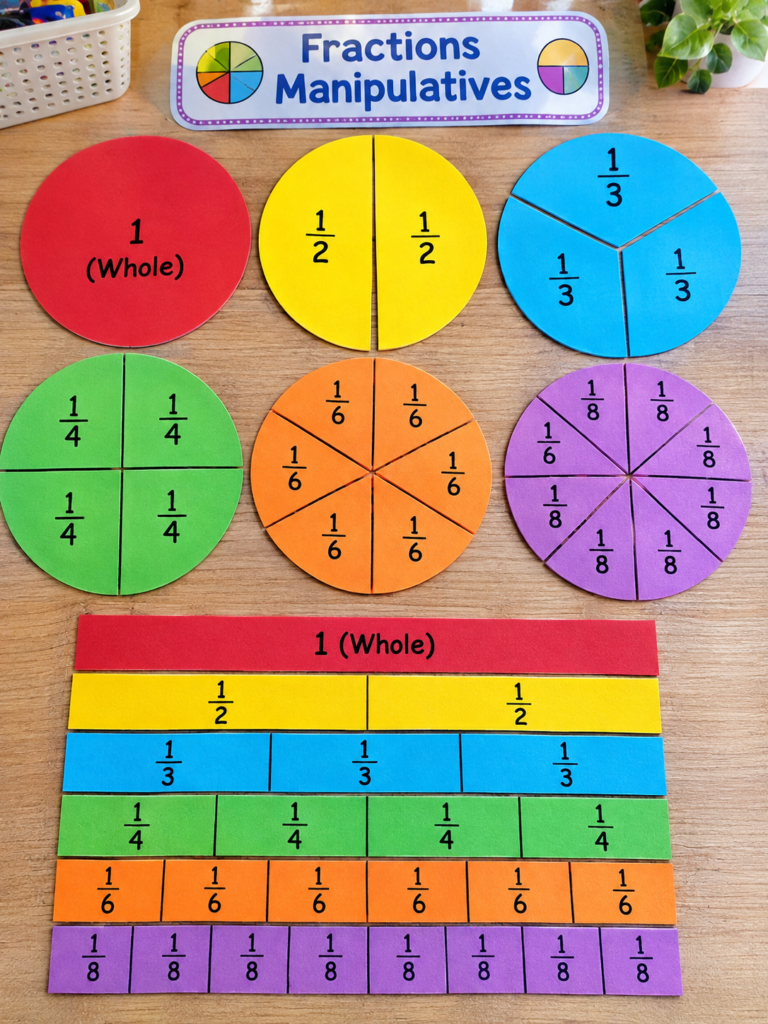
A set might include circles divided into equal halves, thirds, quarters, sixths and eighths, alongside strips showing equivalent lengths.
Children can use the pieces to compare fractions such as 1/2 and 2/4, or see how several smaller parts make up one whole.
Accuracy is essential: every section of a fraction circle must be equal, and the lengths of fraction strips must represent the correct proportions.
Use clearly printed fraction labels and sturdy cardstock, then consider laminating the finished pieces or placing them in storage envelopes.
These details make the set more suitable for repeated classroom use and give you an opportunity to sell coordinated learning packs rather than isolated cut-outs.
24. Classroom Visual Schedule Cards
A teacher managing several activities throughout the school day may need a simple way to show pupils what comes next.
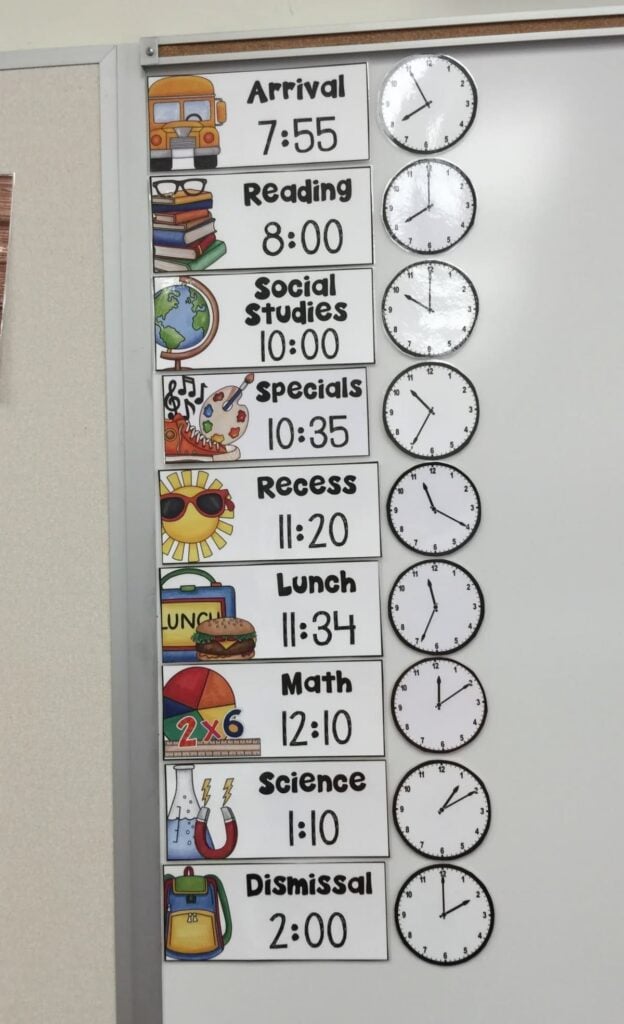
Visual schedule cards provide that reference by pairing an activity name with a recognisable picture or symbol.
They can be arranged on a classroom board, attached with hook-and-loop fasteners or moved as the day’s routine changes.
Your Cricut can cut a collection of consistently sized cards for activities such as morning work, reading, mathematics, lunch, outdoor play and dismissal.
You could also offer blank cards for teachers who want to add activities specific to their classrooms.
Keep the pictures clear, the wording short and the design easy to recognise from a distance.
A useful feature is making the cards interchangeable, so teachers can rearrange the timetable without replacing the entire set.
This gives you a defined audience among classroom teachers, early-learning centres and parents who use structured daily routines at home.
Build a range of products to sell with these 25 Easy Cricut Projects to Make and Sell for Extra Money.
25. Classroom Award Rosettes
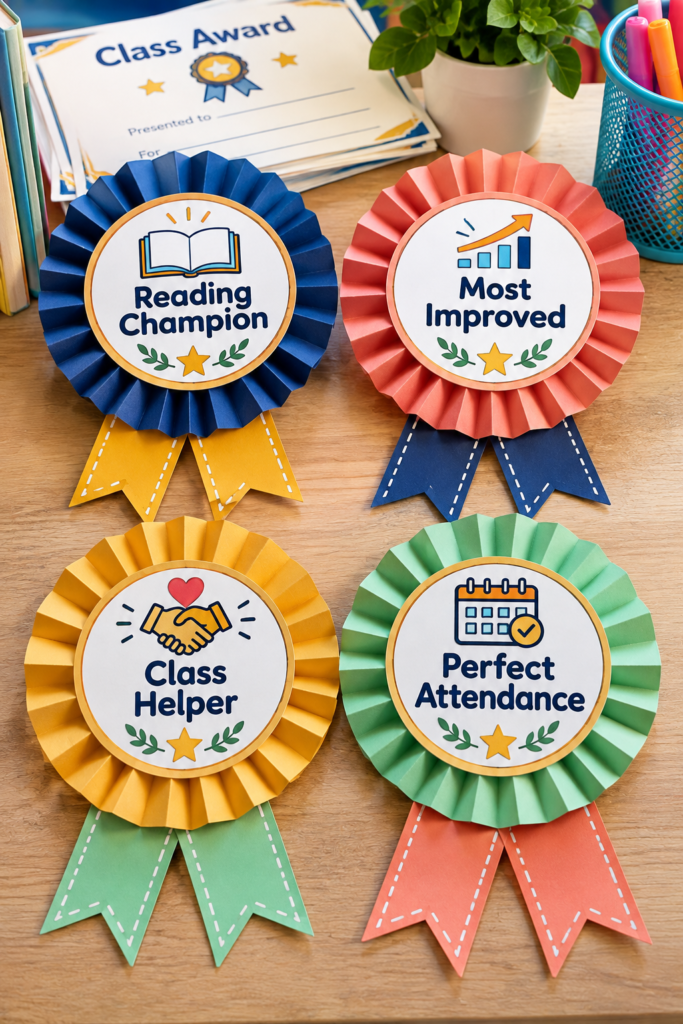
School recognition events, reading competitions and end-of-term celebrations often call for small awards that can be personalised for different pupils.
Paper award rosettes offer an alternative to buying identical ready-made badges, particularly when a school wants specific titles, colours or quantities.
Use your Cricut to cut layered circles, pleated-style paper strips, ribbon tails and centre labels.
Award titles might include Reading Champion, Most Improved, Perfect Attendance or Class Helper. You can prepare a selection of standard designs and customise the centre wording for each school or event.
Pay attention to the number of layers and the weight of the finished rosette, especially when it will be pinned to clothing; use an appropriate backing and secure attachment rather than relying on paper alone.
Offering coordinated sets in school colours can make this a suitable option for teachers, parent committees and organisers of children’s competitions.
26. Library Reading Challenge Passports
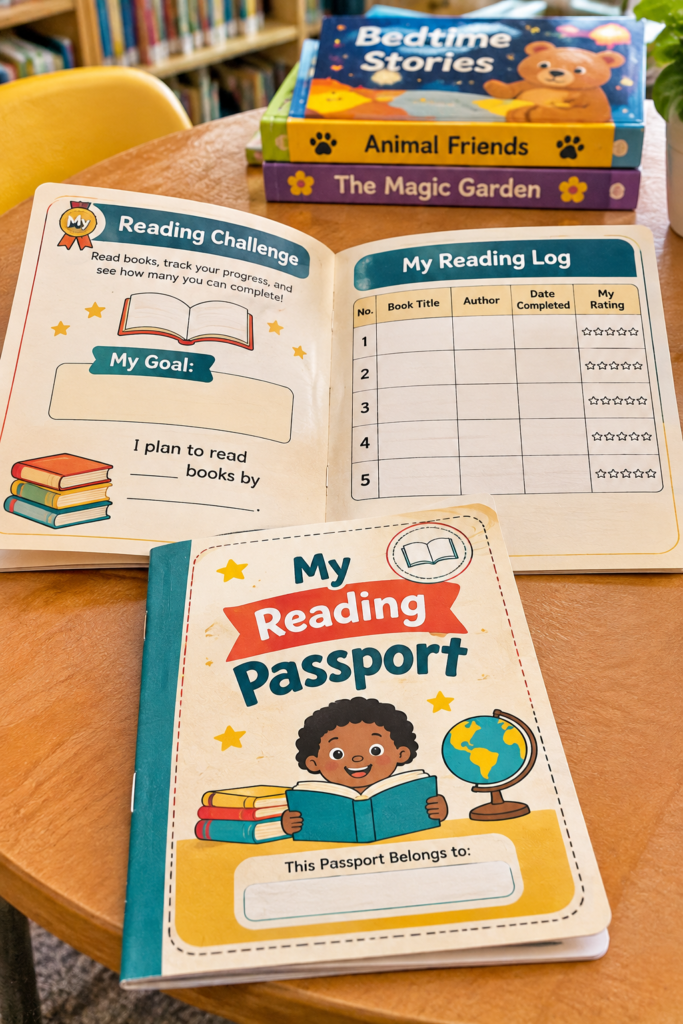
Reading challenges become easier to track when participants have a dedicated place to record their progress.
A reading passport is a small booklet that can follow a child through a school reading programme, library challenge or book club activity. It gives libraries and educators a customised alternative to handing out loose tracking sheets.
Design the booklet with spaces for the book title, author, date completed, a short review or rating, and challenge milestones.
You can create different editions for age groups, holiday reading programmes or specific library events.
Use your Cricut to cut the cover, add a personalised title and score the folds, then print the inside pages with clearly spaced writing areas.
Check that the finished booklet opens comfortably and that the pages are secured firmly enough for repeated use.
Libraries, teachers, reading clubs and homeschool groups are potential customers, especially when they need matching copies for a group of participants.
Start with manageable products using these 21 Simple Cricut Projects for Beginners That Actually Sell.
27. Book Club Discussion Card Decks
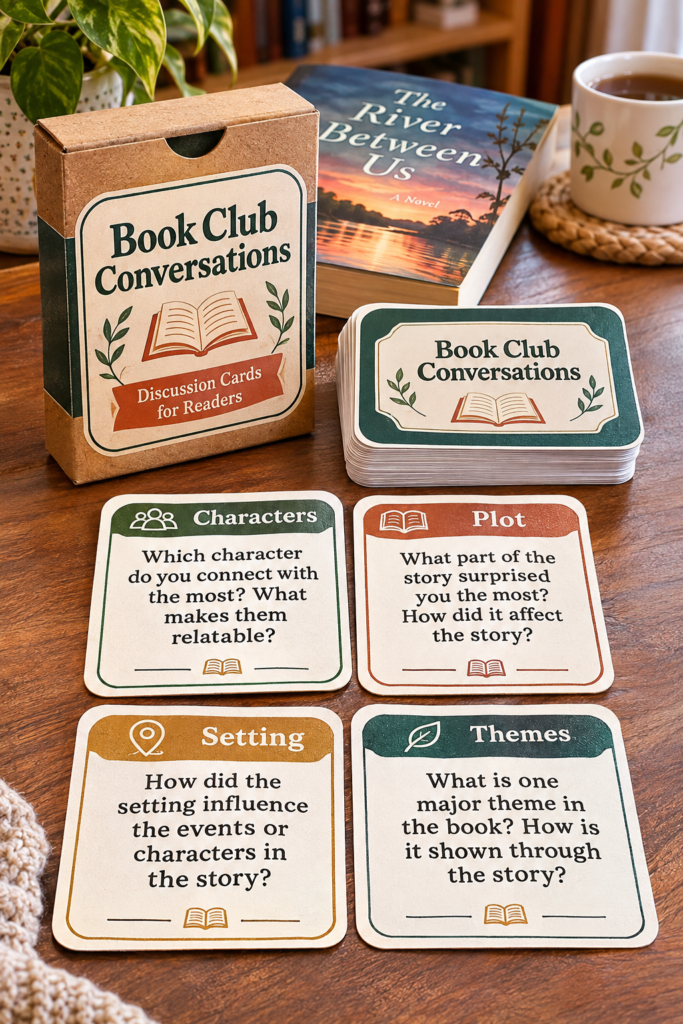
A book club organiser sometimes needs more than a list of questions to keep a group conversation moving.
Discussion cards provide prompts that members can draw at random or select when a conversation needs direction. They can also be designed for different reading ages, genres and meeting formats.
Build an original deck around topics such as character decisions, changes in the plot, setting, conflict, themes and the reader’s interpretation of the ending.
Some cards can invite members to compare two characters, while others can ask how a particular event influenced the story.
Use the Cricut to cut matching cards and category dividers, then print the questions clearly on each one.
Make sure the prompts encourage discussion rather than having one obvious correct answer, and write your own questions instead of reproducing copyrighted discussion materials.
You could sell general-purpose decks or create custom editions for libraries, schools, adult reading groups and children’s book clubs.
28. Homeschool Science Observation Cards
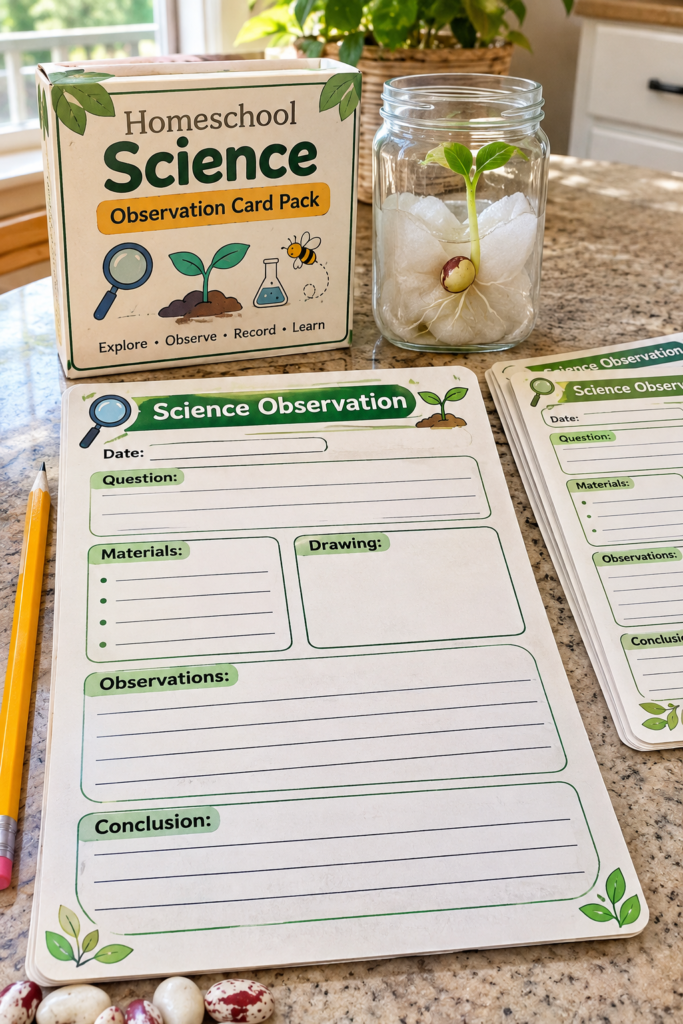
A science activity becomes more useful when children have a way to record what they notice rather than simply completing an experiment and moving on.
Observation cards provide a structured space for documenting a simple investigation, whether a child is watching a seed germinate, comparing leaves or observing how ice changes as it melts.
Prepare sheets with fields for the activity date, question, materials, observations, drawings and conclusion.
For younger learners, use larger drawing areas and short prompts; older children can have more room to record measurements and explain what their observations suggest.
A Cricut can cut the sheets into consistent sizes, create section dividers and personalise the covers of activity packs.
The scientific instructions and expected learning points should be checked carefully, with activities suited to the child’s age and appropriate safety guidance.
This is a good opportunity to offer themed packs to homeschool families, tutors and small learning groups, rather than selling a single generic observation sheet.
Practise your skills at home with these 22 Easy Cricut Projects for Beginners You Can Make at Home.
29. Theatre Costume Identification Labels
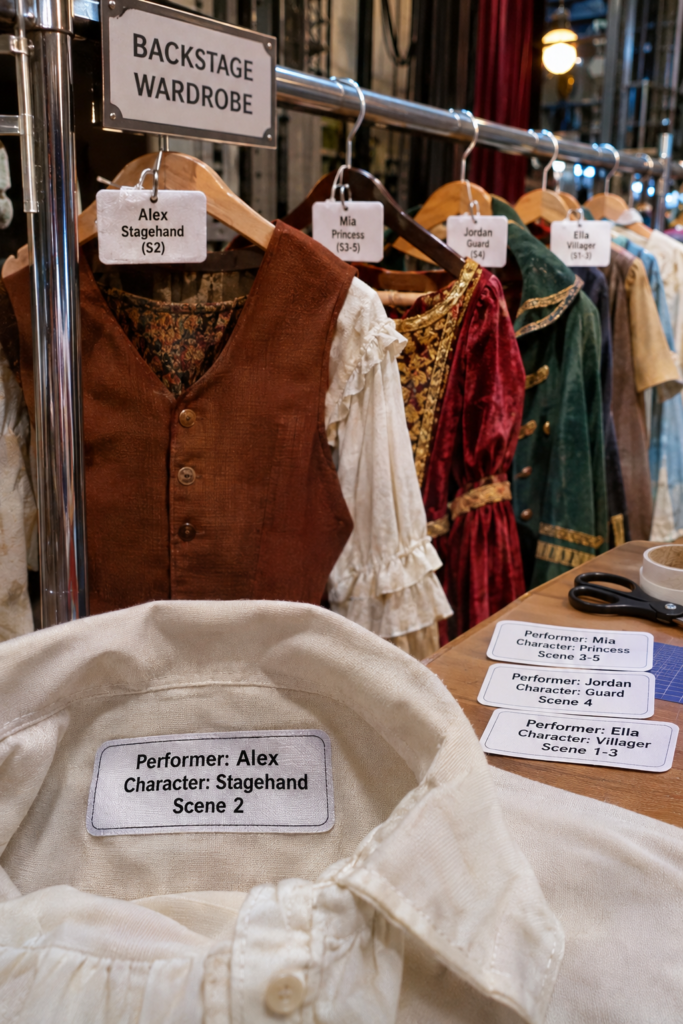
Costume departments handle clothing for multiple performers, productions and scenes.
During rehearsals and quick costume changes, clearly identified garments can make it easier for dressers and performers to find the correct items.
Custom identification labels offer theatre groups and performance companies a way to organise costume pieces according to their own systems.
Create heat-transfer labels featuring performer names, character names, production codes or department identifiers.
Use suitable heat-transfer vinyl (HTV) and confirm that the fabric can tolerate the required application temperature and pressure.
Test the transfer on a sample or inconspicuous area before applying it to a costume, particularly when working with delicate or specialist fabrics.
Some garments may be better suited to removable tags or labels attached to hangers rather than direct heat application.
Offering labels in coordinated sets for a production can make this one of the more specialised profitable Cricut projects, with theatre groups, schools and community performance companies as potential customers.
30. Dance Recital Costume Name Transfers
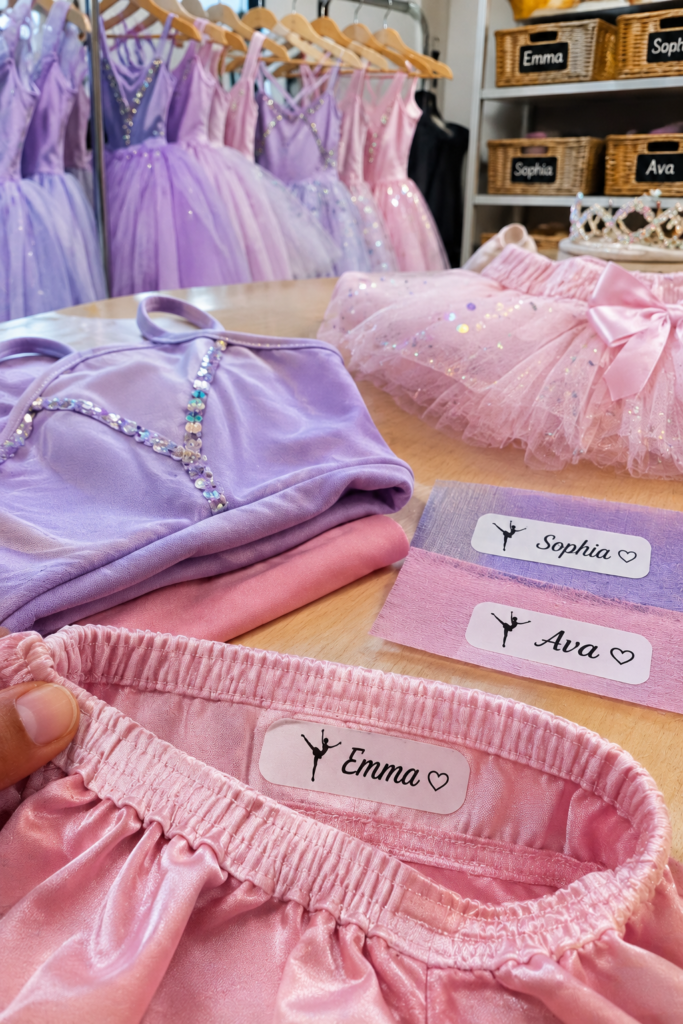
Dance studios often coordinate costumes for several classes and performers, and garments can become mixed up during rehearsals, fittings and recital preparation.
Personalised name transfers provide a way to identify individual costumes without making every dancer’s outfit look different.
Use your Cricut to cut dancers’ names, initials or small identification details from garment-compatible HTV.
The transfers can be applied to an agreed area, such as an inside waistband or another discreet location chosen by the studio.
Before accepting a large order, confirm the costume fabric, the placement, the transfer material and the application method.
Stretch fabrics, mesh and embellished dancewear may require particular care, and not every costume is suitable for heat application.
Studios may order coordinated batches for an entire class or recital group, so accurate spelling and a clear name list are important parts of the service.
Beginners can also create meaningful presents with these 33 Cricut Projects for Beginners That Make Great Personalized Gifts.
31. Small-Team Uniform Name and Number Transfers
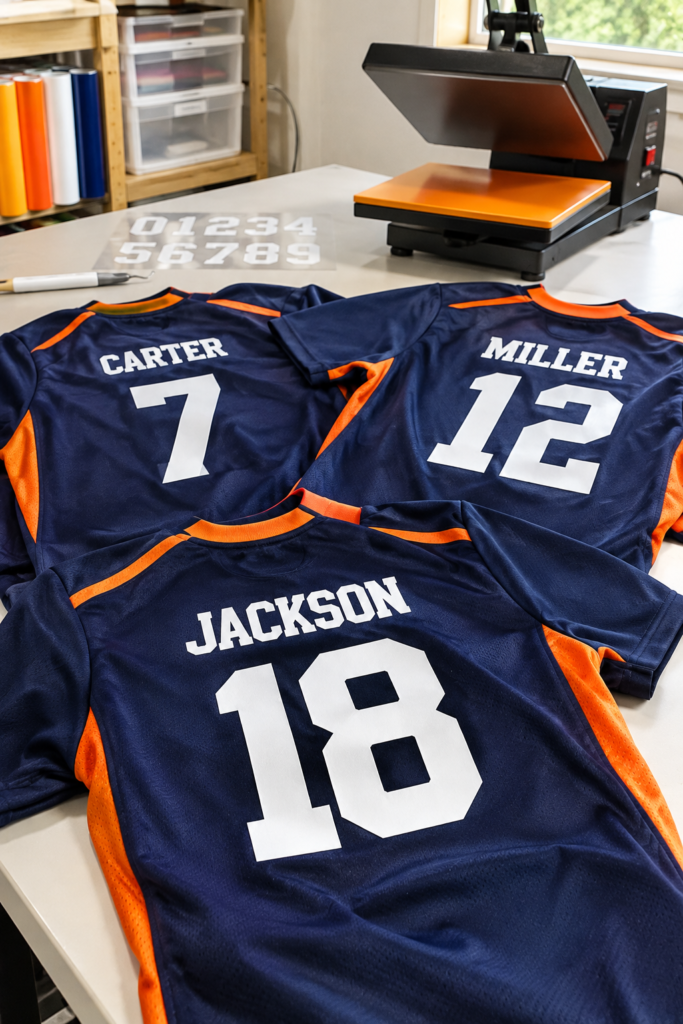
Local sports clubs, school teams and recreational groups may need names and numbers added to uniforms without ordering a completely new set of garments.
Custom heat-transfer designs allow a team to personalise compatible jerseys, training shirts and other approved sportswear.
Prepare individual names, player numbers or original team designs in the sizes requested by the customer.
Your Cricut can cut the designs from suitable HTV, but the finished result depends on choosing a transfer material that works with the garment fabric and following its application instructions.
Ask for the final player list and check every spelling and number before cutting; a mistake repeated across several shirts can become an expensive waste of material.
Also confirm that the customer has permission to use any club logo, school emblem or other protected branding supplied for the order.
Rather than offering only single transfers, you can quote for a complete team set, replacement numbers or additional player names.
32. Personalised Leatherette Luggage Tags
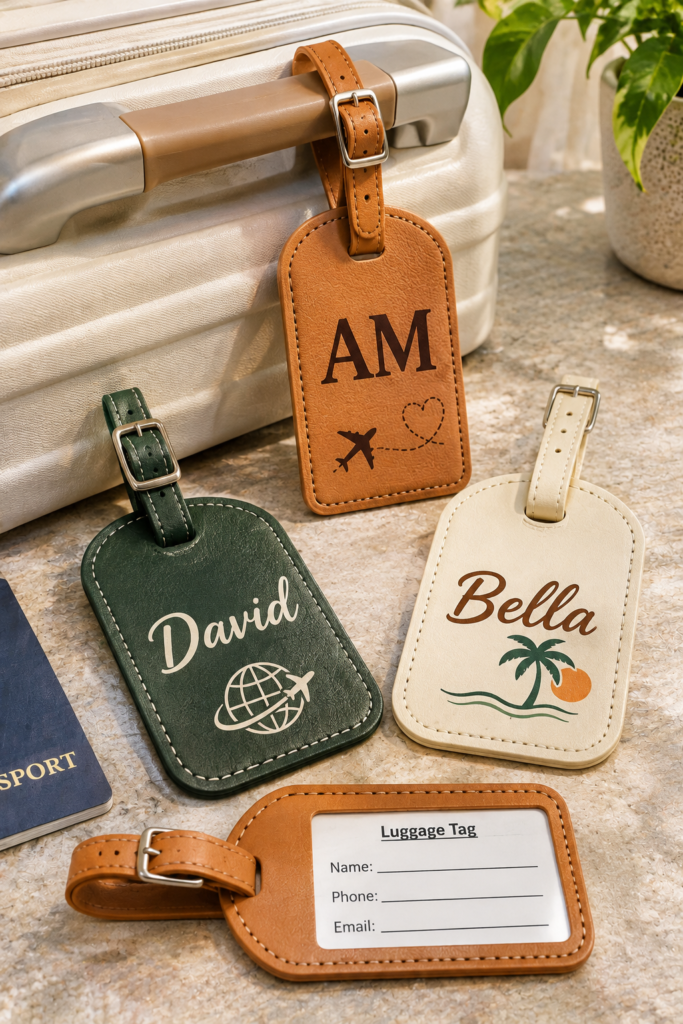
A luggage tag needs to do more than look attractive. It should be easy to recognise, securely attached to a bag and capable of carrying the contact details its owner chooses to display.
Personalised leatherette tags offer travellers, gift buyers and small businesses an option that can be customised with names, initials or short messages.
Start with leatherette blanks or compatible faux-leather material and check the cutting requirements for the exact material and Cricut machine being used.
Cricut’s guidance for its leather and faux-leather materials specifies compatible Explore, Maker and Venture machine families, along with the appropriate mat and material setting; other materials may have different requirements.
A simpler design can use a cuttable faux-leather blank with vinyl lettering, while more specialised effects should only be offered when the machine and required tools support them.
Test the cut and personalisation method before producing a batch, and make sure the strap or fastening is secure.
Find child-friendly activities to make with your machine in these 35 Easy Cricut Projects for Kids.
33. Personalised Vow Book Covers
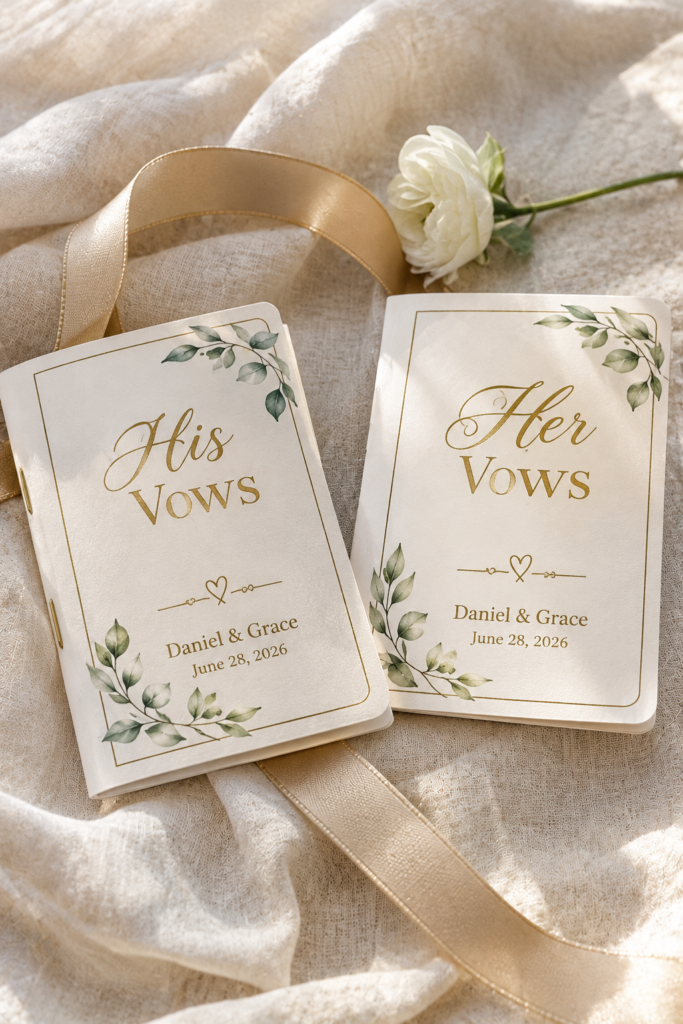
Couples who write their own wedding vows may want matching booklets that feel connected to the rest of their wedding stationery.
Personalised vow book covers can be made with their names, wedding date, initials or a design that matches the invitation suite.
Cut the cover from suitable cardstock or another compatible material, then add the wording and decorative details using vinyl, layered cardstock or an appropriate writing tool.
Measure the booklet before designing the cover so that it folds neatly around the pages without covering the writing area or leaving too little room for binding.
You can offer matching covers for both partners, with the same layout and different names, or coordinate the colours with the wedding theme.
This is a relatively small custom order that can also be offered alongside invitation suites, ceremony programmes and other wedding stationery.
34. Backstage Prop Identification Labels
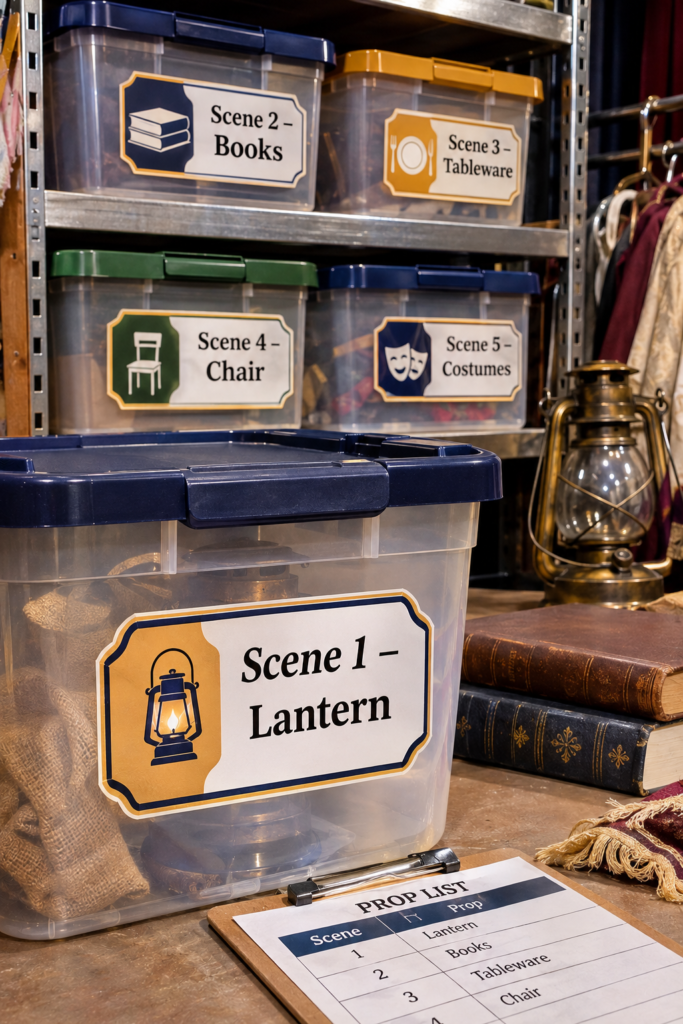
Theatre productions, school plays and event companies may use dozens of props that need to be returned to the right storage area after rehearsals and performances.
Identification labels can help crews distinguish items by prop name, production, scene or department, particularly when similar objects are used across different scenes.
Design labels with clear wording and, where useful, a simple colour or code system.
Your Cricut can cut the labels from suitable adhesive vinyl or other compatible materials, but the best choice depends on where they will be applied.
A label intended for a storage box may not be suitable for a painted prop, delicate surface or frequently handled object.
Check that the adhesive will not damage the finish or leave residue, and consider removable options where props are reused for different productions.
Custom label sets can be supplied to schools, theatre groups, community arts organisations and event teams that need their own naming system.
Prepare handmade seasonal items with these 31 Easy Cricut Projects for Christmas.
35. Custom Award Presentation Folders
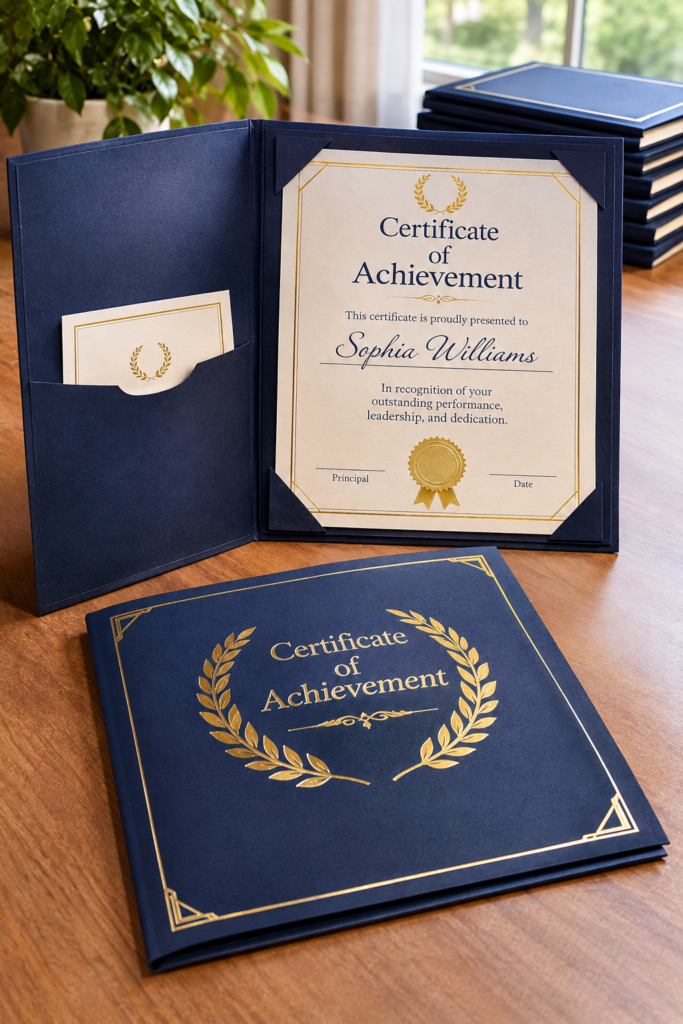
Schools, training centres, clubs and small organisations sometimes present certificates, achievement letters or recognition documents in folders rather than handing them out as loose sheets.
Custom presentation folders give these documents a more organised finish and allow the organisation to include its name, event title or recipient’s details.
Use your Cricut to cut and score the folder from suitable cardstock, then add a personalised front panel, decorative details or a simple logo supplied with permission.
The inside can include pockets or corner slots to hold the document in place.
Measure the actual certificate or letter before creating the template, allowing enough room for the paper to slide in and out without bending.
Test the fold, pocket depth and overall strength with a finished sample before accepting a larger order.
You can offer standard folder sizes for common document formats, as well as custom dimensions for award ceremonies, graduation events, training programmes and club presentations.
Create festive decorations and accessories with these 33 Easy Cricut Projects for Halloween.
Which Cricut Machine and Tools Are Needed?
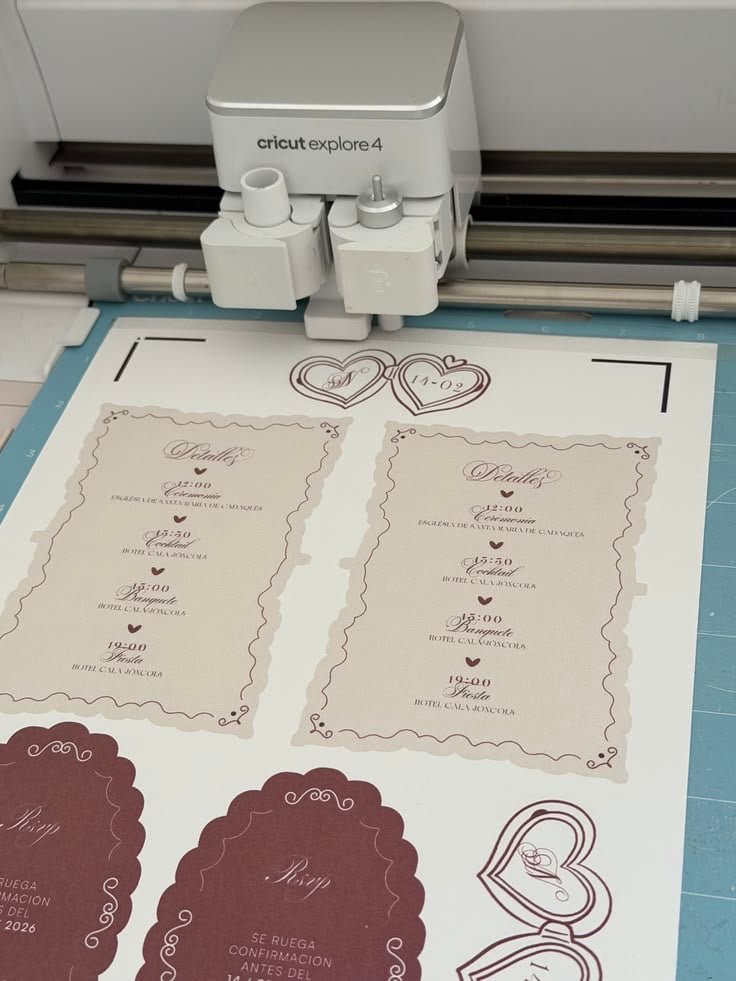
You do not need the most expensive Cricut machine to make every item in this collection. Your choice depends on the materials, product sizes and production methods you plan to use.
Choosing a Cricut Machine
For most paper-based ideas, including invitation suites, earring display cards, reading passports and presentation folders, a Cricut Explore machine is a practical starting point. It cuts compatible cardstock, adhesive vinyl and heat-transfer vinyl.
The Cricut Joy Xtra is suitable for smaller projects such as tags, cards and labels. It also supports Print Then Cut for designs that combine printed details with machine-cut shapes. The original Cricut Joy does not support this feature.
A Cricut Maker machine offers additional tool options for makers working with specialist materials.
Depending on the model and material, it can support tasks such as engraving, debossing and cutting certain types of leather. These features are useful for expanding your product range but are not essential for most paper and vinyl projects.
Essential Tools and Materials
A basic setup should include:
- Fine-point blade: For cutting compatible cardstock, vinyl and paper.
- Cutting mats: LightGrip and StandardGrip mats for different material weights.
- Scoring tool or stylus: For neat folds in booklets, cards and folders. Check machine compatibility.
- Weeding tools: For removing excess vinyl from designs.
- Scraper and transfer tape: For applying adhesive vinyl.
- Cricut pens: For adding names, text and decorative details.
- Heat press: For applying HTV to compatible garments and costumes.
- Printer: For printed designs and Print Then Cut projects.
You will also need suitable cardstock, adhesive vinyl, HTV, leatherette blanks and other materials depending on the products you choose to make. Always check material and machine compatibility before purchasing supplies.
Start with the equipment needed for your first products and expand as customer orders justify the investment.
You don’t need a heat press for every Cricut project. Try these 21 Cricut Projects for Beginners Without a Heat Press.
How to Start a Small Cricut Business Without Buying Everything
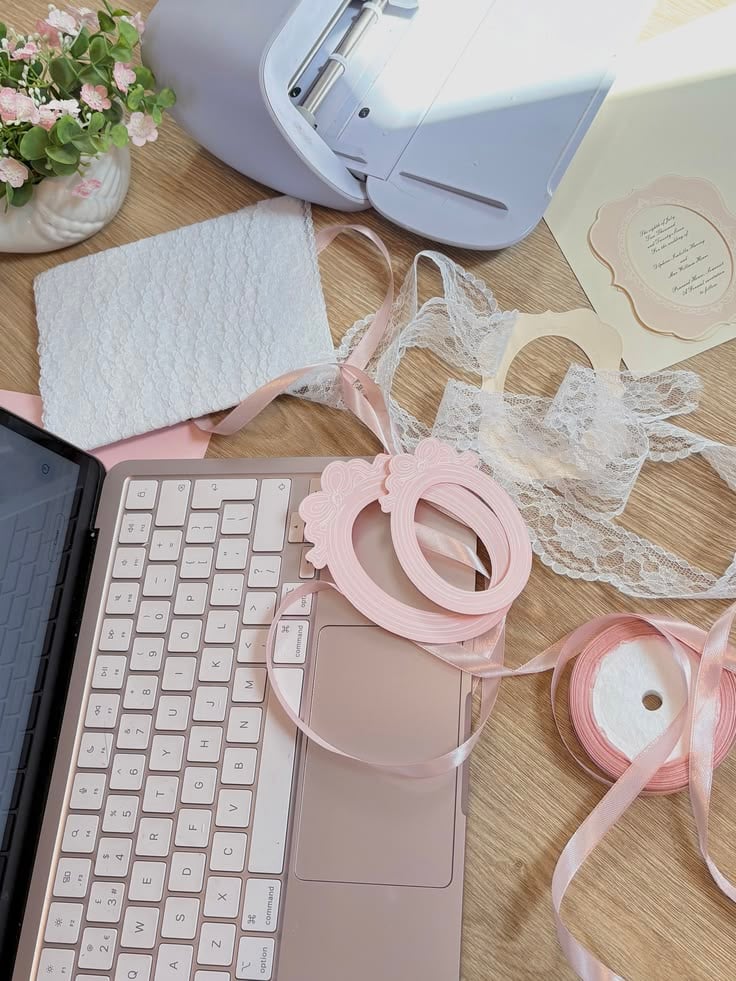
Starting a Cricut business does not mean you have to invest in every material, tool and accessory at once.
A more manageable approach is to begin with a small range of products, understand your production costs and expand as you gain customers.
- Choose a customer group: Decide who you want to serve, such as florists, clothing businesses, wedding stationery customers or schools. Understanding their needs makes it easier to choose suitable products.
- Select two or three related products: Start with items that appeal to the same customers. For example, a florist may need care cards, bouquet tags and branded packaging accessories.
- Make samples and test their quality: Produce a few finished samples to check cutting accuracy, material suitability, durability and overall appearance before accepting orders.
- Calculate your production costs: Include materials, consumables, packaging, labour and other business expenses. Set prices that cover your costs and leave room for profit.
- Photograph your finished products: Use clear photographs that show the details, personalisation options and different ways customers can use the items.
- Set clear prices: Provide prices for individual orders and larger quantities. Explain what customisation is included and whether additional design work attracts an extra charge.
- Gather customer feedback: Pay attention to comments about quality, sizing, design and usability. Use this information to improve your products before introducing more options.
The aim is to build a small, recognisable product range rather than spend money on equipment and materials you may not need.
When you want a new idea to try, browse these 30 Cricut Projects to Make When You Don’t Know What to Make.
Conclusion
Custom earring cards for jewellery sellers, reading resources for teachers and personalised stationery for wedding customers show just how varied a Cricut business can be.
The most promising profitable Cricut projects are those that solve a specific need and can be produced at a price that makes the work worthwhile.
Rather than investing in several materials at once, choose a small product range, make quality samples and test it with potential buyers.
Build on the products that attract genuine interest, and let your customers’ needs shape what you offer next.
Beginners can stretch their craft budget with affordable supplies. See these 29 Cricut Projects for Beginners Using Dollar Store Items.
Frequently Asked Questions
What Cricut projects can you sell without a heat press?
You can sell paper-based products such as invitation suites, earring display cards, reading passports, classroom resources, packaging accessories and presentation folders. These mainly require a cutting machine, suitable cardstock and basic tools.
Which Cricut machine is suitable for starting a small business?
The Cricut Explore is a good starting option for making a wide range of paper and vinyl products. The Joy Xtra suits smaller projects, while the Maker offers additional capabilities for specialist materials.
How much does it cost to start a Cricut business?
The cost depends on the machine you own, the products you plan to make and the materials required. Starting with a few products and essential tools helps keep your initial investment manageable.
Can you sell products made with Cricut Design Space images?
You must check the licensing terms for each image or design. Cricut’s Angel Policy permits certain small-business sales using eligible Cricut content, but restrictions apply. Do not assume every Design Space image is cleared for commercial use.
What Cricut materials should beginners buy first?
Start with cardstock, adhesive vinyl, transfer tape and suitable cutting mats. Add HTV, leatherette or specialist materials when you are ready to make products that require them.