Give children more to do than watch a Cricut cut! Try easy Cricut projects for kids that involve puzzles, paper models, storytelling and creative challenges.
Have you noticed how quickly children lose interest in a craft when they have to follow too many instructions or wait for an adult to complete every step? The right project gives them something to figure out, arrange, test or create on their own.
With a Cricut machine, parents can prepare the shapes, letters and templates, leaving children to take part in the fun parts of making.
These easy Cricut projects for kids go beyond decorating paper; they include hands-on activities that encourage storytelling, early maths, science, problem-solving and imaginative play.
Handmade presents often feel more meaningful when they reflect the recipient’s personality. 31 Easy Cricut Projects for Gifts has more ideas for creating personalised gifts for different occasions.
Easy Cricut Projects for Kids That Make Learning More Hands-On
1. Story Sequence Cards
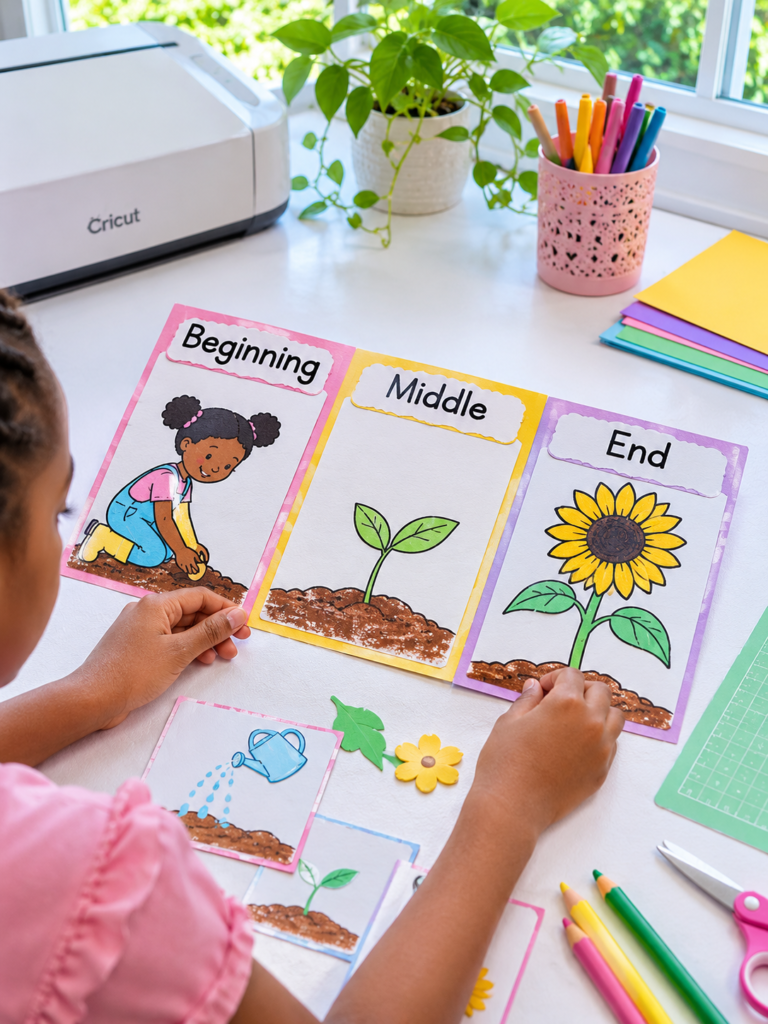
Children can understand a story more easily when they can see what happens first, what follows and how everything ends.
Story sequence cards turn that process into a hands-on activity rather than asking them to remember every event from a story they have only heard.
Use your Cricut to cut several uniform cards from cardstock. Add simple headings such as Beginning, Middle and End, or leave the cards blank for children to organise themselves.
They can draw scenes from a familiar story, write short descriptions or attach printed pictures to represent important events.
Try this activity: Read a familiar story together, shuffle the completed cards and ask the child to put the events back in order. For a more challenging round, leave out one card and ask them to explain which part of the story is missing.
The same cards can be reused with different stories, making this more than a one-time craft. It gives children opportunities to practise storytelling, sequencing and recalling events in the correct order.
2. Word-Family Slider
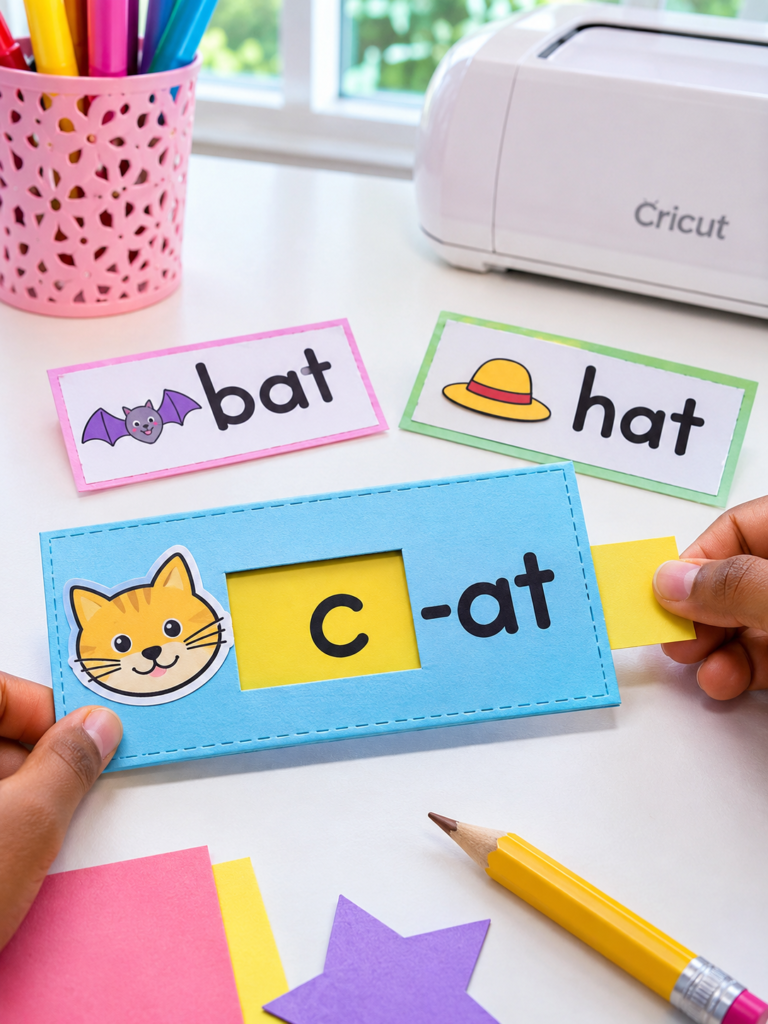
Children learning to read often benefit from seeing how changing one sound can create a different word.
This paper slider makes that relationship visible and gives them a chance to experiment with letter combinations.
Cut a rectangular base and a narrow sliding strip with your Cricut. Create a small window in the base so that one letter or word ending on the strip appears at a time.
For example, the child can combine the beginning sounds c, b and h with -at to form cat, bat and hat.
Make it progressively harder: Begin with familiar three-letter words, then introduce other word families such as -an, -ig and -op. Once the child understands the pattern, ask them to say each word aloud, identify its beginning sound and use it in a sentence.
The sliding mechanism should move freely without the strip falling out. Cardstock works well for the base, while a slightly thinner paper strip can make movement easier.
Teenagers who enjoy custom accessories and personalised belongings may find something they like in 30 Cute Cricut Projects for Teen Girls.
3. Sentence-Building Word Cards
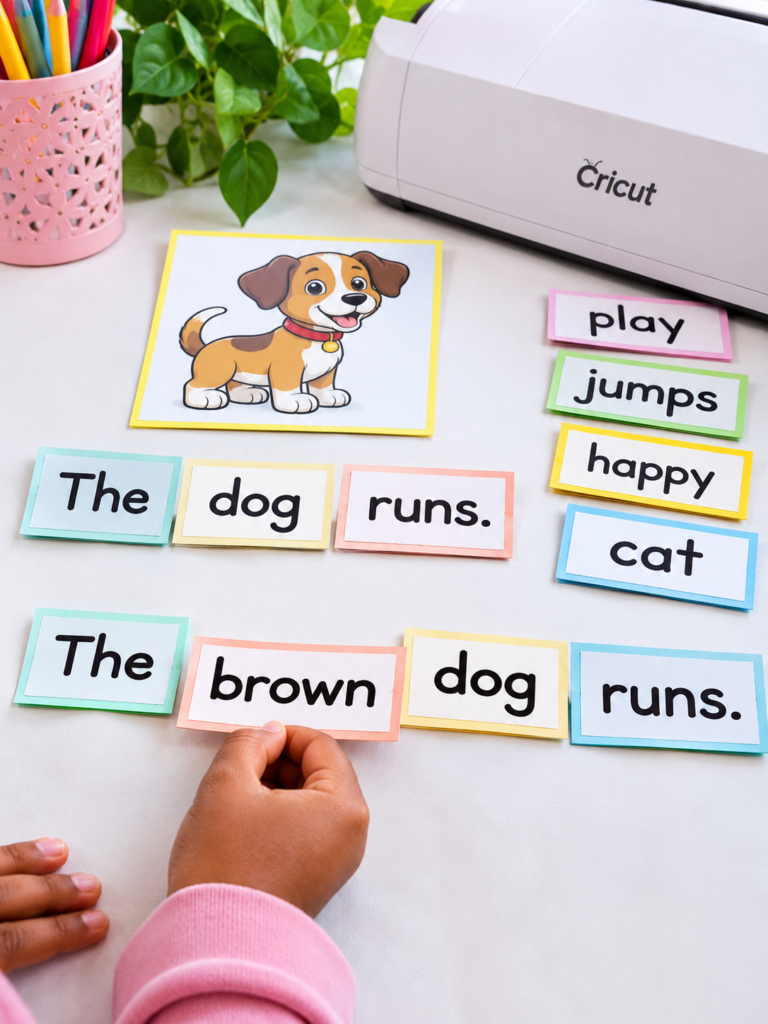
Knowing individual words does not automatically mean a child understands how to arrange them into a sentence. These movable word cards allow children to test different word orders and see how words work together to communicate an idea.
Use your Cricut to cut individual cards and add words in large, readable lettering. Start with simple combinations such as The dog runs.
Children can then add describing words to make the sentence The brown dog runs. Older readers can work with longer sentences, question words and punctuation cards.
Turn it into a sentence challenge: Give the child a small collection of mixed-up words and ask them to arrange the cards into a sentence.
Next, introduce an extra word that changes the meaning, or remove a word and ask them to identify what is missing.
For younger children, picture cards can accompany the written words. This gives them a visual clue while they practise vocabulary, word order and sentence construction.
4. Bilingual Picture-Word Cards
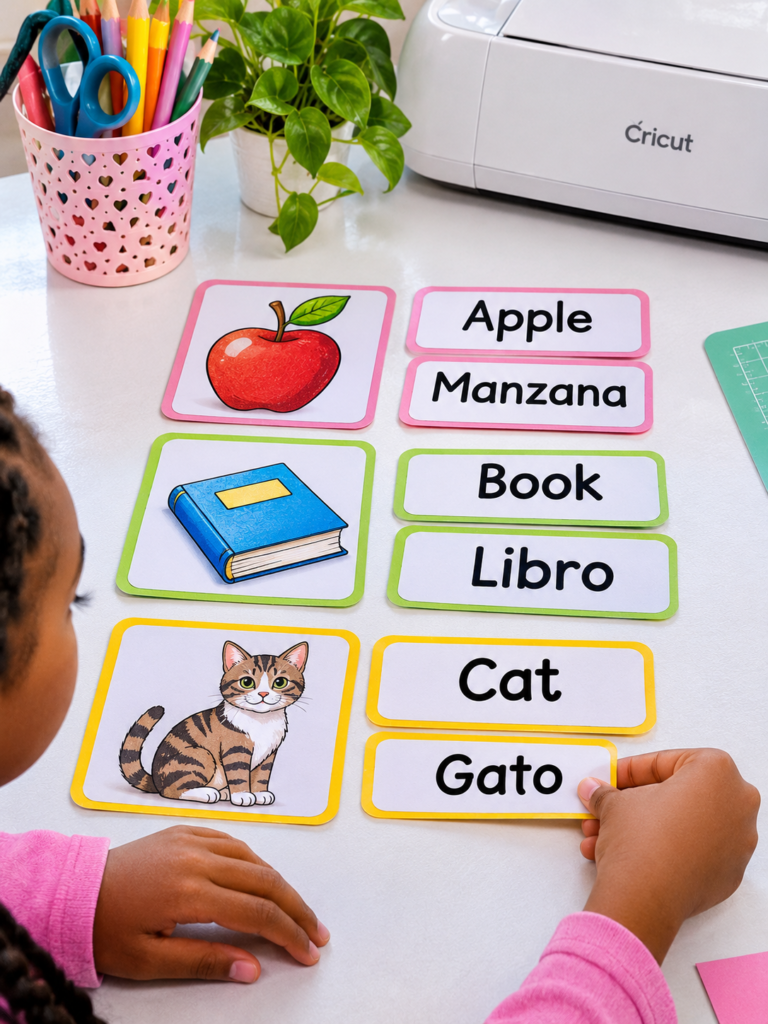
Children growing up around two languages may understand a word in one language but struggle to remember or say its equivalent in another.
These easy Cricut projects for kids can turn everyday vocabulary practice into a simple matching activity.
Use your Cricut to cut picture cards featuring familiar items such as fruits, animals, clothing and household objects.
Children can draw the pictures themselves or use suitable printed images, then add the name of each item in both languages with help from a fluent speaker.
Make the cards useful beyond memorising words: Place the two language versions face down and let the child match the words to the correct picture.
Another round can involve naming an object in one language and finding its equivalent in the other. Start with words the child encounters regularly, such as food eaten at home or objects used at school.
Spelling and meaning deserve particular attention. Ask someone fluent in the relevant language to check the translations, especially where regional expressions, accents or different writing systems are involved.
Automatic translation alone may not capture the word a child uses in everyday conversation.
5. Character Emotion Cards
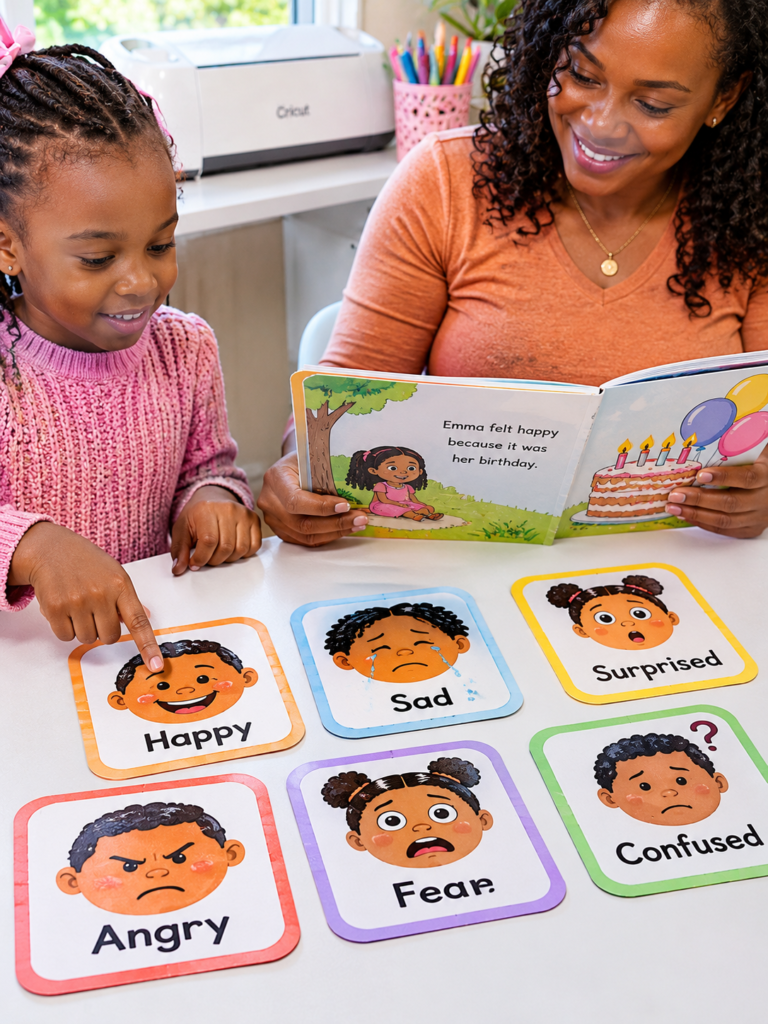
Children sometimes recognise that a character is happy or upset without having the words to explain what the character might be feeling.
Emotion cards can give parents and teachers a starting point for discussing feelings through familiar stories and everyday situations.
Cut card shapes with your Cricut and let children draw faces showing happiness, disappointment, surprise, anger, fear or confusion. Keep the expressions distinct enough to compare, but allow children to interpret them in their own way.
The cards can then be used while reading a story: pause at an important moment and ask which expression best represents the character’s reaction.
Take the discussion beyond naming the feeling: Ask what happened in the story that might have caused the emotion.
A character who loses a favourite toy, for example, may feel disappointed or sad. Explain that two people can respond differently to the same situation, so there is not always one correct card.
This activity develops emotion vocabulary, observation and the ability to talk about feelings without expecting children to give identical answers.
6. Punctuation Sorting Board
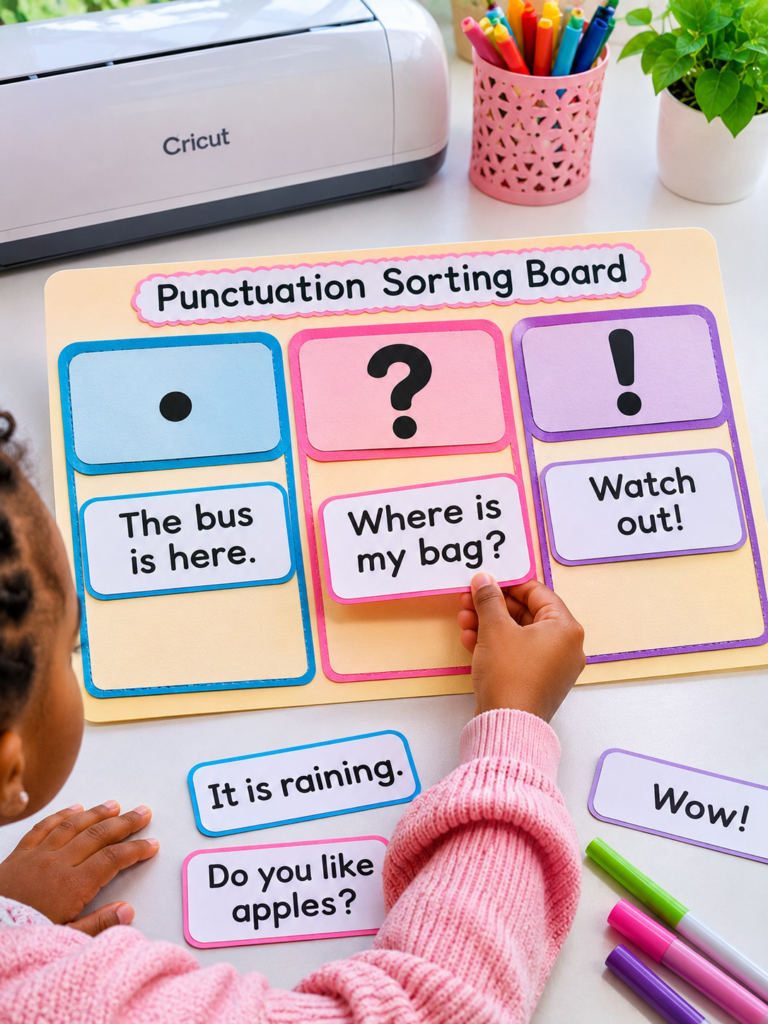
A sentence can become a question, an instruction or an expression of excitement depending on the punctuation used.
Children who are learning to write may understand the words but still find it difficult to choose the correct ending. This sorting board gives them a visual way to practise that decision.
Use your Cricut to cut a board with three clearly marked spaces for full stops, question marks and exclamation marks.
Prepare separate sentence cards such as Where is my bag?, The bus is here. and Watch out! Children read each card and place it under the punctuation mark that fits its meaning.
Use the same sentence to teach the difference: Change the punctuation in a sentence such as You finished your work. to You finished your work? Then discuss how the punctuation changes the way the sentence is read.
Explain that an exclamation mark expresses strong feeling or emphasis; it is not simply a more exciting full stop.
The activity can progress from sorting completed sentences to giving children unfinished sentences and asking them to choose the appropriate punctuation themselves.
7. Number-Line Floor Path
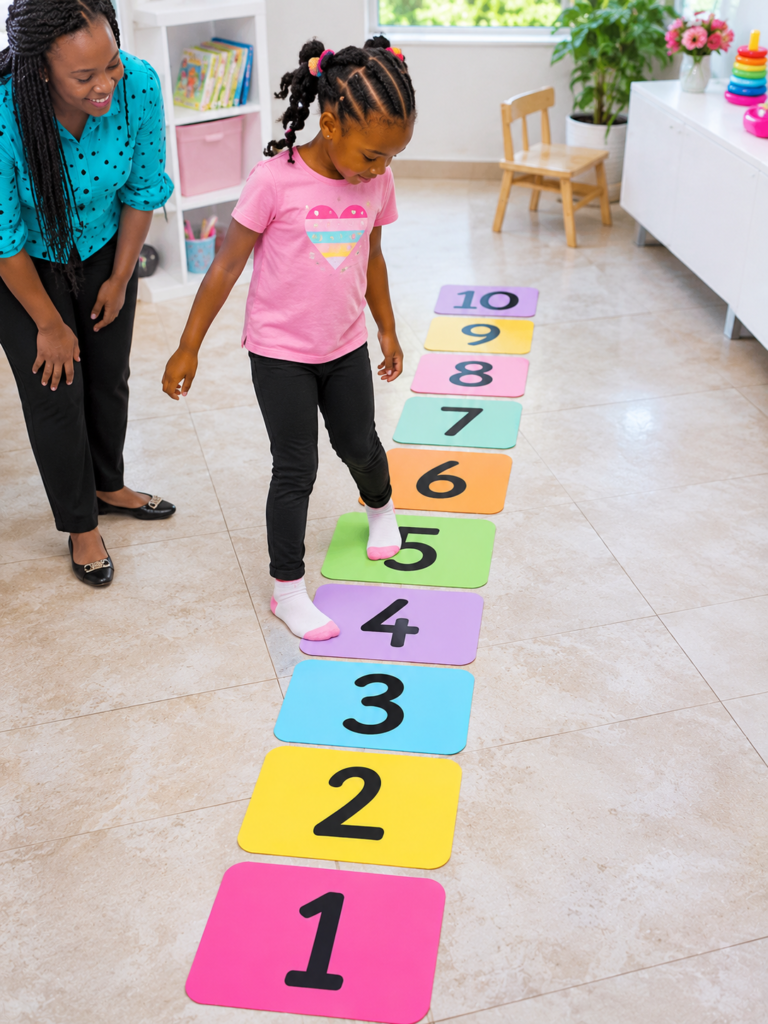
Children who can recite numbers may still have difficulty identifying which number comes before or after another.
A floor number line makes number order something they can see and move through rather than only repeat aloud.
Cut large number cards with your Cricut and arrange them in sequence on the floor. Begin with a manageable range, such as 1–10, before introducing larger numbers.
Children can step on each number while counting, stand on a number and identify its neighbours, or find a missing card from the sequence.
Try a movement challenge: Call out a number and ask the child to stand on it, take two steps forward and name the number reached.
Repeat by moving backwards. This helps connect counting with addition and subtraction, provided the child is ready for those concepts.
Keep the cards flat and secure them to prevent slipping. Leave enough space between them for safe movement, especially when several children are taking turns.
Adding personalised decorations can make a living space feel more like home. 29 Easy Cricut Projects for Home Decor shares creative ways to decorate different rooms.
8. Place-Value Slider
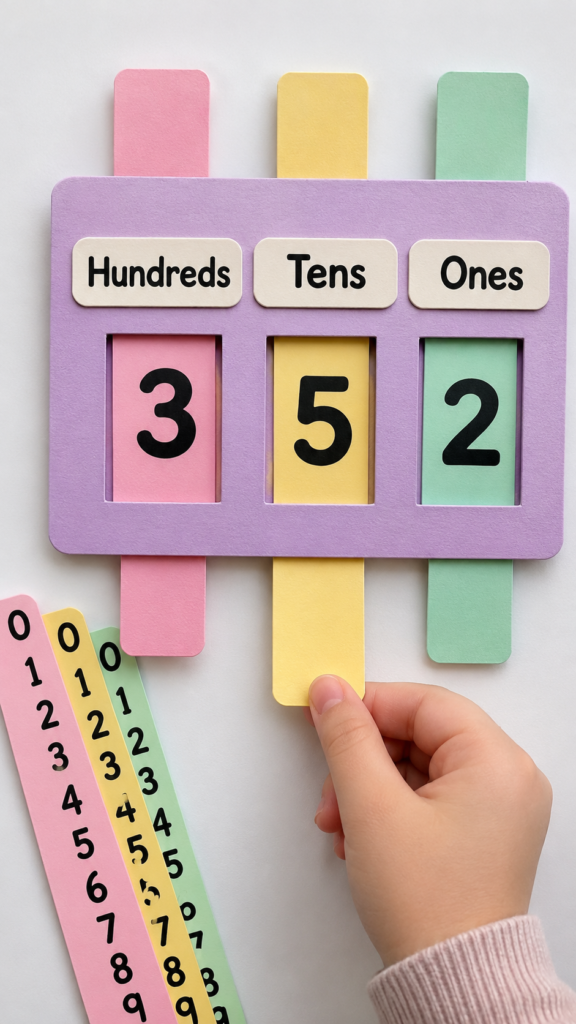
Reading a number such as 352 involves understanding that the 3 represents three hundreds, the 5 represents five tens and the 2 represents two ones.
Children can memorise the number without understanding why each digit has a different value. A place-value slider makes the positions easier to examine.
Use your Cricut to cut a base with three labelled columns: Hundreds, Tens and Ones. Prepare separate number strips that can slide into each column.
Children can change the digits to build numbers, then read the value represented by each position.
Teach the concept with a number change: Build 352, then move the 5 from the tens column to the ones column. Discuss how the number changes from 352 to 325.
The digits are the same, but their positions give them different values. For younger learners, begin with tens and ones before introducing hundreds.
The slider should have clearly separated columns and enough room for each digit to sit directly under its correct place-value heading.
9. Fraction Comparison Strips
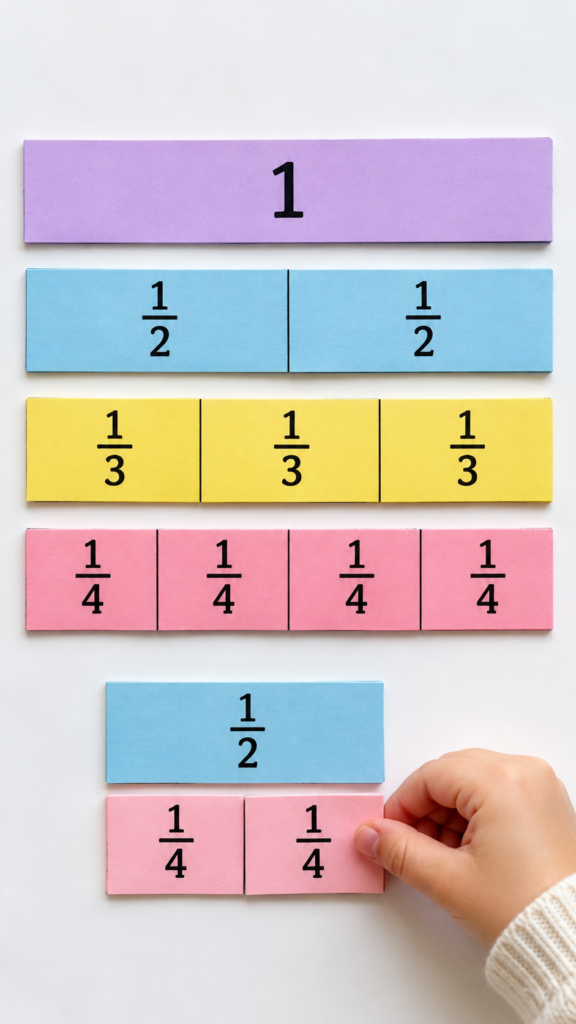
Fractions can be difficult to understand when children only see numbers such as ½, ⅓ and ¼ written on a page.
Comparison strips provide a physical way to see how a whole is divided and why different fractions represent different amounts.
Cut strips of equal length and width with your Cricut. Divide one strip into two equal sections, another into three equal sections and another into four equal sections.
Label the parts and let children place the strips alongside one another to compare the sizes.
Put the strips to the test: Ask which is larger, ½ or ¼. Children can compare the shaded or marked portions directly rather than guessing from the numbers.
You can also place two quarter sections beside one half section to show that 2/4 and 1/2 represent the same amount.
Accuracy is essential here: every section within a strip must be equal in size. The strips should also share the same overall length so that children compare fractions of the same-sized whole.
10. Movable-Hand Clock
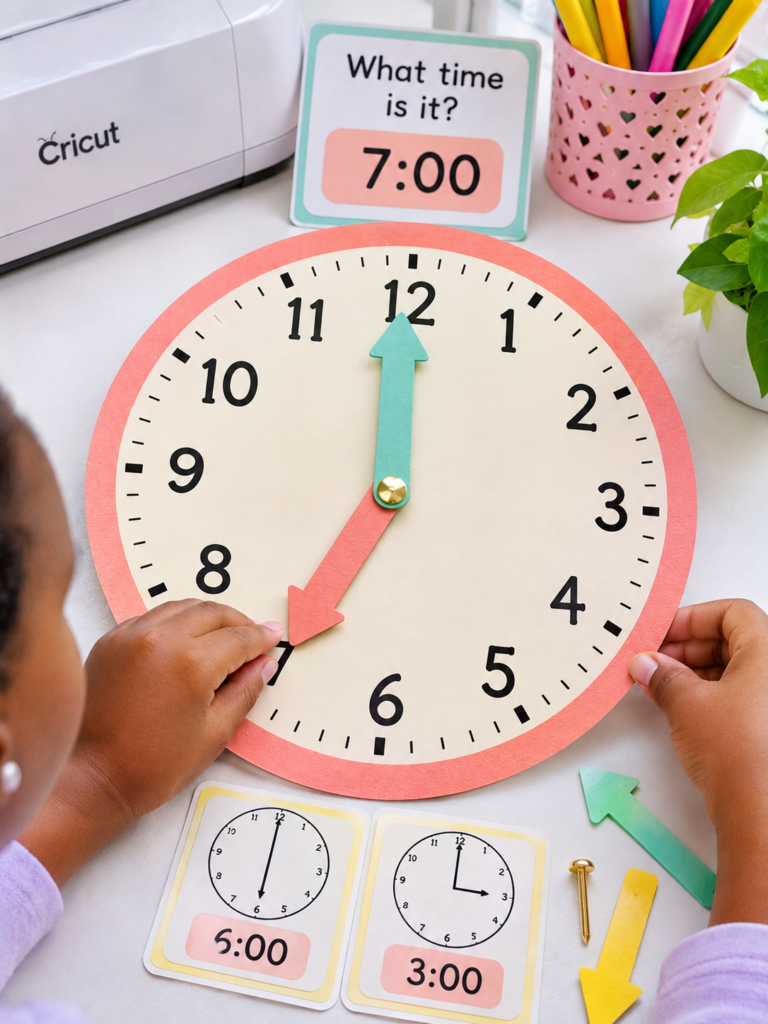
Learning to tell time involves more than recognising the numbers around a clock.
Children must understand the difference between the hour hand and minute hand, as well as how their positions change throughout the day. This movable clock gives them a way to practise setting and reading times.
Cut a large clock face, number markers and two hands from suitable cardstock using your Cricut.
An adult can make a hole through the centre and secure both hands with a paper fastener so they rotate independently. Make the hour hand shorter than the minute hand to reflect the standard clock design.
Start with times children encounter daily: Set the clock to 7 o’clock for getting ready for school or 8 o’clock for bedtime.
Once the child can identify whole hours, introduce half-past and quarter-hour times. Explain that the minute hand points to 6 at half-past and to 3 at quarter-past on an analogue clock.
Keep the hands loose enough to move but secure enough to stay in position. Children can take turns setting a time called out by an adult and reading a time shown on the clock.
11. Local Map Puzzle
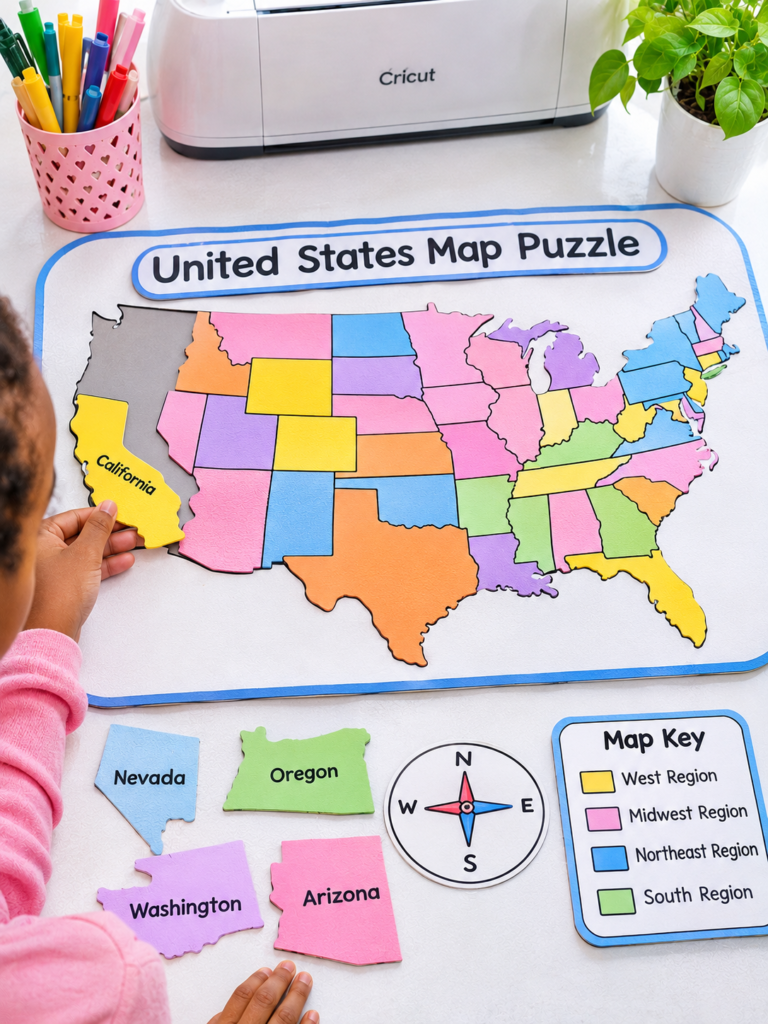
Children may know the names of nearby towns, cities or states without understanding where those places sit in relation to one another.
A map puzzle can help connect those names to actual locations and introduce basic geography through a place they recognise.
For this project, choose a map of the child’s country, state or region. Use your Cricut to cut a simplified outline into large sections that fit together. Rather than dividing it into random shapes, use recognisable geographical or administrative boundaries where possible.
Children can assemble the pieces, identify the areas and mark familiar locations such as their town, school, a major river or a neighbouring state.
Give the puzzle a geography task: Once the map is assembled, ask the child to locate their area, identify neighbouring regions and trace a possible journey between two places.
Older children can add a small legend to distinguish rivers, roads, state boundaries and major towns.
The map should be based on a reliable geographical source. Check that its boundaries, names and relative positions are correct before using it as a learning resource.
A decorative outline may look attractive but should not be treated as an accurate map.
12. Water-Cycle Learning Wheel
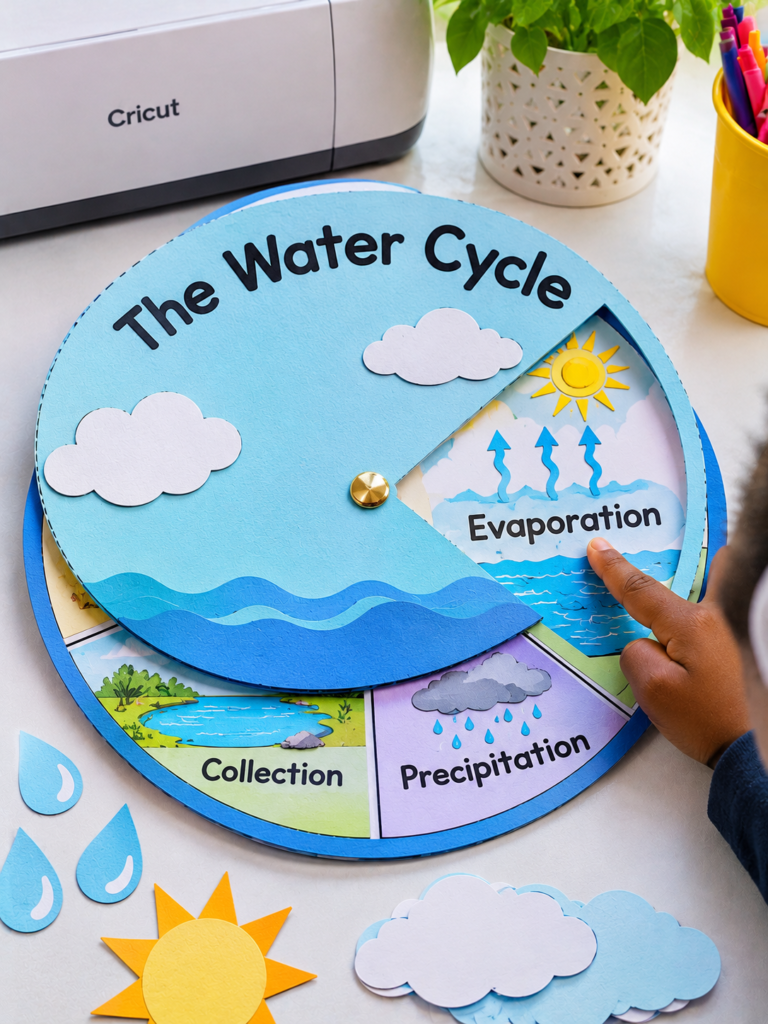
Where does rainwater go after it falls, and how does it return to the atmosphere? Children often learn the names of the water-cycle stages without understanding how water moves between them.
This rotating wheel can make those connections easier to explain.
Cut two circular cardstock pieces with your Cricut. Divide the lower circle into sections showing evaporation, condensation, precipitation and collection.
Add a viewing window to the upper circle and attach the two pieces at the centre with a paper fastener. As the child rotates the top layer, each stage appears with a short explanation or illustration.
Teach the movement, not just the vocabulary: Explain that heat from the Sun causes liquid water to evaporate into water vapour. As the vapour cools, it condenses into tiny water droplets that form clouds.
Water eventually returns to the surface through precipitation, such as rain, and may collect in rivers, lakes, oceans or the ground. From there, the process continues.
One important detail to explain is that the water cycle does not have a fixed starting point. Evaporation, condensation and precipitation can happen in different places and at overlapping times.
The wheel is a simplified learning model, not a complete picture of every route water takes.
Cardstock makes it possible to create a variety of paper-based designs, from greeting cards to decorative pieces. 27 Easy Cricut Projects Using Cardstock offers more ideas to try.
13. Moon-Phase Observation Wheel
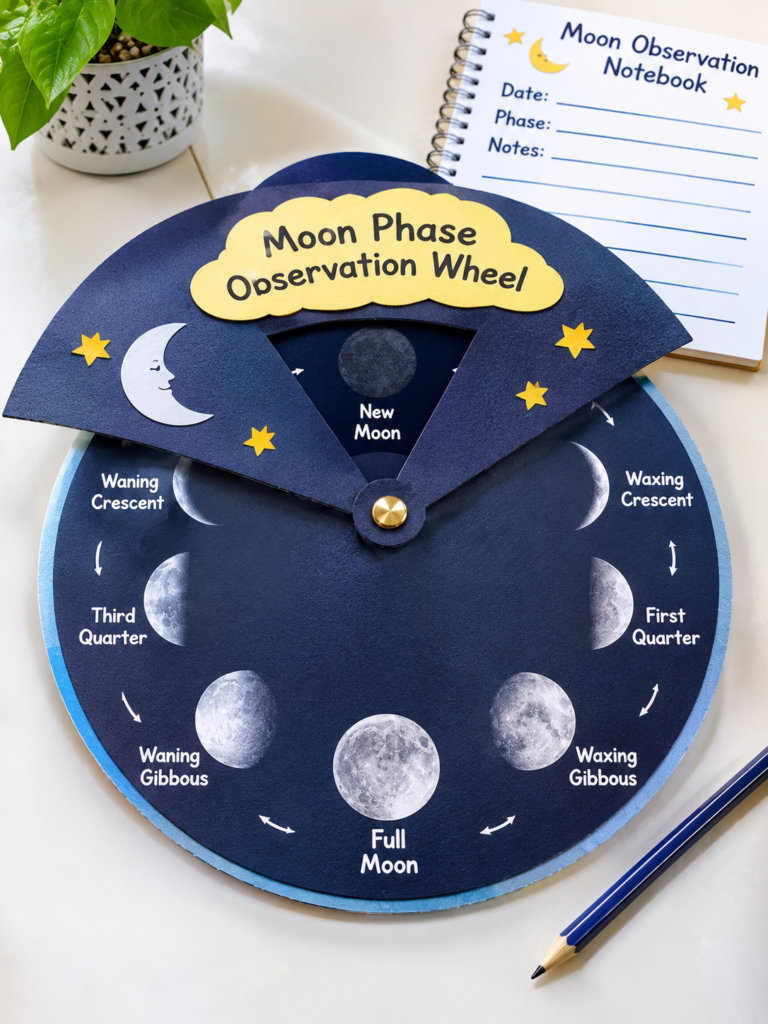
Children may see the Moon as a full circle on one night and a thin crescent on another, then assume its shape is changing.
A moon-phase wheel gives them a way to examine the different appearances and understand what causes them.
Cut two circular cardstock layers with your Cricut. Place illustrations of the eight main phases on the lower circle and create a viewing window in the upper one. Attach the layers at the centre so the child can rotate the wheel to view each phase in sequence.
The eight phases are new Moon, waxing crescent, first quarter, waxing gibbous, full Moon, waning gibbous, third quarter and waning crescent.
Connect the model to the night sky: Explain that the Moon does not produce its own light. Sunlight illuminates half of the Moon, but as the Moon travels around Earth, our view of that illuminated portion changes. The Moon itself does not change shape.
For a longer activity, have the child observe the real Moon over several weeks and draw what it looks like in a small observation notebook.
They can then compare their drawings with the wheel. This is particularly useful because the wheel shows the expected sequence, while the notebook records what the child has personally observed.
14. Plant Life-Cycle Sequence Cards
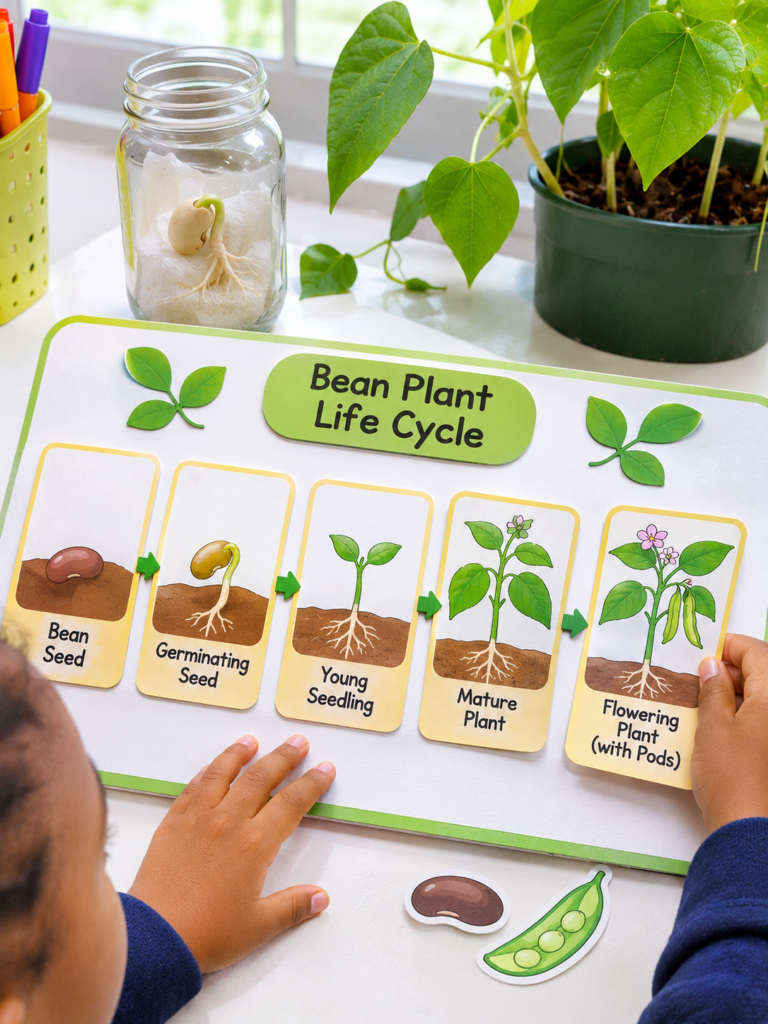
Plant growth is easier to understand when children can connect each stage with what is happening beneath and above the soil.
Instead of simply memorising that plants begin as seeds, this project can introduce the conditions and changes involved in growing a particular plant.
Use your Cricut to cut a set of large plant-shaped panels or individual stage illustrations.
Choose one plant, such as a bean, and show its development from seed through germination, seedling growth, mature plant and, where applicable, flowering and seed production.
Children can colour the parts, label the roots, stem and leaves, and arrange the stages on a circular display.
Add a simple growing experiment: Plant a bean seed in a transparent container with damp paper towel so the roots and early shoot can be observed.
Ask the child to record what changes over several days and compare the real growth with the paper model.
15. Habitat Sorting Board
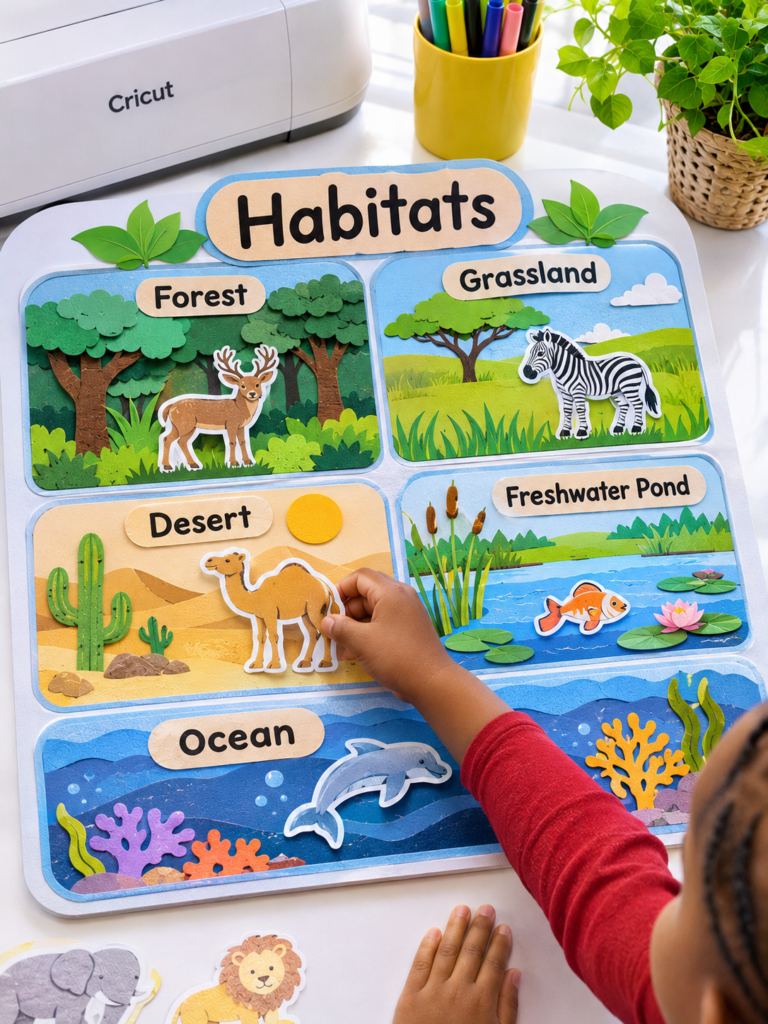
An animal’s habitat is more than the place where it is commonly seen. It provides the food, water, shelter and environmental conditions the animal depends on.
This project can help children understand those relationships instead of simply memorising that certain animals belong to certain places.
Cut a large board divided into habitat zones, such as a forest, grassland, desert, freshwater environment and ocean.
Prepare animal pieces that children can place in the appropriate areas. Include a few animals with less obvious habitat connections to encourage discussion.
Make the child defend each placement: Ask why a fish belongs in an aquatic habitat, what a camel is adapted to cope with in dry environments, or what a forest animal might use for shelter.
This encourages children to connect an animal’s physical features and needs with its surroundings.
Avoid treating habitats as exclusive categories. Some animals use more than one habitat during their lives, while others move between environments to find food or reproduce.
For that reason, the board should introduce common habitat associations rather than suggest that every animal has only one possible home.
16. Food-Chain Sequence Cards
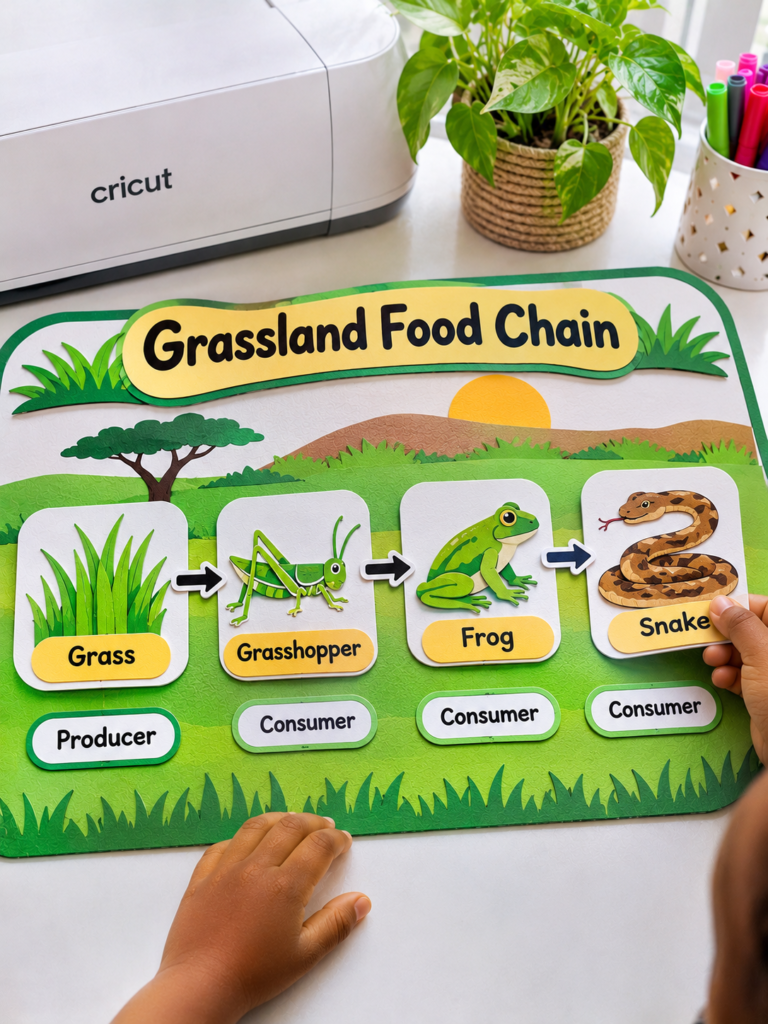
Understanding which animals eat other organisms is only part of learning about a food chain.
Children also need to understand how energy moves through an ecosystem and why plants are important to many feeding relationships.
Use your Cricut to cut illustrated pieces representing organisms from one familiar ecosystem.
For example, a simple grassland food chain could include grass, a grasshopper, a frog and a snake. Arrange the pieces in a line and add arrows between them.
Teach children how to read the arrows: The arrow points from the organism being eaten towards the organism that receives the energy.
In the example above, the arrow goes from grass to grasshopper, then from grasshopper to frog and from frog to snake.
Introduce the terms producer and consumer as the child becomes familiar with the arrangement. Grass is a producer because it makes its own food using sunlight. The grasshopper, frog and snake are consumers because they obtain energy by eating other organisms.
You can also ask what might happen when one organism becomes scarce. This introduces the idea that organisms in an ecosystem depend on one another.
Explain that real feeding relationships are more complicated than one straight line: several food chains can connect to form a food web.
17. Weather Observation Wheel
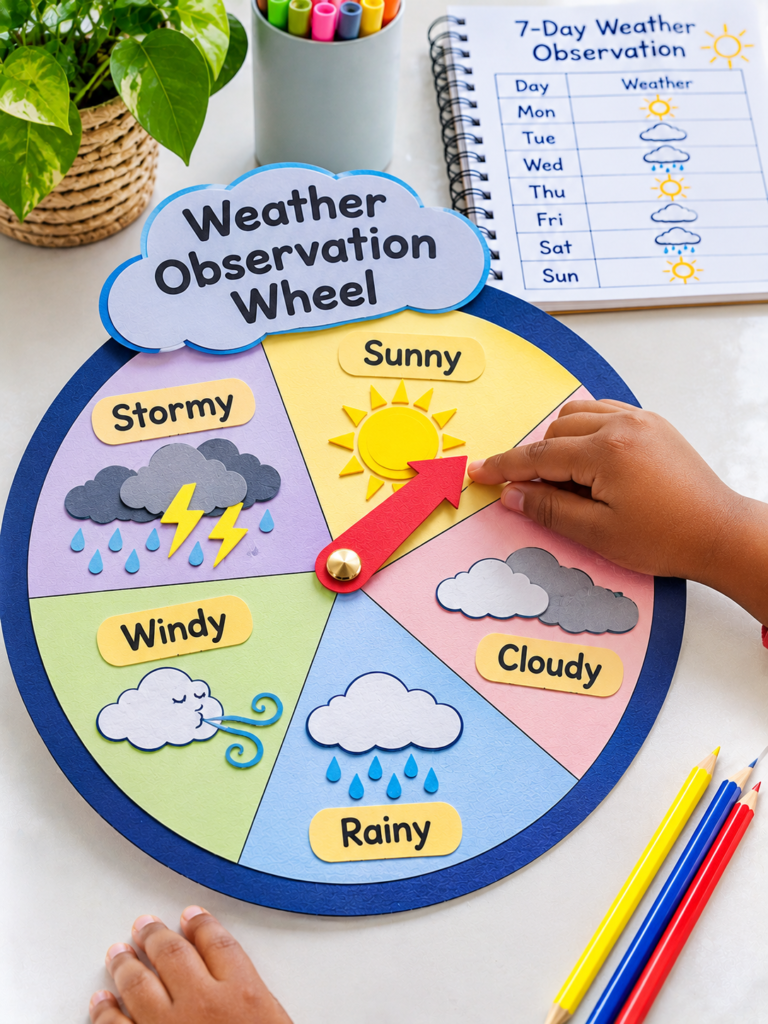
Children often describe a day as simply sunny or rainy, but weather involves several conditions that can be observed and compared.
This project gives them a way to record those conditions and build an understanding of how weather changes over time.
Cut a circular wheel with your Cricut and divide it into sections for common observations such as sunny, cloudy, rainy, windy and stormy.
Add a movable pointer secured with a paper fastener. Children can turn the pointer to record the day’s main weather condition.
Turn it into a seven-day weather record: Each day, ask the child to observe the sky and update the wheel.
Alongside it, keep a small notebook where they record the date, temperature if measured with an appropriate thermometer, and whether rain occurred. At the end of the week, compare the entries.
This creates an opportunity to explain the difference between weather and climate. Weather describes atmospheric conditions over a short period, while climate refers to longer-term patterns in a region.
The wheel records observations; it does not predict tomorrow’s weather.
Anyone interested in experimenting with Infusible Ink can find project inspiration in 25 Easy Cricut Projects Using Cricut Infusible Ink, featuring designs for compatible blanks.
18. Nature Field Journal Tabs
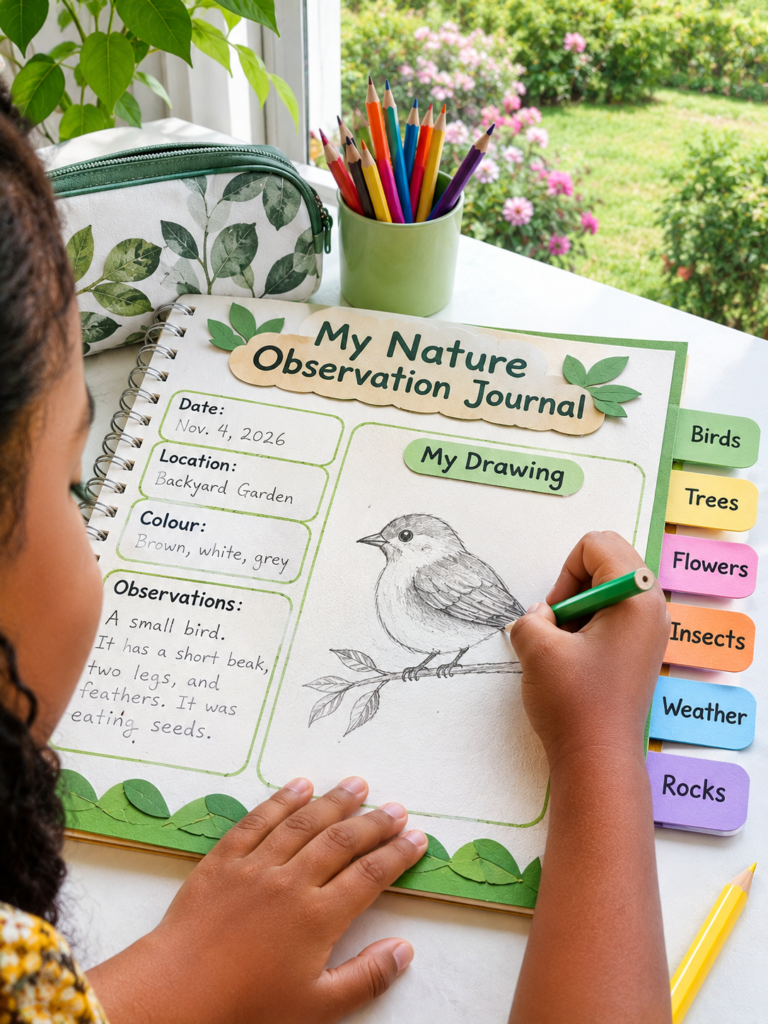
Outdoor observations can become difficult to organise when children record everything on loose sheets of paper.
A field journal with labelled sections gives them a simple structure for keeping notes about the plants, animals and natural features they encounter.
Use your Cricut to cut divider tabs for sections such as birds, trees, flowers, insects, weather and rocks.
Attach the tabs to a small notebook or a homemade paper journal. Children can record the date, location, a drawing and a few observations each time they notice something interesting.
Teach them to observe like young naturalists: Rather than writing only that they saw a bird, encourage them to describe its approximate size, colour, beak shape, behaviour and where it was seen.
They can compare observations from different days to notice patterns, such as birds appearing near a particular tree or flowers opening at certain times.
Keep the journal focused on looking, listening, drawing and recording.
Children should not touch unknown plants, disturb nests, handle unfamiliar insects or collect potentially harmful natural materials. Photographs and sketches are often enough to document what they find.
19. Animal Track Detective Cards
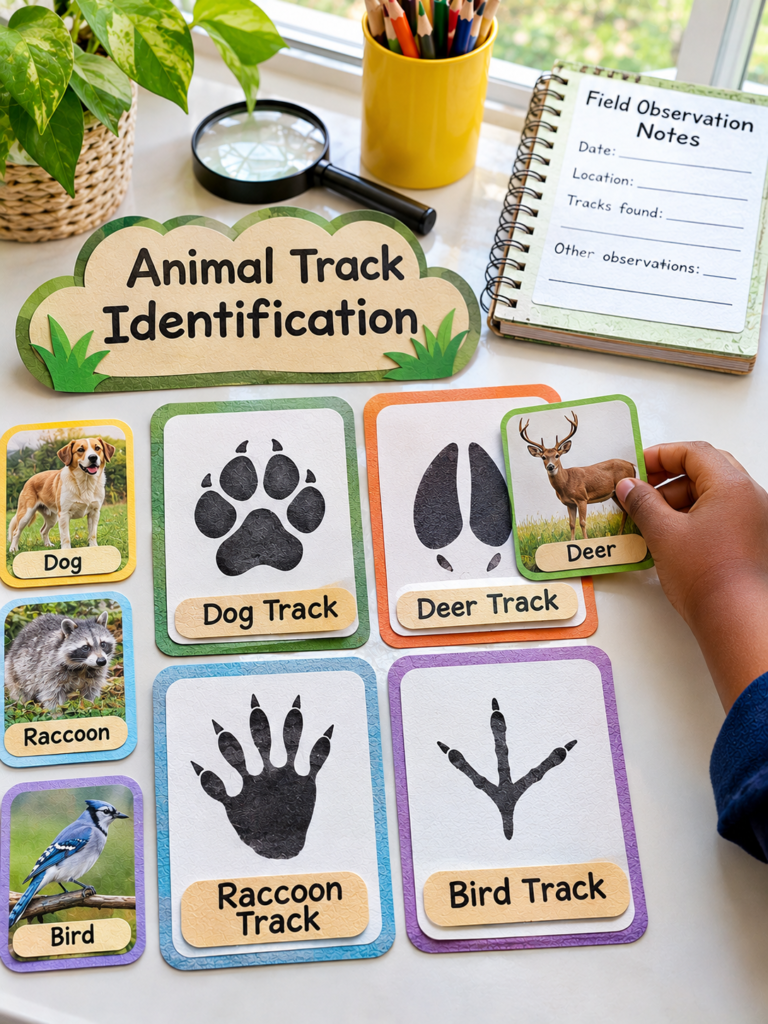
Finding footprints outdoors can raise an interesting question: which animal passed through this area? Animal track cards introduce children to the clues wildlife leaves behind and encourage them to compare shapes, sizes and patterns rather than identify animals from appearance alone.
Use your Cricut to cut card-sized panels featuring verified illustrations or photographs of animal tracks.
Include the animal’s name and, where useful, a short note about its typical movement. You can make a second set of cards showing the animals themselves for matching.
Make it a detective exercise: Show the child a track without revealing the animal’s name.
Ask them to examine the number of toes, the overall shape and the arrangement of the prints. Then let them compare it with the reference cards and explain which animal they think made it.
For greater accuracy, use tracks from animals found in the child’s region. A footprint can look different depending on whether the animal was walking, running or moving across soft mud, sand or snow.
The cards should therefore show representative examples, not suggest that every animal leaves one identical print.
20. Tangram Shape Puzzle
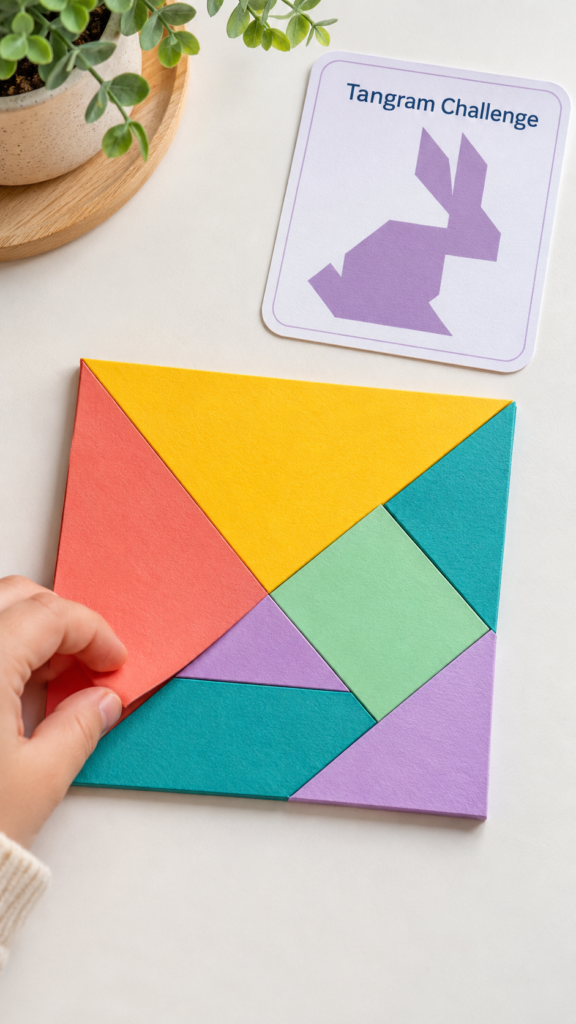
A child may recognise a triangle, square or parallelogram individually but find it harder to understand how those shapes can fit together to form something completely different.
Tangrams provide a practical way to investigate that relationship.
They are among the more useful easy Cricut projects for kids when the aim is to teach geometry through experimentation rather than worksheets.
The traditional tangram consists of seven pieces cut from one square: five triangles, one square and one parallelogram.
Use your Cricut to cut the pieces accurately from cardstock or thin craft board. Prepare challenge cards with silhouettes of objects, animals and geometric shapes for children to recreate.
Give the puzzle a proper challenge: Start with designs that use two or three pieces, then progress to silhouettes requiring all seven.
Ask children to identify which shapes they used, compare the sizes of the triangles and explain how they fitted the pieces together.
For an extra geometry exercise, have them trace the completed arrangement and compare its outline with the original square.
The challenge cards must match the exact tangram set. Traditional tangram puzzles generally require all seven pieces to be used without overlapping, so an incorrectly proportioned set can make some silhouettes impossible to complete.
21. Pattern-Building Strips
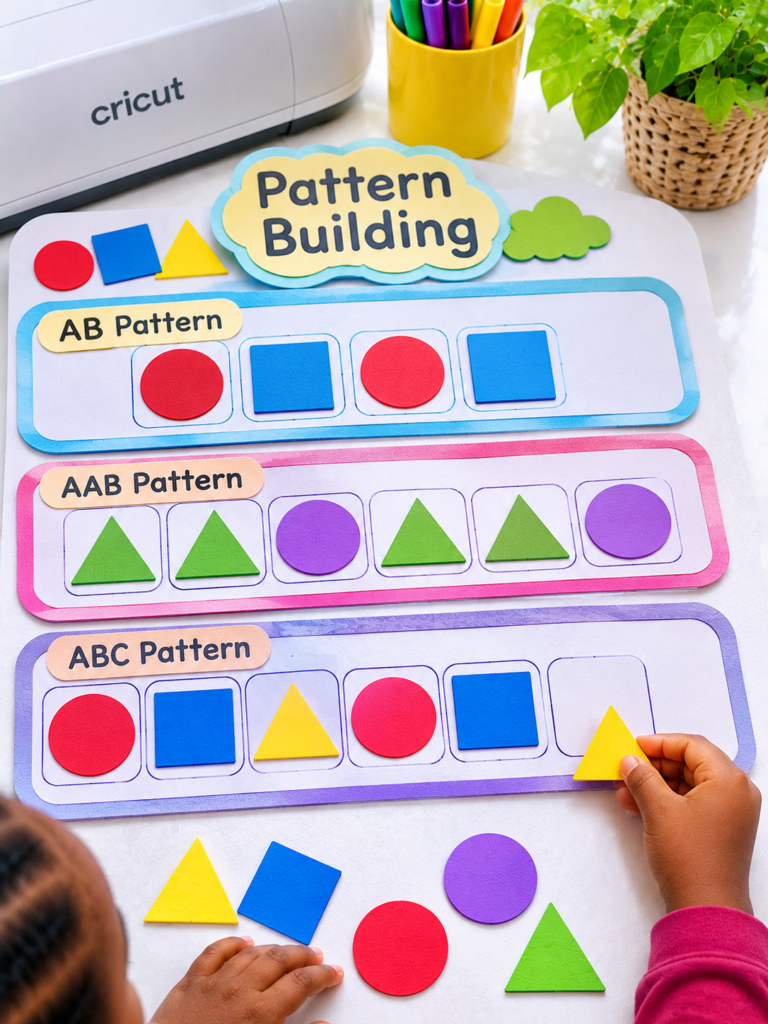
Recognising a repeating pattern is an important early maths skill, but some children can copy a sequence without understanding the rule behind it.
Pattern-building strips give them a chance to identify what repeats, predict what comes next and create their own sequences.
Cut long strips with marked spaces and prepare separate shapes such as circles, squares, triangles and rectangles.
Children place the shapes along the strip to complete patterns. Begin with a simple AB pattern, such as circle-square-circle-square, then introduce AAB, ABB and ABC patterns as their understanding develops.
Try a pattern that has a missing space: Arrange a sequence such as triangle-triangle-circle, triangle-triangle-circle, then leave the next space empty.
Ask the child to choose the missing shape and explain the rule. Later, let them create a pattern for someone else to solve.
The important teaching point is that children should be able to explain the repeating unit, not just guess the next shape. This makes the activity useful for introducing sequences, prediction and early algebraic thinking.
Vinyl is a versatile material for personalising everyday items, and 23 Cricut Projects for Beginners Using Vinyl shares more ways to work with it.
22. Paper Bridge Engineering Challenge
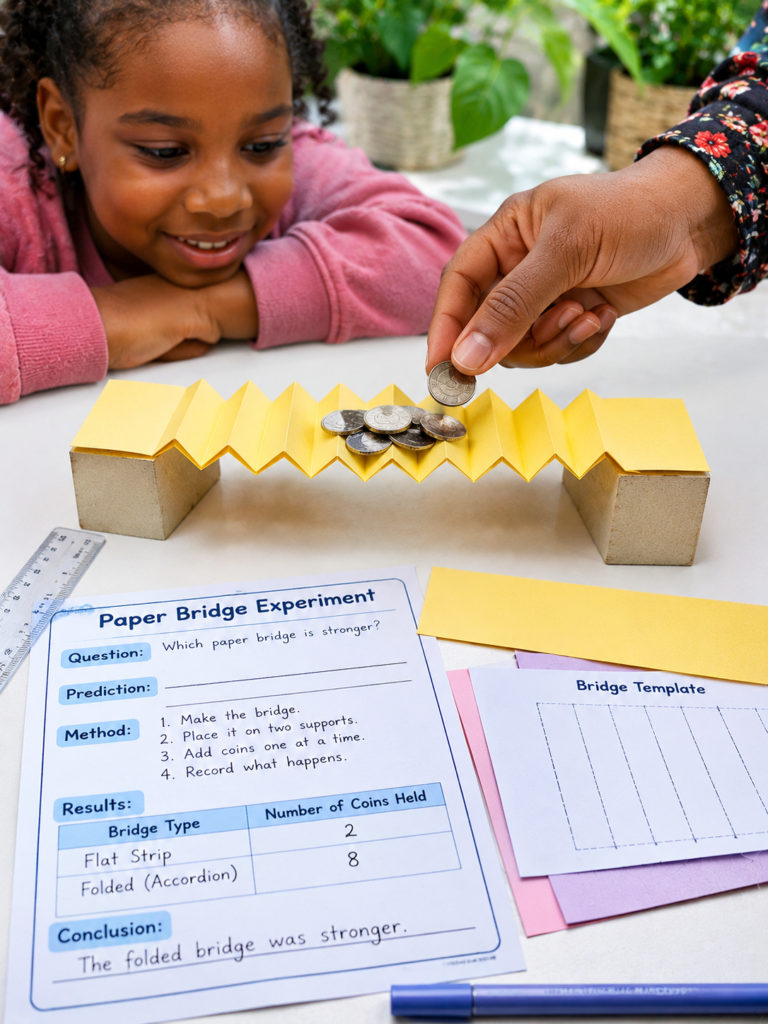
Why can a flat sheet of paper bend under a small weight, while the same paper becomes more resistant to bending after it is folded? This is the question behind this engineering activity.
It gives children a simple way to investigate how changing a material’s shape can affect its performance.
Use your Cricut to prepare paper strips, bridge-deck templates and optional support pieces. Set up two books or blocks at a fixed distance apart, then ask the child to span the gap using a flat sheet of paper.
Place small objects, such as coins, on the bridge one at a time and record how much it supports before bending significantly.
Next, let the child redesign the bridge by folding the paper into an accordion shape, rolling it into a tube or adding supports.
Make the experiment fair: Keep the distance between the supports, paper size and test objects the same when comparing designs.
Change one feature at a time so the child can identify what made a difference. Ask them to predict which design will perform better before testing it.
This introduces a basic engineering process: design, test, observe and improve. Explain that the result applies to the particular paper model, not every real bridge.
The activity demonstrates how folds and structural shapes can change resistance to bending.
23. Geometric Solid Nets
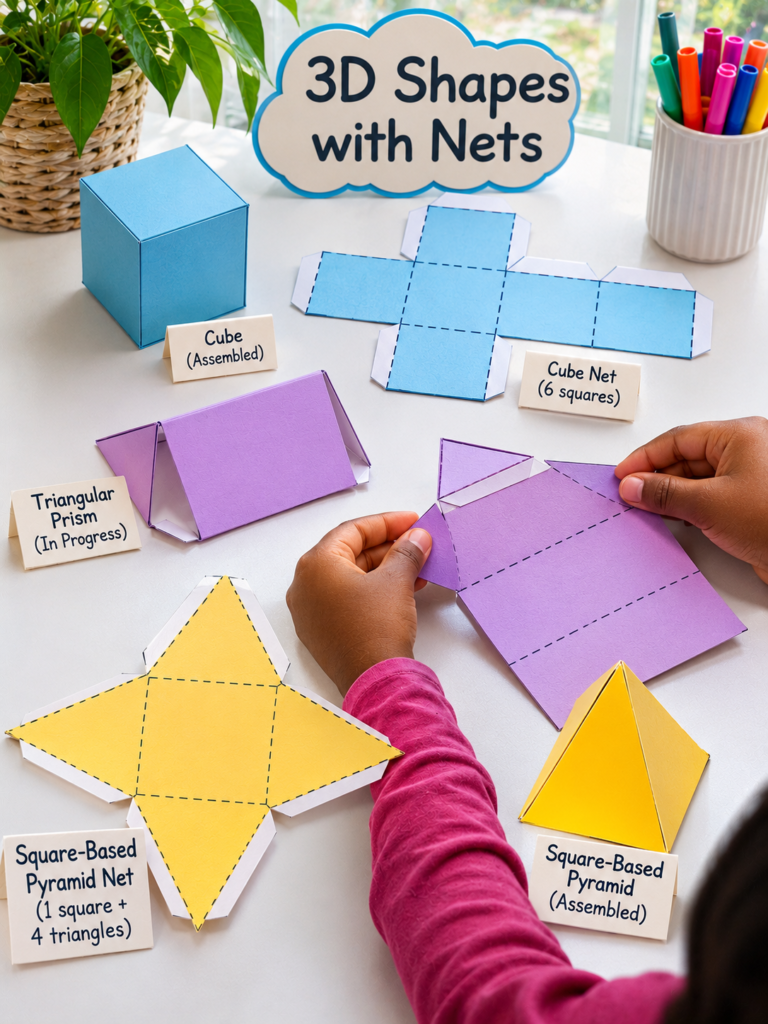
A flat shape can look very different once it is folded into a three-dimensional object. Children sometimes struggle to connect a diagram of a cube or pyramid with the flat faces that form it. Solid nets make that connection visible.
Use your Cricut to cut templates for a cube, triangular prism and square-based pyramid. Each net should include the correct arrangement of faces and small tabs for joining the edges.
Add light score or fold lines where appropriate, so children know where to bend the material before assembling it.
Turn construction into a geometry lesson: Before folding, ask the child to count the faces, identify the shapes and predict which edges will meet. Once the model is assembled, count the faces, edges and vertices.
For example, a cube has six square faces, twelve edges and eight vertices.
The nets must be mathematically correct. A cube net needs six connected squares arranged in a foldable configuration; six squares placed in any random arrangement will not necessarily form a cube.
Begin with a simple net and move to less familiar arrangements as the child gains confidence.
24. Make-Your-Own Board Game
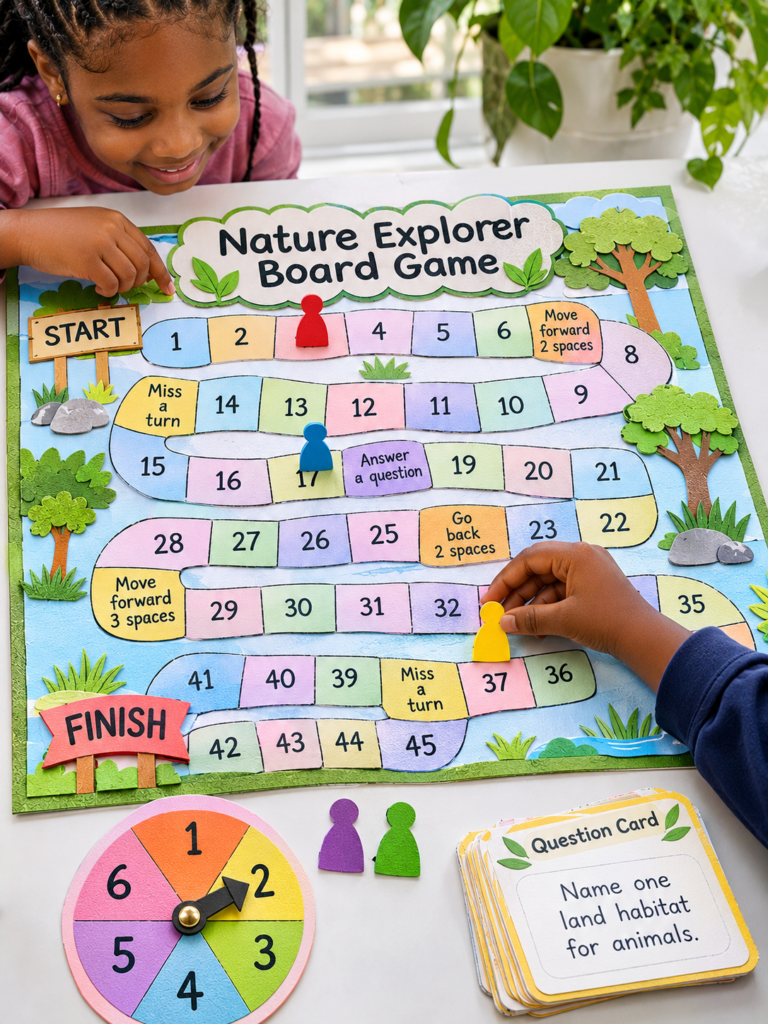
Some children enjoy playing board games but have little experience deciding how the rules, turns and winning conditions work.
Making a game from scratch lets them take part in those decisions rather than simply following instructions someone else has written.
Use your Cricut to cut a blank game path, player markers, question cards and a simple spinner.
The child chooses the theme, decides where the path begins and ends, and creates instructions for selected spaces. For example, a space might ask a player to move forward two places, answer a question or miss a turn.
Test the game before decorating it: Play a short round together. Check whether the spinner gives fair results, whether the instructions are clear and whether a player can reach the finish.
When something does not work, let the child suggest a change and test the revised rule.
This project introduces more than counting and turn-taking.
Children practise logical thinking, explaining instructions, considering fairness and revising a design after testing it. Keep the first version simple enough to finish and play in one sitting.
25. Indoor Scavenger Hunt Cards
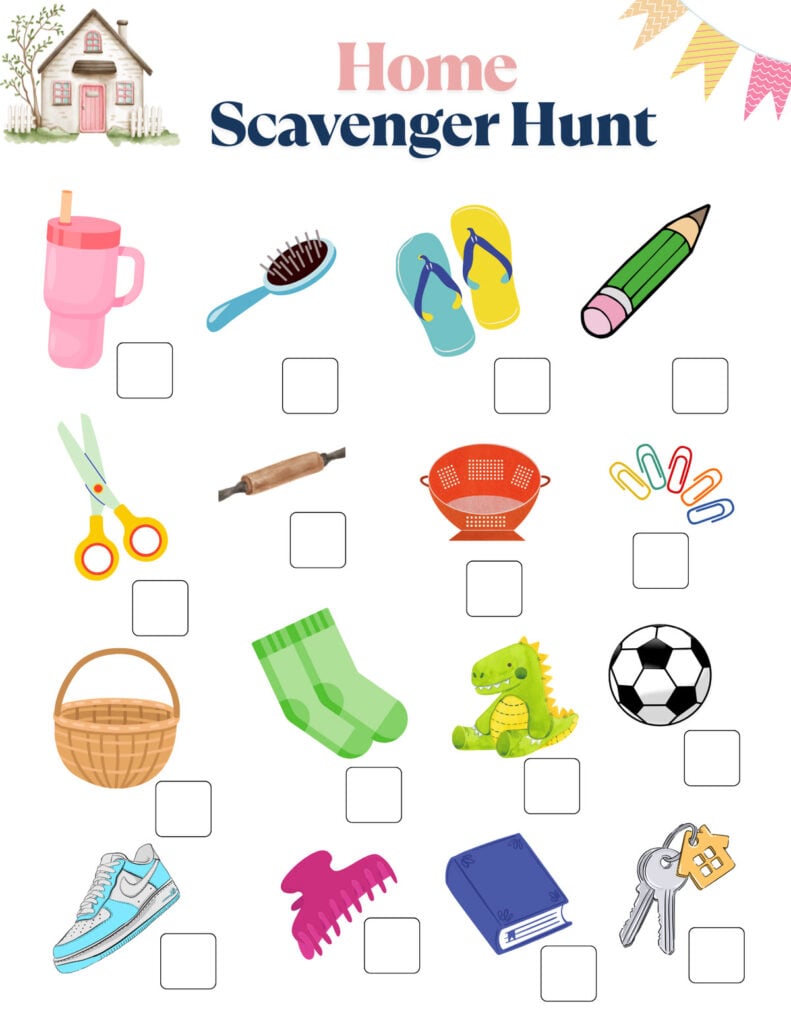
Keeping children occupied indoors can be difficult, particularly when outdoor play is not possible or there is limited space for active games.
Scavenger hunt cards turn familiar surroundings into an observation and problem-solving activity without requiring an elaborate setup.
Use your Cricut to cut clue cards with prompts such as find something that makes a sound, find an object with a circular shape or find something that begins with the letter B.
You can also include clues about texture, colour, size and everyday uses. Children can help create the cards and take turns hiding clues for other players.
Choose clues that make children think: Instead of asking them to find something red, try asking them to find an object that is used to keep food fresh. This encourages them to connect an object’s appearance with its purpose. For younger readers, add a small picture beside each written clue.
Check every clue against the actual home or classroom before play.
Avoid instructions that encourage children to climb furniture, open electrical appliances, handle cleaning products or search in places that are off-limits.
Selling handmade items can be a way to earn from your crafting skills. 25 Easy Cricut Projects to Make and Sell for Extra Money offers product ideas to consider for a small business.
26. Mini Town Play Mat
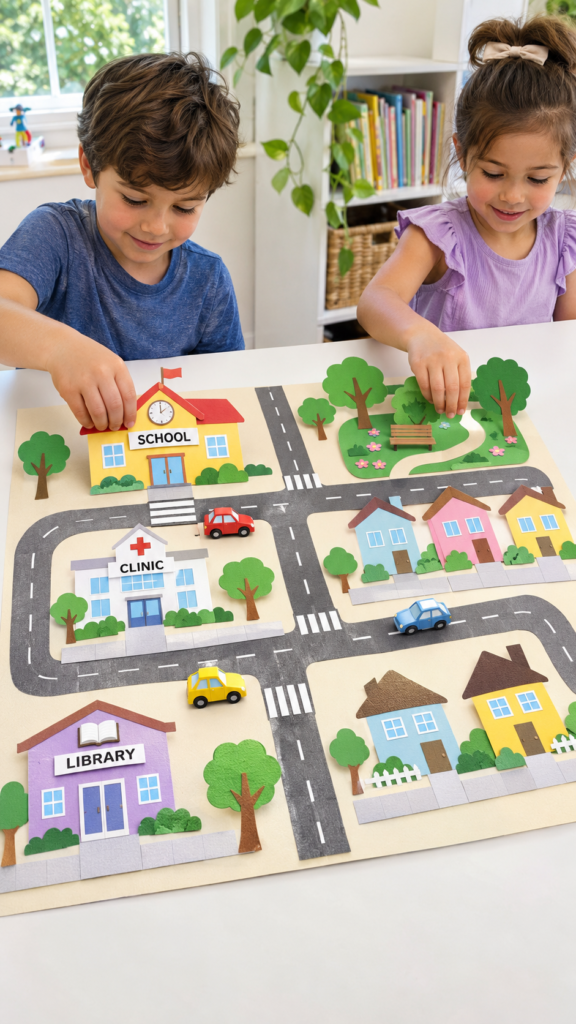
Children often recognise places such as schools, hospitals, shops and homes but may not understand how these places fit into a community.
A mini town play mat can introduce that idea through a layout they create themselves.
Use your Cricut to cut road sections, building outlines, trees, parks and other town features.
Arrange the pieces on a large sheet of paper or lightweight board to create a reusable play surface. Leave some areas empty so children can decide where new buildings, roads and public spaces should go.
Introduce a town-planning problem: Give the child a school, a clinic and several homes to place on the mat.
Ask how people might travel between them, where a pedestrian crossing would be useful and why a park should have space around it. Older children can add a simple map key and label the main roads.
This is more than arranging miniature buildings. It introduces spatial planning, basic map symbols and the idea that community facilities serve different purposes.
Keep the road widths suitable for the toy vehicles being used, and make sure the pieces can be moved without damaging the play surface.
27. Shadow Puppet Kit
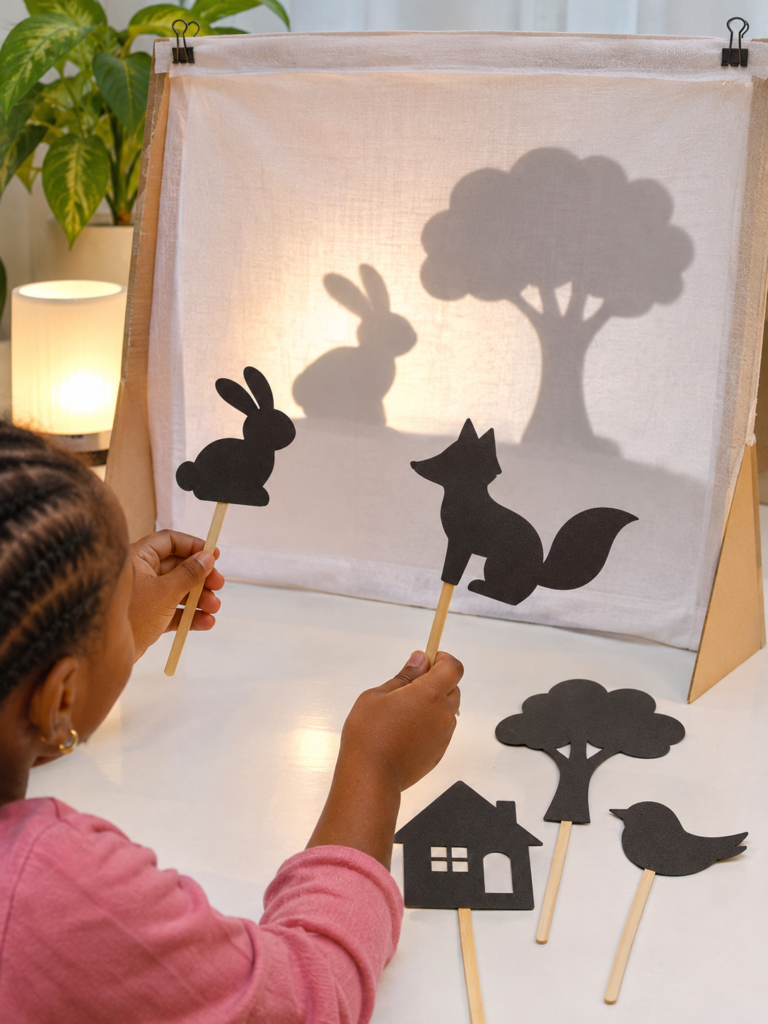
A shadow puppet activity can introduce storytelling and a simple science concept at the same time.
Children create characters, perform scenes and observe how light behaves when an object is placed between a light source and a screen.
Use your Cricut to cut recognisable silhouettes such as animals, trees, people and everyday objects from cardstock.
Attach each silhouette to a craft stick or another suitable handle. Set up a plain white screen using a sheet or light-coloured fabric, with a battery-powered lamp positioned behind the puppets.
Let children investigate the shadows: Ask what happens when a puppet moves closer to the light source or closer to the screen.
They can compare the size and sharpness of the shadows and experiment with overlapping two puppets. Explain that a shadow forms when an object blocks light from reaching the screen.
Children can then use the puppets to perform a short story, changing the characters and setting as the scene develops. Keep the lamp stable and use a cool-running light source. Adults should handle sharp tools and supervise the lighting setup.
28. Tabletop Puppet Theatre Backdrop
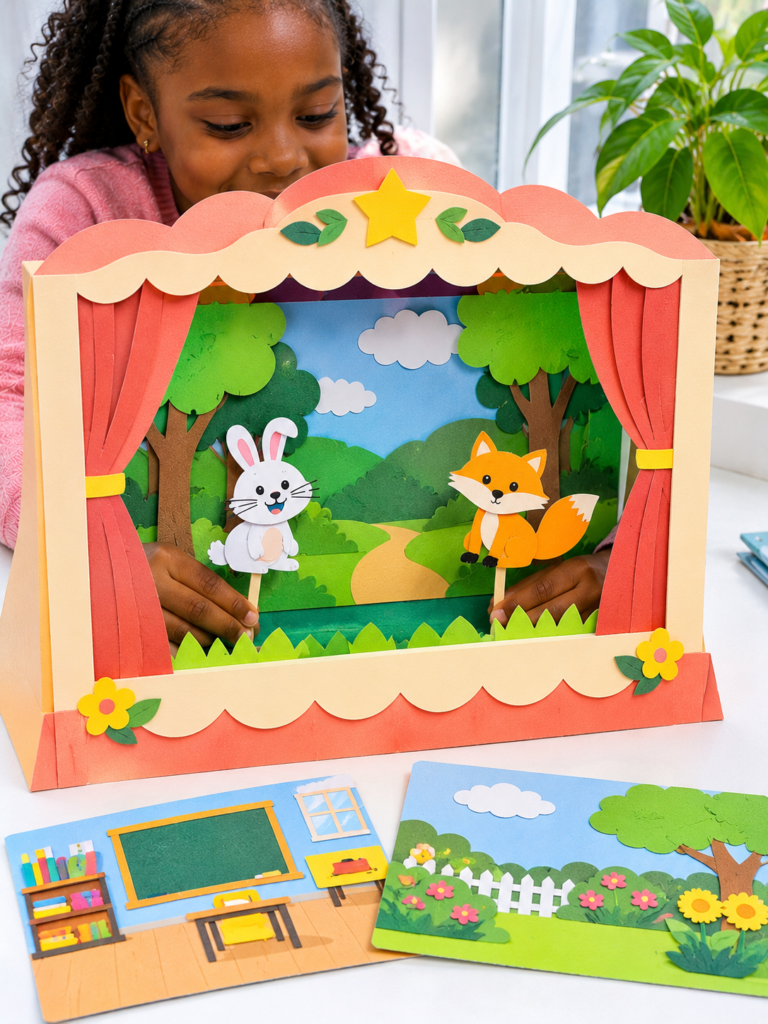
Children who enjoy making up stories may find it difficult to create a setting for their characters without a suitable background.
A tabletop puppet theatre gives them a small performance space that can be changed to suit different stories.
Cut a theatre frame from sturdy cardstock or lightweight board, leaving a clear opening through which the puppets can appear.
Use your Cricut to prepare interchangeable scenery such as a classroom, garden, house or forest. Children can arrange the scenery behind the opening and create their own dialogue and performances.
Make the scenery interchangeable: Rather than attaching every decoration permanently, use removable tabs or slots to hold the background pieces.
This allows the same theatre to become a different setting without making another frame. Children can also create a new background when they want to tell a different story.
For a stable tabletop version, use a wide base or folded support at the back. Test the frame before decorating it to make sure it stands securely and does not fall forward when children move the puppets.
Beginners interested in creating items customers may want to buy can get more inspiration from 21 Simple Cricut Projects for Beginners That Actually Sell.
29. Paper Weaving Loom
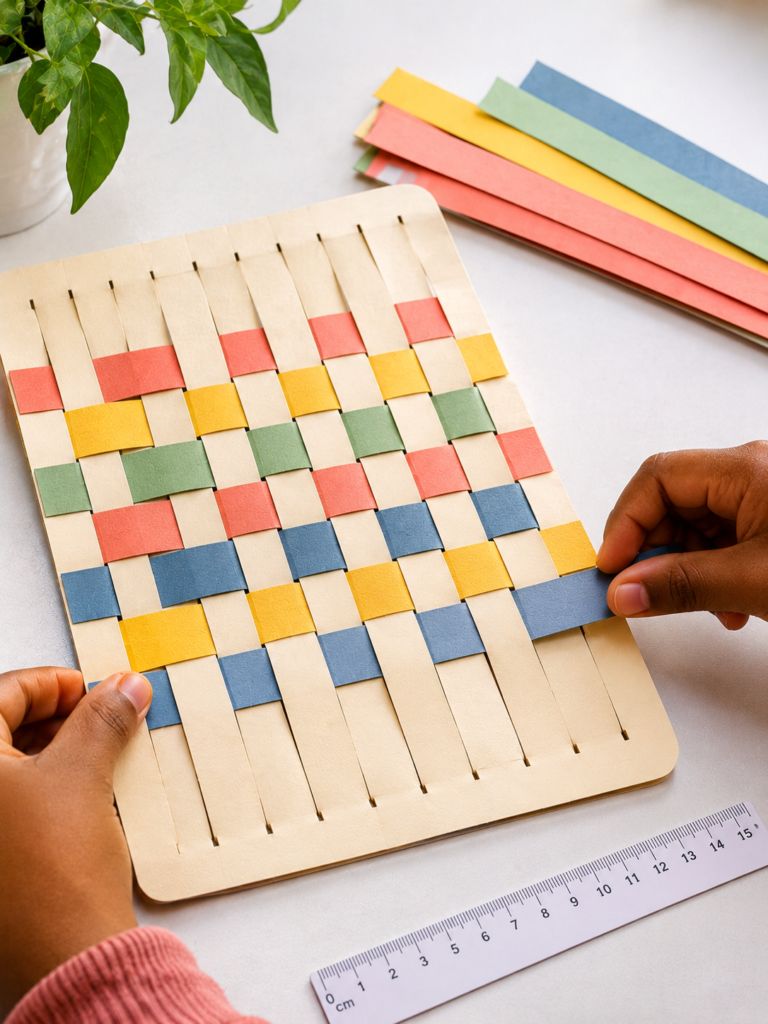
Children who find it difficult to control paper strips during weaving can benefit from a simple loom that keeps the working material in place.
This Cricut project provides the structure, while the child makes the colour and pattern choices.
Cut a rectangular loom from firm cardstock and create evenly spaced slits along two opposite sides. Prepare long paper strips in different colours.
Children weave each strip over one section and under the next, alternating the sequence as they move across the loom.
Use the finished weaving to teach pattern and structure: Begin with two colours and an over-under sequence. Once the child understands the movement, introduce three colours or ask them to create a repeating colour arrangement.
They can compare how the design changes when the weaving begins with a different colour or sequence.
The slits should be wide enough for the strips to pass through without tearing, but not so wide that the paper becomes loose. Keep the strips long enough to reach across the loom with a little extra at each end for securing.
30. Pop-Up Scene Card
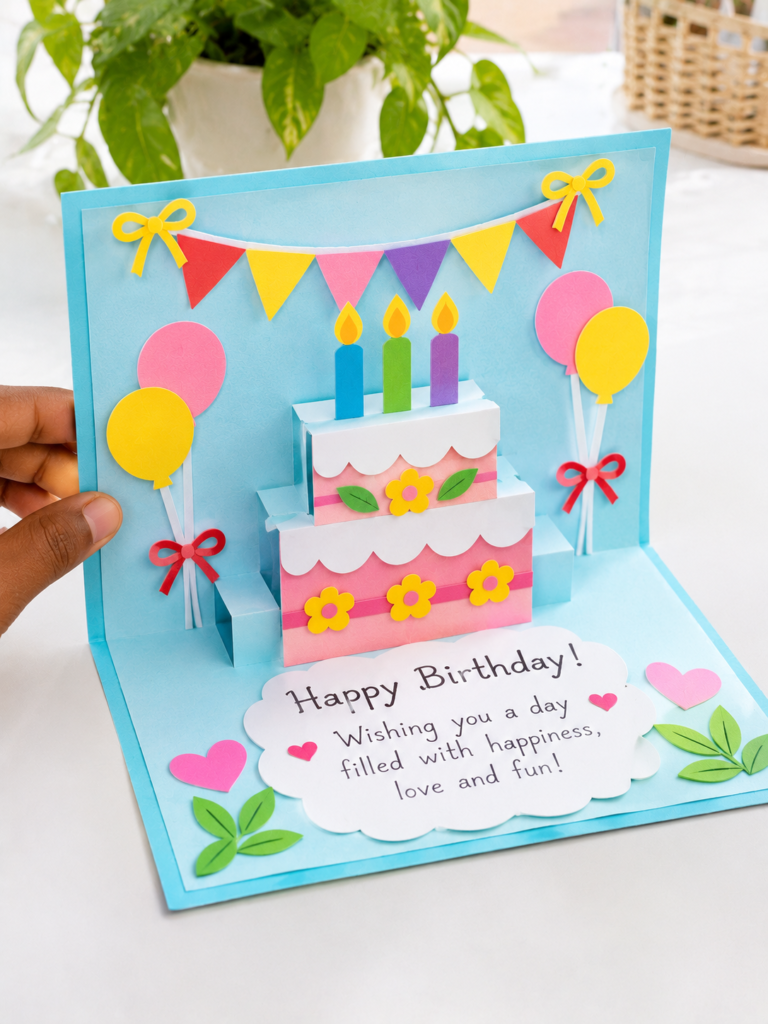
Flat greeting cards can be simple to make, but children may be curious about how a picture can appear to stand up when a card opens.
A pop-up scene introduces paper engineering through folds, tabs and supports that create movement.
Use your Cricut to cut a folded card base and simple pop-up supports. Start with one element, such as a tree, house or birthday cake, attached to a folded tab inside the card.
When the card opens, the support pushes the cut-out into an upright position. Children can decorate the scene and add a message around it.
Explain the mechanism before adding decoration: The pop-up element depends on the folds and attachment points being positioned correctly.
Let the child open and close the card slowly to see how the folded support moves. Once the basic design works, they can add a second element at a different position.
Test the mechanism before children decorate the card. The cut-outs should not extend beyond the card’s edges when folded shut, and the supports must fold flat enough for the card to close.
31. Layered Paper Habitat Diorama
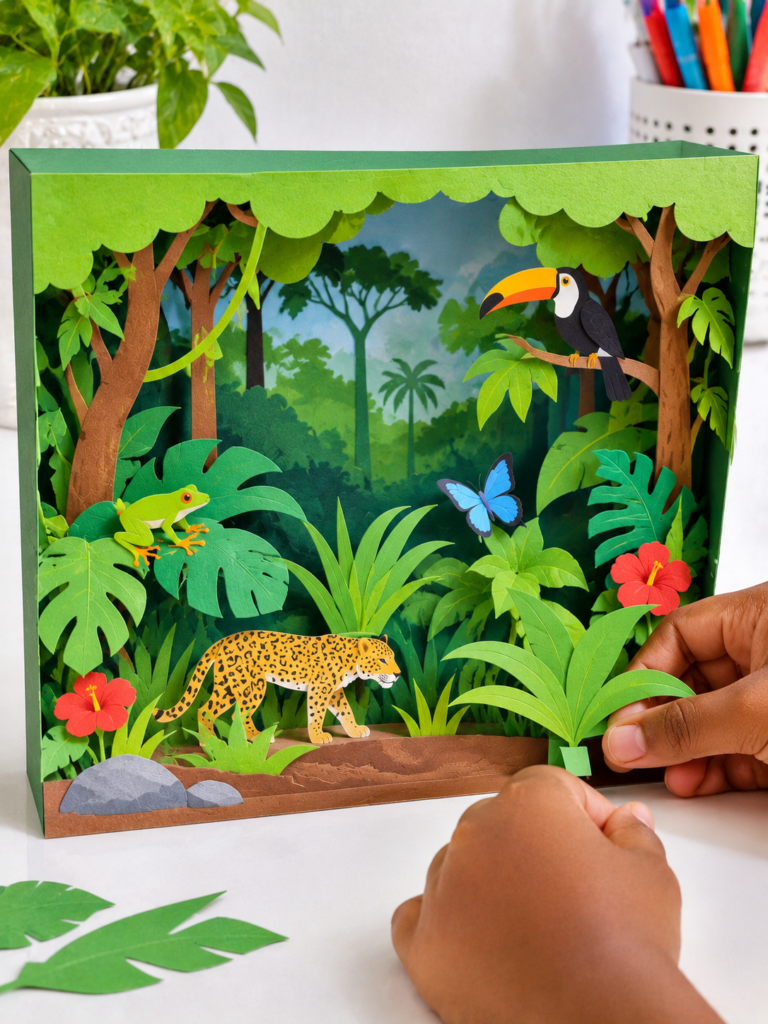
A habitat diorama can help children understand that an environment contains different living and non-living features arranged in relation to one another.
The layered construction also introduces foreground, middle ground and background, which are useful ideas in art and visual composition.
Choose one habitat, such as a rainforest, grassland, desert or ocean. Use your Cricut to cut scenery in separate layers: distant mountains or trees at the back, plants or rocks in the middle, and smaller foreground details near the front. Children can add suitable animal figures and decide where each one belongs.
Give the scene a habitat test: Ask the child to explain why the selected animal belongs in that environment. What does it eat? Where might it find shelter? What features of the habitat help it survive? This helps prevent the diorama from becoming a collection of attractive but unrelated pictures.
Use reliable references when selecting the plants, animals and landscape features.
A desert scene, for example, should not include rainforest vegetation simply because the colours look attractive. The finished model should represent one recognisable ecosystem.
32. Window Light Catcher
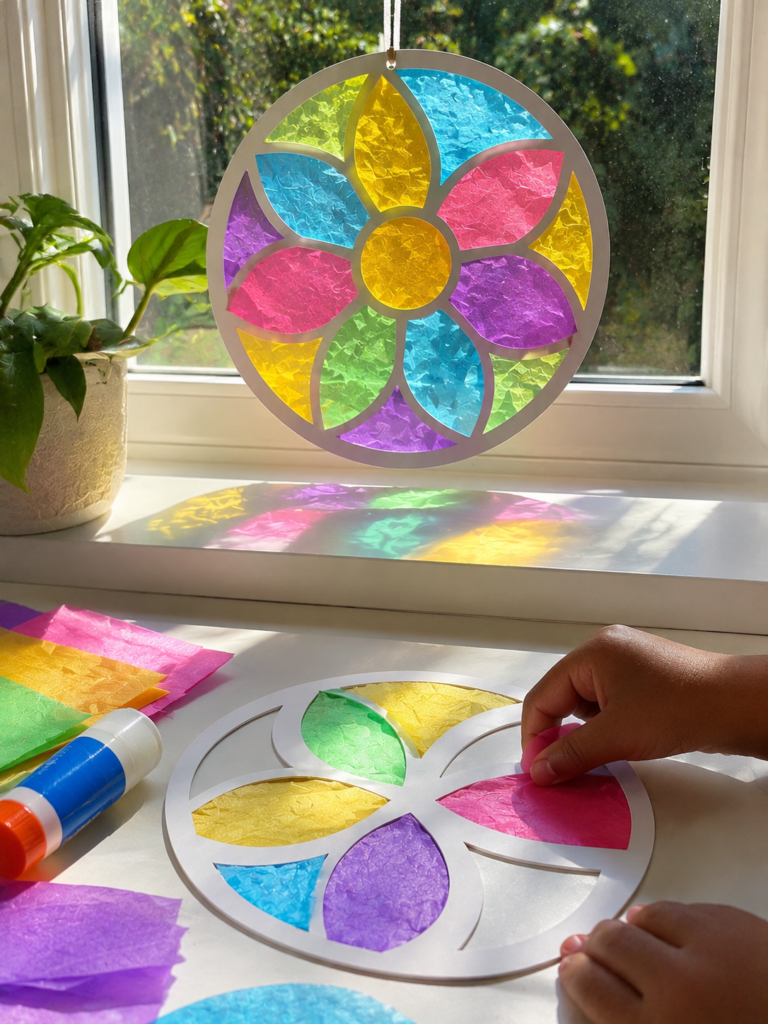
Children can observe how light passes through different materials with this simple window decoration.
Unlike an ordinary paper collage, the light catcher uses translucent tissue paper to create coloured areas when daylight shines through it.
Use your Cricut to cut a frame from cardstock, leaving open sections for the coloured paper.
Children can arrange small pieces of tissue paper behind the openings, overlapping colours to create new combinations. Attach another frame or paper backing around the edges to hold the tissue in place.
Turn the decoration into a colour experiment: Place two different tissue colours over one another and hold the design near a bright window. Ask what happens to the light passing through the overlapping sections.
Children can compare the result with the colours viewed separately and record which combinations they like.
Use translucent tissue paper rather than ordinary opaque construction paper, as the latter will block most of the light.
Attach the finished piece with a window-safe method and position it where it does not obstruct the view or create a distraction near a window.
Simple projects are a good starting point when learning to use a Cricut machine. 22 Easy Cricut Projects for Beginners You Can Make at Home provides more ideas to practise with.
33. Folded Paper Lantern
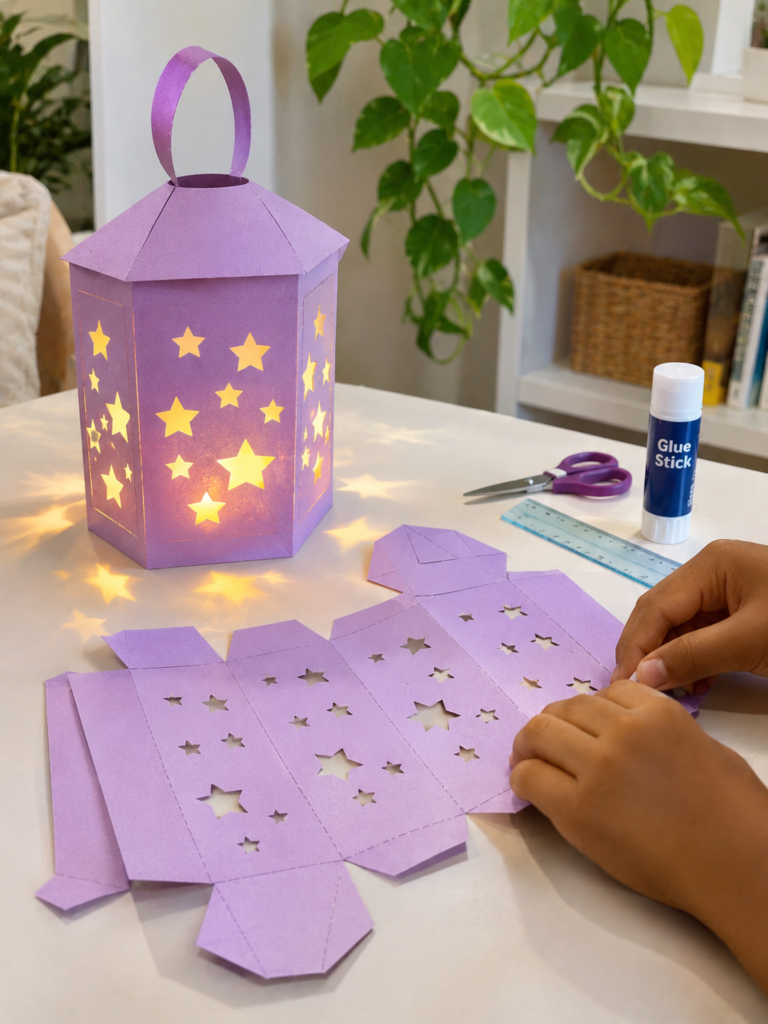
Making a paper lantern introduces children to how a flat sheet can become a three-dimensional object through cutting, folding and joining.
It is also a suitable project for exploring repeated shapes and symmetry without requiring a complicated design.
Use your Cricut to cut a lantern template with a base, side panels and joining tabs.
Add simple repeated openings or decorative shapes to the panels before folding and assembling the lantern. Children can choose the colours, arrange the patterns and help join the pieces.
Look at the design before assembly: Ask children to identify which parts repeat and whether the decoration is symmetrical.
They can also compare how the lantern looks when viewed from different sides. This encourages them to think about the relationship between a flat template and the finished three-dimensional form.
Keep the lantern decorative rather than treating it as a candle holder. Paper is combustible, so never place a candle or open flame inside it.
Where a light effect is wanted, use a suitable battery-operated LED placed securely inside, away from loose paper.
34. Drawing Stencil Collection
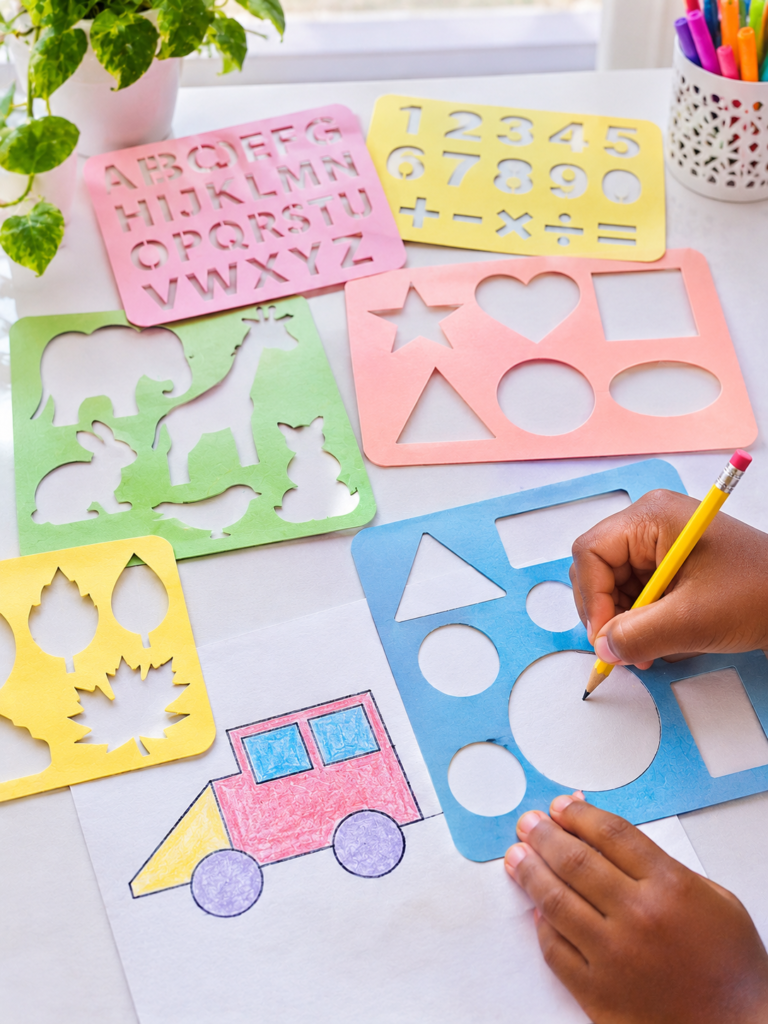
Some children have plenty of drawing ideas but find it difficult to make consistent shapes, letters or outlines by hand. A stencil collection gives them reusable guides without requiring them to copy a complete picture.
Use your Cricut to cut simple outlines, geometric shapes, numbers, letters and themed objects from cardstock or compatible stencil material.
Children can place the templates on paper, trace around the openings and combine the shapes to create their own pictures, borders or patterns.
Use the stencils to build a picture rather than just trace one: For example, a child can combine circles, rectangles and triangles to draw a vehicle, then add their own details.
Another activity is to repeat one shape at different sizes to create a pattern or scene.
Cardstock is suitable for simple, occasional use, although it may wear with repeated tracing. For reusable stencils, choose a material confirmed as compatible with the particular Cricut machine and cutting setup.
Cricut’s stencil film options have different machine compatibility requirements, so check the material instructions before purchasing.
35. Comic-Strip Storybook
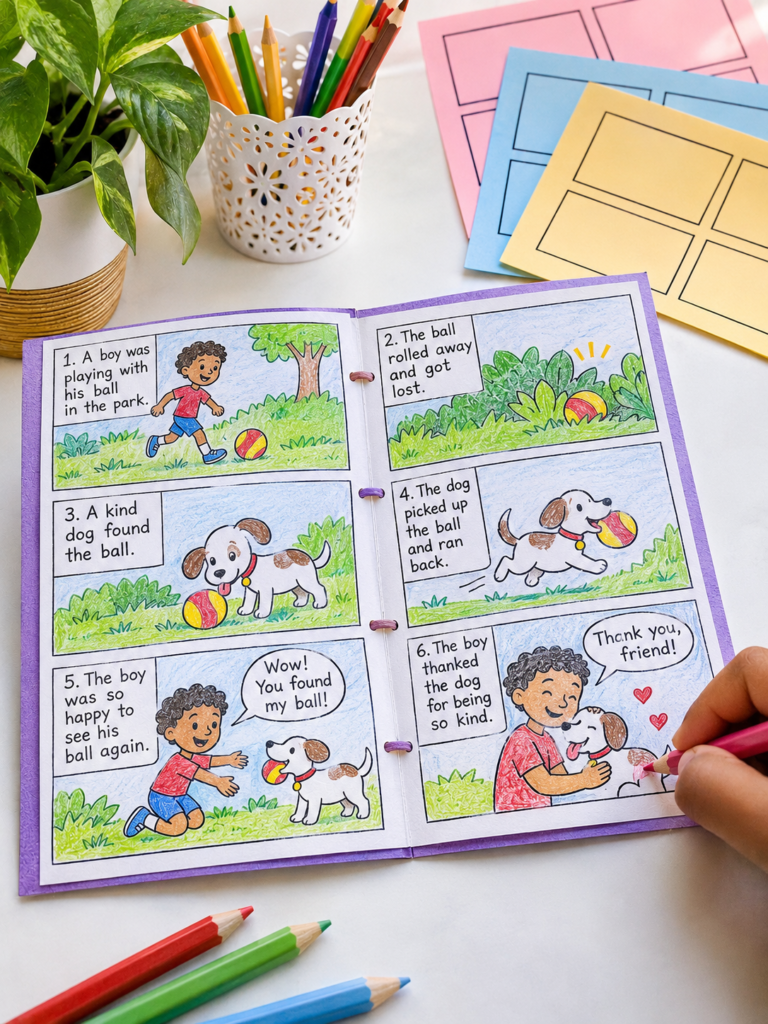
Children who enjoy drawing may have stories in their heads but struggle to organise them into written paragraphs.
A comic-strip booklet gives them a visual structure for planning events, showing conversations and connecting one scene to the next.
Use your Cricut to cut and assemble a small booklet with several panels on each page. Leave room for illustrations, speech bubbles and short captions.
Children can invent their own characters, decide what happens in each scene and write dialogue to show what the characters say.
Teach the difference between a picture and a story sequence: Ask the child to plan what happens in the first panel, what changes in the next and how the final panel resolves the situation.
They can use speech bubbles for spoken words and captions for information that the pictures alone do not explain.
For younger writers, begin with three panels and let them draw before adding short sentences. Older children can work with more panels, introduce a problem for the main character to solve and revise their dialogue.
Leave enough space for handwriting; tiny speech bubbles can make the finished booklet frustrating to use.
New users can also build their confidence with the projects in 19 Easy Cricut Projects for Beginners.
Understand What the Cricut Machine Does and What the Child Does
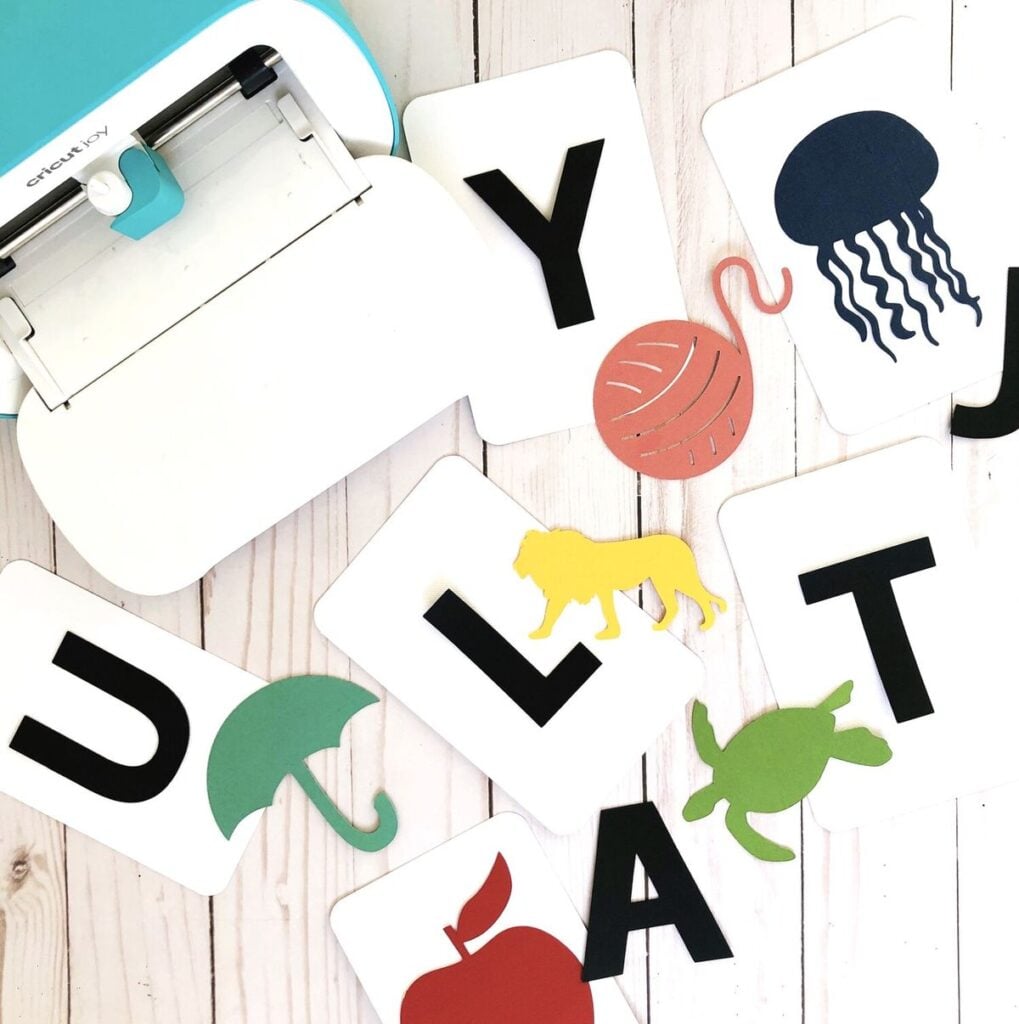
Before choosing from these easy Cricut projects for kids, parents should understand that the machine and the child have different roles.
The Cricut prepares certain craft components, but the child should still have an active part in creating and using the finished project.
What the Cricut Machine Does
Depending on the model, blade and tools used, a Cricut machine can cut shapes, draw designs and score fold lines. However, it does not automatically print full-colour pictures or complete every part of a craft.
There are a few important details to understand:
- Cutting and printing are different: Cutting cardstock shapes is not the same as printing a coloured illustration. Print Then Cut requires a compatible Cricut machine, a separate printer and suitable printable material.
- Material and blade compatibility: Not every Cricut model can cut every material or use every blade. Some thicker materials require specific blades and compatible machines. Check Cricut’s official material compatibility guide for supported materials, blades and settings.
- Smart Materials: These are designed for particular Cricut models and allow matless cutting. Other models require a cutting mat.
What the Child Does
The child takes part in the decisions, activities and creative work that give each project its purpose. Depending on age and ability, this can include:
- Choosing colours, shapes and designs for the project.
- Arranging cut-out pieces to complete tangram puzzles and patterns.
- Writing words, sentences and stories on prepared cards or booklets.
- Colouring, decorating, folding and assembling paper crafts.
- Testing a paper bridge, observing what happens and suggesting changes.
- Creating rules and choosing questions for a homemade board game.
Parents can prepare the designs, select compatible materials, operate the machine and handle sharp blades. Children can then participate in suitable parts of the activity with age-appropriate supervision.
The aim is to give children more than a finished craft to admire. The Cricut handles the machine work, while children have opportunities to make choices, practise skills and create something of their own.
Likely Mistakes to Avoid When Making Cricut Crafts With Kids
Even simple Cricut crafts can become frustrating when the design, materials or activity are not suitable for the child. Keep these common mistakes in mind when preparing easy Cricut projects for kids:
- Choosing designs with too many tiny pieces: Small, detailed cut-outs can be difficult for children to handle and arrange. Start with larger, simpler shapes.
- Assuming the machine prints: Drawing with a compatible Cricut pen, printing with a separate printer and cutting are different operations. Check what the chosen project requires.
- Buying materials before checking compatibility: Confirm that the material, blade, cutting mat and machine model work together before purchasing supplies.
- Doing all the creative work for the child: Prepare complicated machine-cutting stages, but let children make meaningful choices about colours, arrangements, decorations and assembly.
- Using unsuitable craft supplies: Check age recommendations, warning labels and intended use. Avoid small detachable pieces with children who may put them in their mouths.
- Making every project a finished product: Some activities are more valuable when children can change the rules, rearrange pieces, experiment or create their own versions.
More gift-making inspiration is available in 33 Cricut Projects for Beginners That Make Great Personalized Gifts, with ideas for creating thoughtful presents using your machine.
Conclusion
A child does not have to follow the template exactly, and that is perfectly fine. The tangram can become a new shape puzzle, the board game can take on an unexpected rule, and the paper model can become something entirely different.
Leave room for those changes. That is where easy Cricut projects for kids become more than prepared craft activities; they become creations children can genuinely call their own.
Choose a project that catches your child’s interest and give them the freedom to make it their own.