What can a Cricut machine add to a birthday celebration? Try these 20 easy Cricut projects for birthdays and parties, from invitations to personalised keepsakes.
Have you ever attended a birthday party and noticed how even the smallest details made it feel special? The name on a place card, a personalised crown, or a little keepsake to take home can make guests feel included in the celebration. You don’t have to order everything online or spend a fortune to get those details right.
With a Cricut machine, there are plenty of creative ways to make party pieces that suit the person being celebrated and the kind of gathering you’re hosting.
These easy Cricut projects for birthdays and parties will give you practical ideas to make the occasion feel more personal.
Handmade presents often feel more meaningful when they reflect the recipient’s personality. 31 Easy Cricut Projects for Gifts has more ideas for creating personalised gifts for different occasions.
How to Balance Creativity and Practicality When Decorating

Before cutting anything, decide how much of the party decoration you can realistically make yourself. Choose one feature to receive most of your creative attention, such as a photo backdrop or a personalised table display.
Keep the remaining decorations simpler so they don’t compete for attention or take too much time to produce.
Also, consider the cost of making each item, not just the price of the materials. A design that requires several layers, special vinyl and hours of assembly may cost more than buying a ready-made alternative. Make a sample first, especially when producing several copies.
This helps you check the size, colours, finish and assembly time before using up your materials. Save detailed designs for pieces that will be noticed or kept, and use simpler designs for items guests will only handle briefly.
The aim is not to make every corner of the venue a craft project. It is to spend your creative effort on details that will make a difference to the celebration.
Teenagers who enjoy custom accessories and personalised belongings may find something they like in 30 Cute Cricut Projects for Teen Girls.
Invitations and Welcoming Guests
1. Folded Birthday Invitations with RSVP Inserts
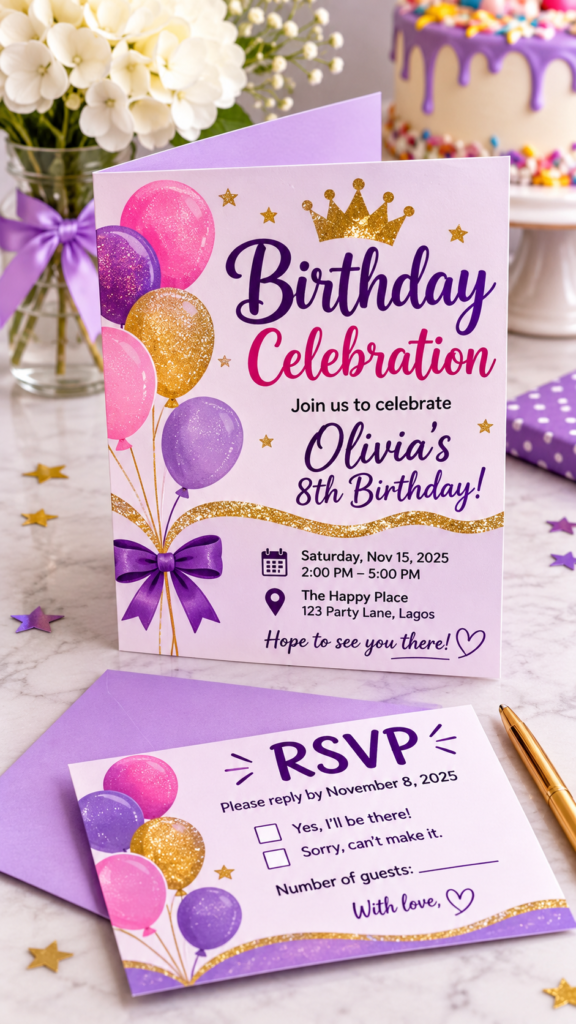
A folded invitation is a good choice when the party has more information than can comfortably fit on a single card.
For example, a child’s birthday invitation might include the party date and venue on the front, with the start time, dress theme and RSVP details inside.
A separate response card can be useful for larger gatherings where the organiser wants guests to confirm attendance and indicate how many people will come.
For this Cricut project, choose a cardstock weight that holds its shape but can still fold neatly. Use a compatible scoring tool to mark the fold before assembling the card.
Make sure the envelope is large enough for the folded invitation and RSVP insert without bending them. One finished sample will help you check the layout and fit before cutting invitations for all your guests.
Useful supplies: Cardstock, envelopes, scoring stylus or compatible scoring tool, paper trimmer and adhesive.
2. Custom Envelope Liners
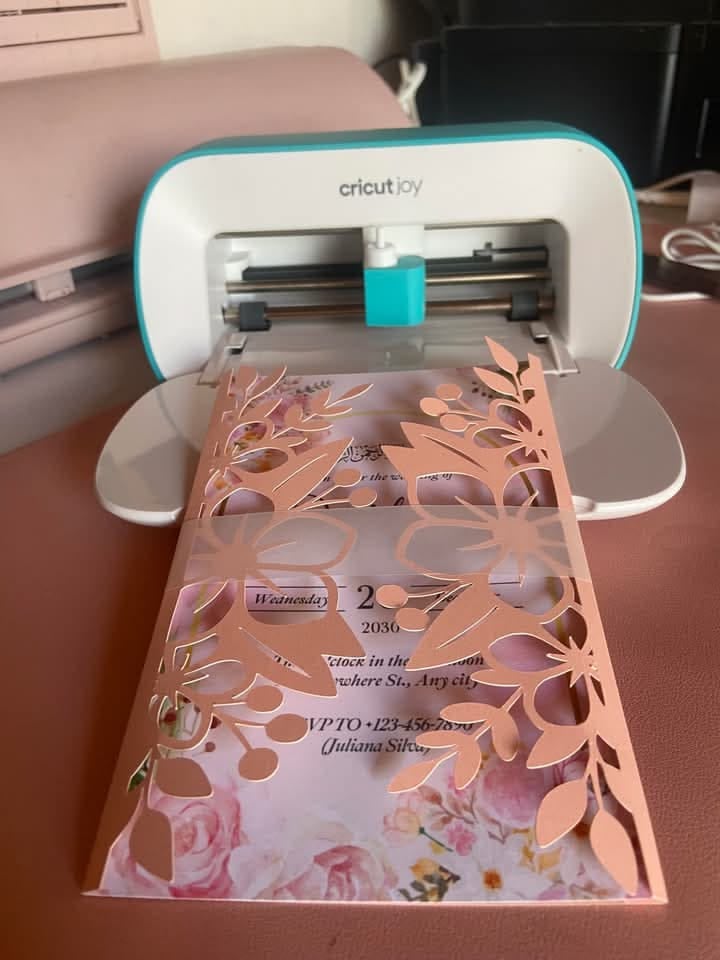
Custom envelope liners add a decorative layer inside a birthday invitation envelope. You can use a contrasting colour, a printed pattern that matches the invitation or the celebrant’s initials.
For a more personal design, use the same motif on the invitation cover and the liner so the two pieces look coordinated without being identical.
For this Cricut project, measure the inside of the envelope and use a liner template that matches its flap shape. Cut the liner slightly smaller than the envelope so its edges do not catch along the sides. Stop the liner below the envelope’s adhesive strip to keep the flap easy to seal.
Lightweight patterned paper is usually easier to fold and fit than thick cardstock. Test the liner inside one envelope before cutting the rest.
Useful supplies: Patterned paper, envelope liner template, paper trimmer, glue tape and envelopes.
Crafting with children can be a fun way to encourage creativity and hands-on learning. 35 Easy Cricut Projects for Kids offers age-friendly ideas for making things together.
3. QR-Code Party Information Cards
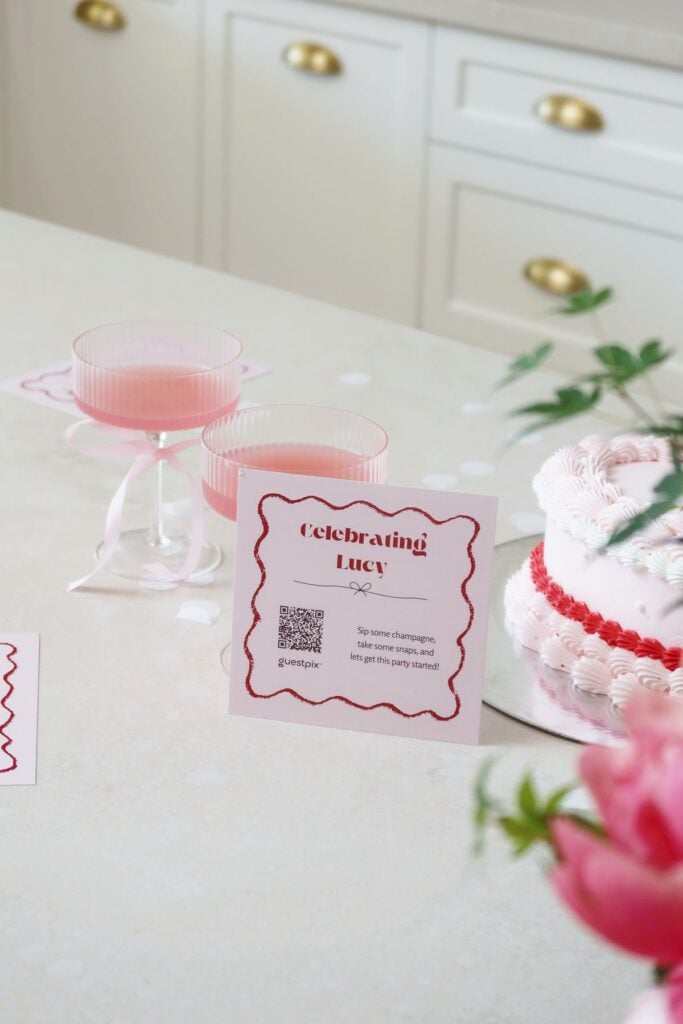
A QR-code information card is useful when guests need more details than the main invitation can comfortably hold. For example, the card can link to a webpage with venue directions, parking information, an event timetable or instructions for a themed celebration.
This is particularly helpful when the information may change after invitations have been sent.
Generate the QR code using the web address you want guests to visit, then add it to your card design before printing. Your Cricut can cut the printed card using its Print Then Cut feature, provided your machine supports it.
Keep the code dark against a light background, leave a clear margin around it and avoid placing decorative patterns behind it.
Scan a printed test copy with different phones before producing the full batch. Include a short web address as an alternative for guests who cannot scan the code.
Useful supplies: Cardstock, inkjet printer, printable sticker paper if using a separate label, and a Print Then Cut-compatible Cricut machine.
Personalised decorations can make a living space feel more like home. 29 Easy Cricut Projects for Home Decor shares creative ways to decorate different rooms.
4. Personalised Guest Name Rosettes
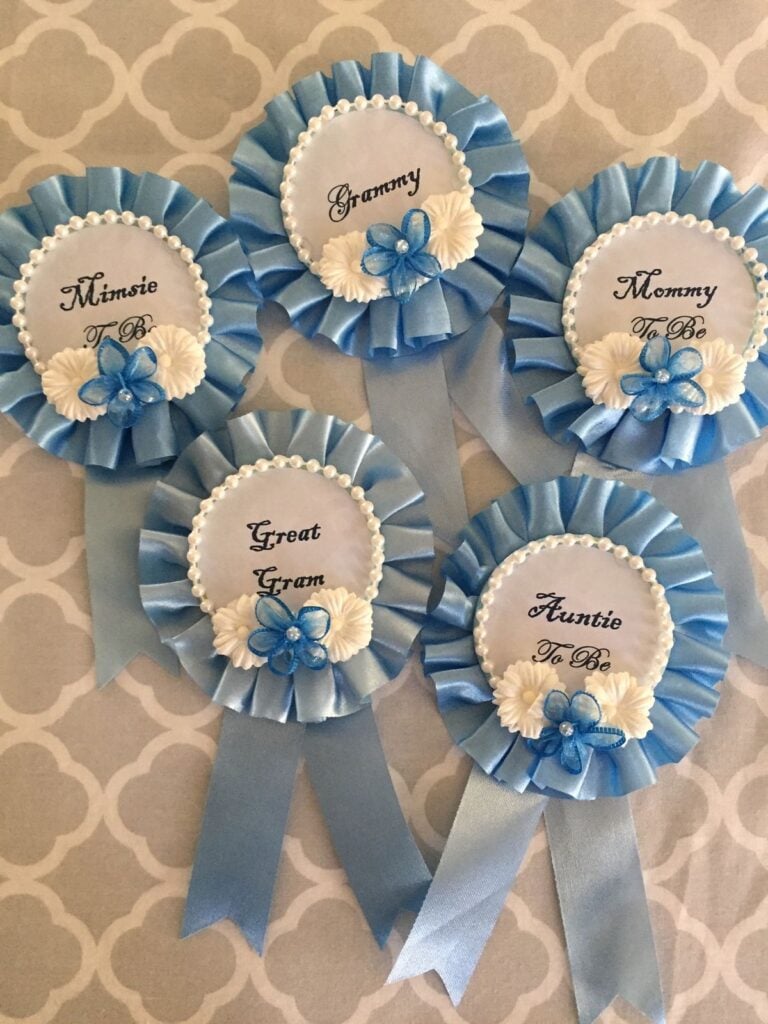
Guest name rosettes can help people identify one another at large birthday gatherings, family reunions and milestone celebrations.
Each rosette can carry a guest’s first name, family name or group role. For a family reunion, for instance, you could use different colours for different family branches while keeping the name lettering consistent.
Cut the rosette layers from lightweight or medium-weight cardstock, then fold and assemble them into a circular fan shape. Add a separate centre circle with the guest’s name.
A scoring tool can help create even folds, particularly when making several rosettes. Attach a badge clip or suitable pin backing securely, and check that it is comfortable to wear and appropriate for the guests.
Avoid making the finished rosette too large or heavy, as it may hang awkwardly on clothing.
Useful supplies: Coloured cardstock, adhesive, Cricut scoring stylus or compatible scoring tool, badge clips or suitable pin backs.
Decorations That Give The Venue Character
5. Layered Paper Flower Centrepieces
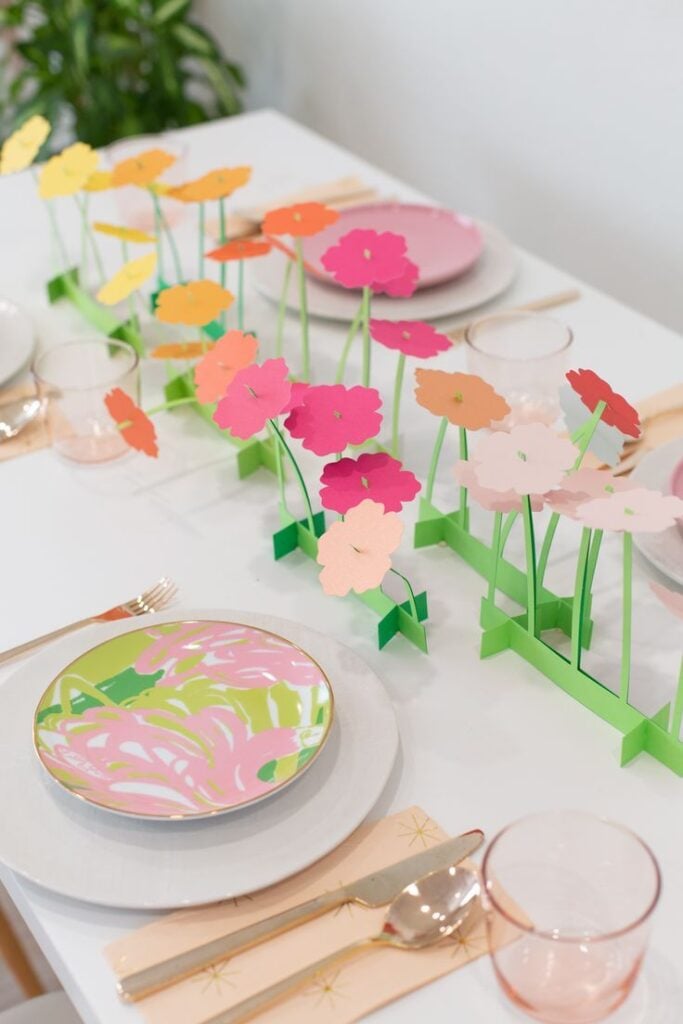
Paper flowers offer a way to decorate birthday tables without buying fresh flowers for every arrangement.
For these Cricut projects for birthdays and parties, cut several petal shapes in graduated sizes, then layer them from the largest at the bottom to the smallest at the centre.
You can use colours that match the party theme or combine two or three shades for a more natural look. Large flowers work well as individual table features, while smaller ones can be grouped in a vase.
Choose cardstock that holds its shape without becoming too stiff to curl. Use a flower shaping tool to gently curve the petals before gluing the layers together.
Floral wire can support the finished flowers, but it may bend under the weight of large blooms, so use a suitable stem support. Keep the arrangement low enough for guests to see one another across the table.
Useful supplies: Coloured cardstock, flower shaping tools, floral wire, floral tape, glue and small vases.
More gift-making inspiration is available in 33 Cricut Projects for Beginners That Make Great Personalized Gifts, with ideas for creating thoughtful presents using your machine.
6. Stencilled Fabric Table Runners
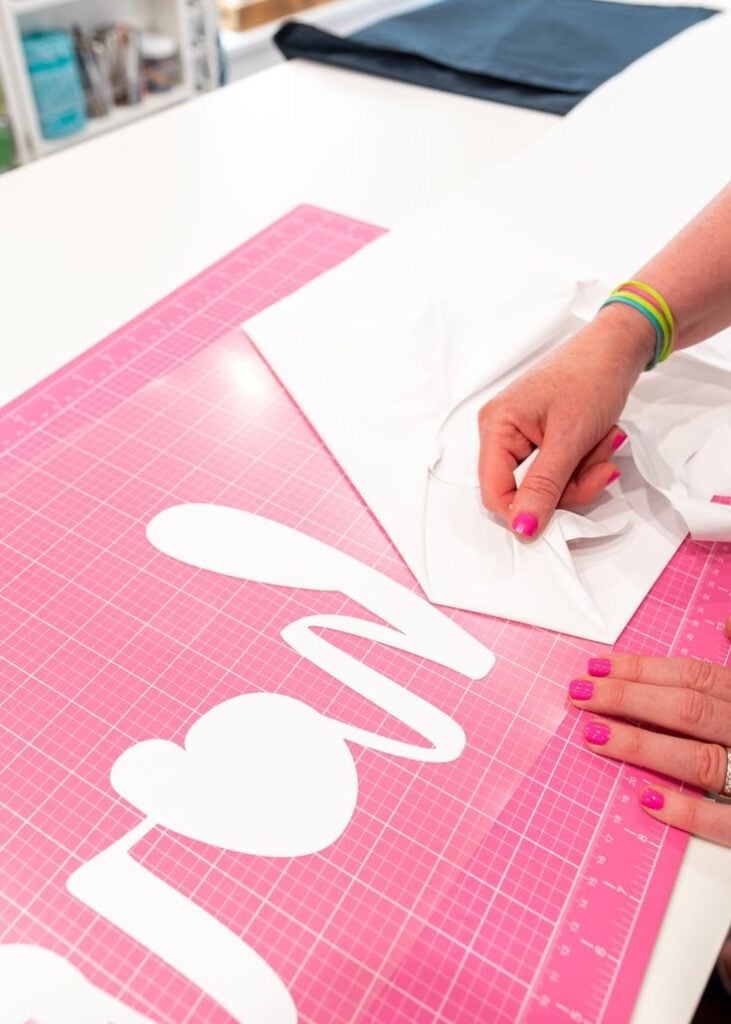
A plain fabric table runner can become part of the party theme with a repeating pattern, celebrant’s initials or birthday date.
Rather than applying a large design across the entire runner, you can cut a stencil that repeats along the centre or runs neatly along both edges.
This gives the table a coordinated look while leaving enough uncovered fabric for plates, serving dishes and other table items.
For these Cricut projects for birthdays and parties, choose stencil film that is suitable for your fabric and paint. Secure the stencil firmly to prevent paint from spreading beneath the edges, then apply fabric paint in light, even layers.
Test the design on a scrap of similar fabric first, as paint can spread differently on textured or loosely woven material. Follow the paint manufacturer’s instructions for drying, heat-setting and washing before using the runner.
Useful supplies: Suitable stencil film, fabric paint, foam applicators, cotton table runners and transfer tape where appropriate.
Cardstock is useful for making everything from greeting cards to decorative pieces. 27 Easy Cricut Projects Using Cardstock offers more paper-crafting ideas to try.
7. Layered Table Number Stands
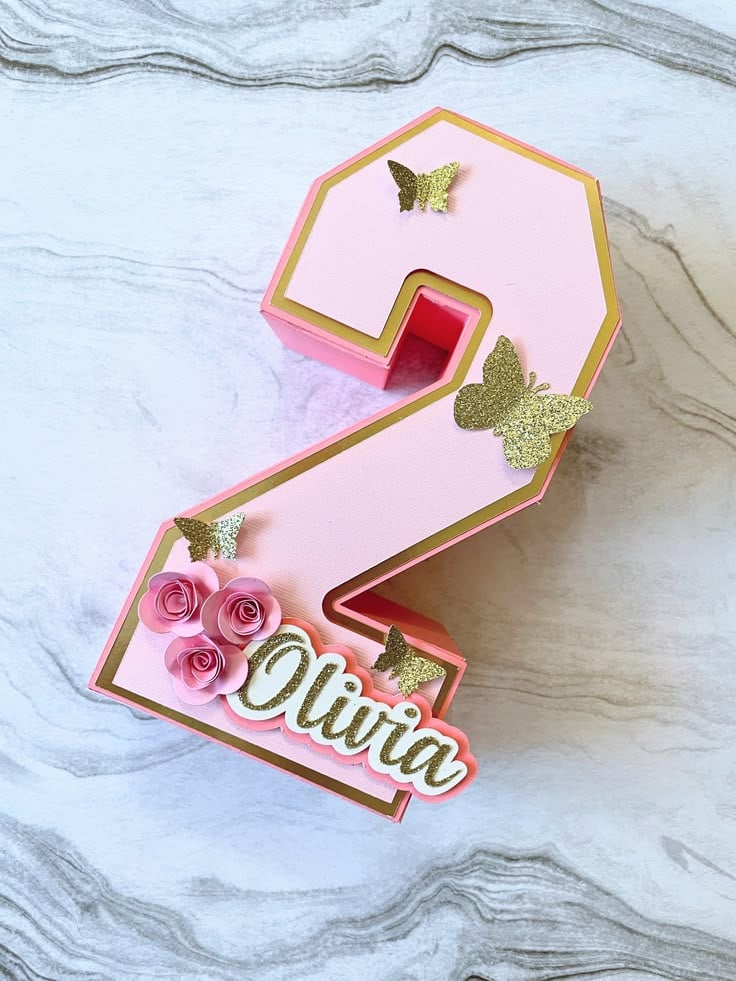
When a celebration has several tables, guests should be able to identify their assigned seats without asking around.
Layered table numbers can make this easier while adding a decorative detail to the centre of each table.
For example, you could cut large numerals from coloured cardstock, layer them over a contrasting backing and add a small decorative motif that matches the event.
Use heavyweight cardstock for the main number so it remains upright, and consider a folded base or a separate display stand to support it. Your Cricut can cut the numerals and decorative layers, while a compatible scoring tool can help create a neat folded base.
Check that the numbers are large and clear enough to read from a short distance. Make one complete stand before producing the remaining table numbers, especially when the design involves several layers.
Useful supplies: Heavyweight cardstock, adhesive, scoring stylus or compatible scoring tool, and suitable display stands.
New users can also build their confidence with the projects in 19 Easy Cricut Projects for Beginners.
8. Hanging Paper Ceiling Mobiles
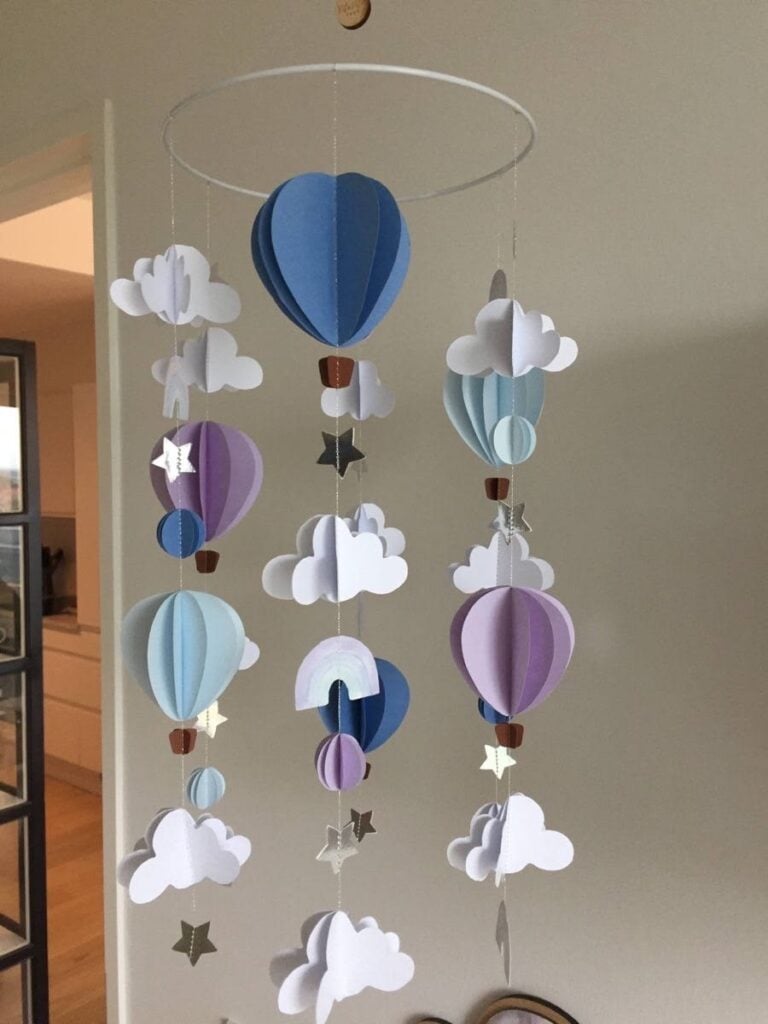
Photo credit: @ unknown
Hanging paper mobiles can add decoration above the tables without taking up space on them.
For these Cricut projects for birthdays and parties, cut repeated shapes such as stars, circles, butterflies or flowers, then suspend them at different heights from a lightweight hoop or frame.
You can use double-sided shapes so the decoration looks finished from different viewing angles. A birthday theme can also be reflected through the colours and shapes without adding lots of lettering.
Choose lightweight paper or cardstock so the hanging pieces do not put too much strain on the frame. Attach the shapes securely and distribute their weight evenly to help the mobile hang properly.
Before installing it, check the ceiling height and use suitable hanging hardware for the venue.
Keep it clear of ceiling fans, lights, sprinklers, doorways and areas where people walk. For rented halls or public venues, obtain permission before attaching anything to the ceiling.
Useful supplies: Lightweight cardstock, clear thread or fishing line, small rings, adhesive and a suitable hanging frame.
9. Milestone Birthday Photo Timeline Display
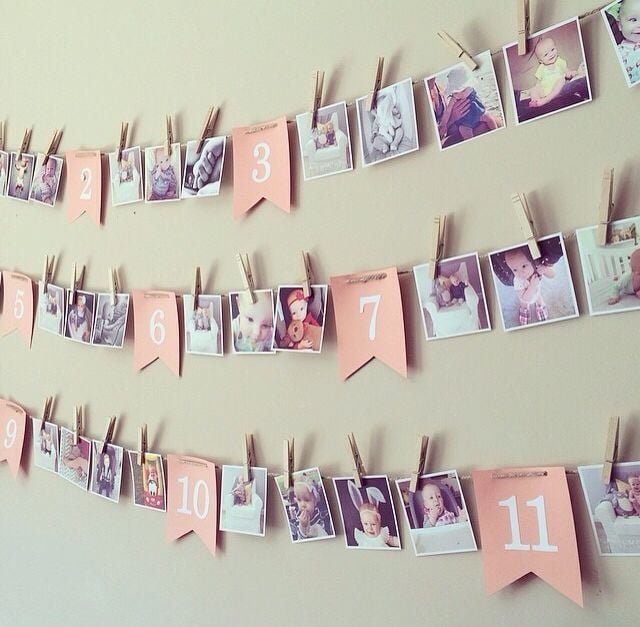
Photo credit: @ Unknown
A milestone birthday is a good occasion to bring out photographs that might otherwise stay in family albums or on old phones. Create a photo timeline showing selected moments from the celebrant’s life, arranged in chronological order.
For a 50th birthday, for example, you could include childhood photographs, school memories, wedding or family pictures, career milestones and more recent moments. Use your Cricut to cut small year labels, age markers or captions to place beside the photographs.
This is one of the more personal Cricut projects for birthdays and parties because family and friends can spend time looking through memories while celebrating.
Before cutting the labels, choose the photographs and decide how much display space they will occupy. Keep captions short and use lettering large enough to read without standing too close.
Photo clips or mini clothespins make it easier to change the arrangement without damaging the pictures. Check that the display string and hanging points can support the combined weight.
Useful supplies: Cardstock, photo clips, mini clothespins, display string, adhesive and photographs.
Anyone interested in experimenting with Infusible Ink can find inspiration in 25 Easy Cricut Projects Using Cricut Infusible Ink, featuring designs for compatible blanks.
10. Personalised Photo-Mat Guestbook
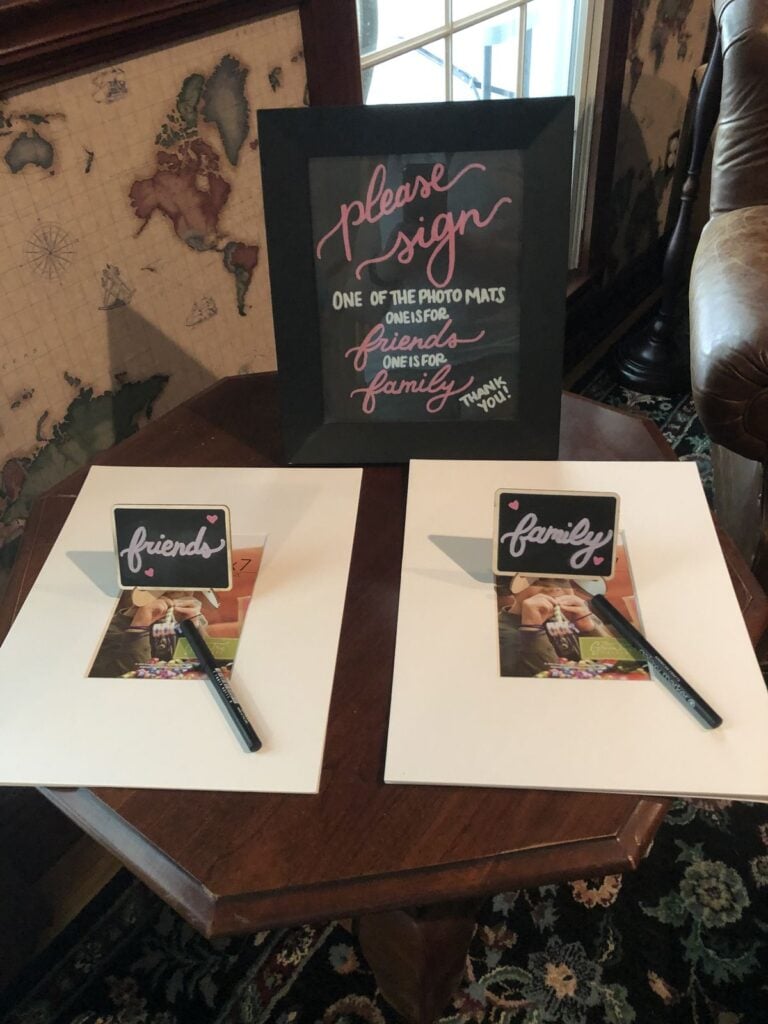
A photo-mat guestbook gives guests a place to leave messages around a photograph of the birthday celebrant. Instead of using a traditional bound guestbook, create a wide decorative border from cardstock or use a ready-made photo mat as the base.
Your Cricut can cut the outer design, the celebrant’s name and a short heading such as “Birthday Memories.”
Leave a generous blank area for guests to sign and write brief messages. This makes a lovely keepsake for milestone birthdays and family celebrations.
Choose a mat opening that fits the photograph and leave enough writing space around it. Heavyweight cardstock or an acid-free photo mat is preferable for a keepsake that will be displayed or stored for years.
Provide fine-tip, quick-drying pens that will not smudge easily, and test them on a spare piece of the same material before the party.
Useful supplies: Heavyweight cardstock or photo mat, backing board, photo corners, fine-tip markers and a suitable frame.
Birthday Table and Food Presentation
11. Personalised Party Crowns
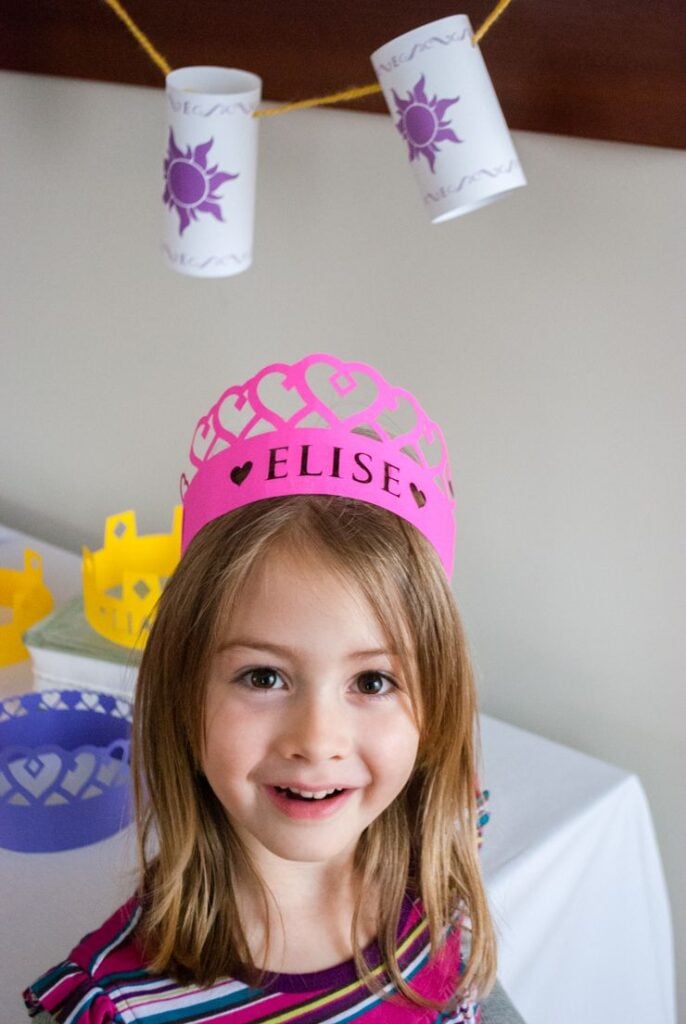
Paper crowns can give children a fun birthday accessory, especially when each child receives one with their name or a design that matches the party theme.
Use your Cricut to cut the crown shape, add the birthday child’s age or name, and decorate the remaining crowns with simple shapes or patterns. You can also make one special crown for the celebrant and simpler versions for guests.
For a comfortable fit, measure the intended wearer’s head rather than relying on one standard size.
Make the crown adjustable with overlapping tabs or a suitable fastening, and use lightweight cardstock with smooth, rounded edges.
Avoid small detachable decorations for very young children, as these can present choking hazards. Test the fastening before making several crowns.
Useful supplies: Lightweight cardstock, elastic or ribbon where suitable, adhesive and decorative paper.
12. Custom Cupcake Wrappers
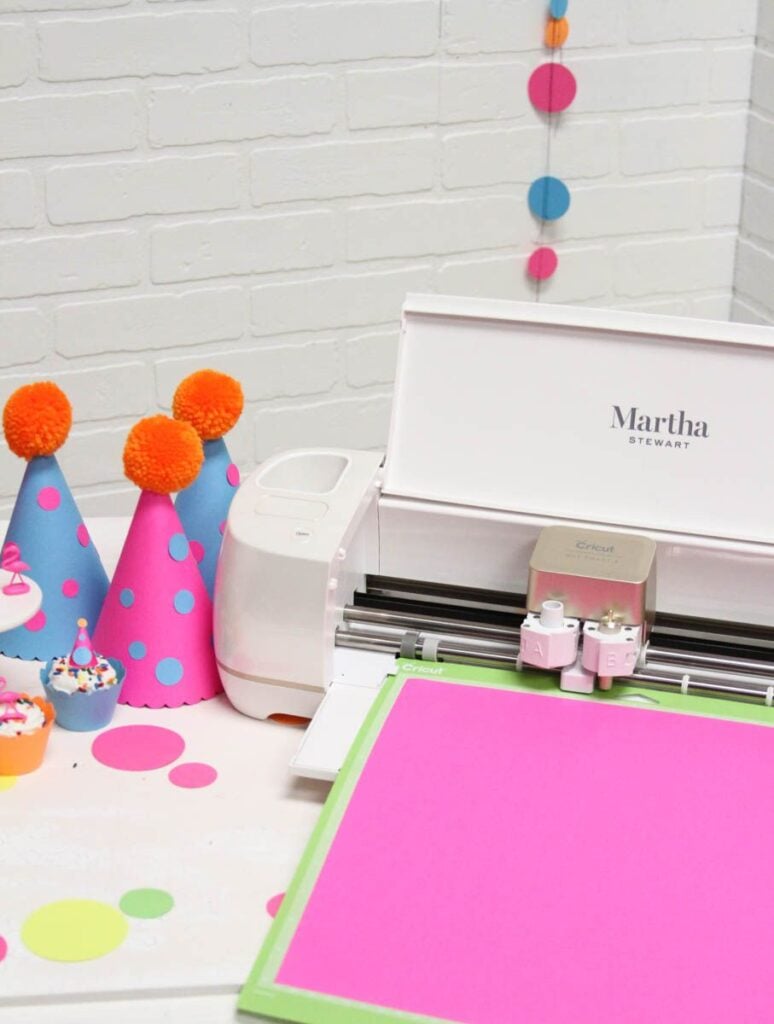
Custom cupcake wrappers give plain cupcakes a decorative finish that matches the birthday theme.
Cut the wrapper from lightweight cardstock and add names, colours, numbers or small motifs. You can make matching designs for all the cupcakes or reserve a different pattern for the celebrant’s portion.
These wrappers are decorative covers, not baking liners, so the cupcake should remain in its original paper or food-safe liner.
Cupcakes vary in diameter and height, so measure the actual cakes before choosing a wrapper template. Leave enough room for the wrapper to overlap and fasten without squeezing the cake.
Check that the top edge sits below the frosting and that the paper does not touch food. Make
Useful supplies: Lightweight cardstock, cupcake wrapper template, glue dots and paper trimmer.
Vinyl offers plenty of possibilities for personalising everyday items, and 23 Cricut Projects for Beginners Using Vinyl shares more ways to work with this material.
13. Personalised Cookie Sleeves
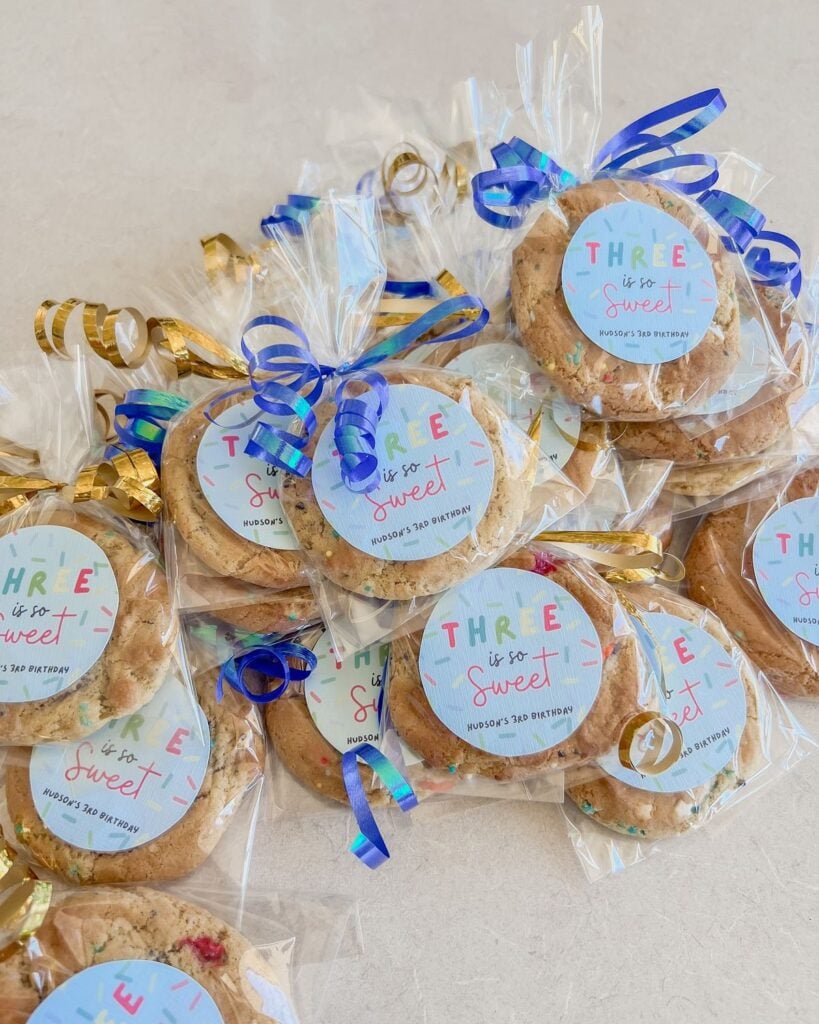
Individually wrapped cookies can be dressed up with paper sleeves carrying the celebrant’s name, party date or a small themed design.
These work well for dessert tables and take-home treats, particularly when you want each package to look coordinated without printing directly onto every wrapper. You can cut the sleeves in different colours while keeping the lettering and design consistent.
Measure the wrapped cookies before cutting so the sleeves fit without being too tight or slipping off.
Use a food-safe inner bag or approved individual packaging to contain the cookie; ordinary decorative cardstock, glue and adhesive vinyl should not touch the food. Keep the sleeve easy to remove so guests can open the treat without tearing the packaging.
Useful supplies: Cardstock, paper sleeve template, glue tape and food-safe cookie bags.
14. Individual Snack Cones
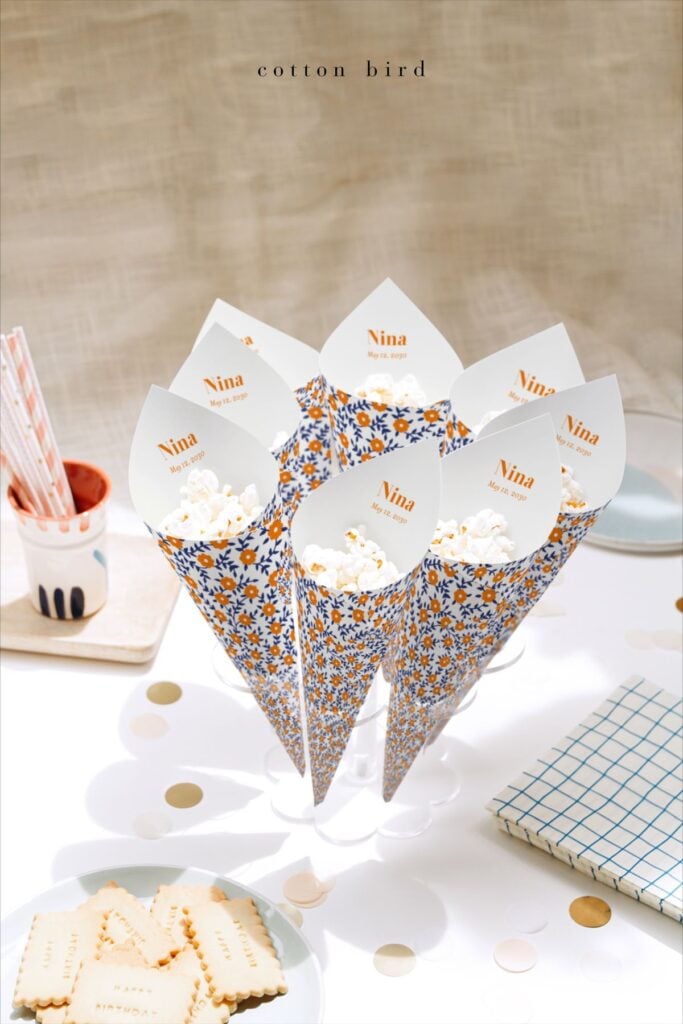
Individual snack cones are a practical way to serve popcorn, crisps and other dry party snacks without placing one large bowl in the middle of a crowded table.
Cut cone-shaped designs from cardstock and add a small birthday motif, colour or guest name. You can prepare them in advance and arrange them in a holder so guests can pick one up easily.
Choose a cone template with a wide enough opening for the snack and a base that closes securely. Ordinary craft cardstock is not automatically food-safe, so use an appropriate food-grade liner or food-safe paper container between the snack and the decorative cone.
Avoid using glue or adhesive where it could come into contact with food. Fill the cones shortly before serving to help keep the snacks fresh and crisp.
Useful supplies: Cardstock, food-safe paper liners or inner cones, glue dots and a compatible scoring tool.
Turning your crafting skills into extra income starts with choosing products people may want to buy. 25 Easy Cricut Projects to Make and Sell for Extra Money offers ideas to consider for a small business.
15. Dessert Tasting Scorecards
A dessert tasting card can turn a birthday dessert table into a small activity, especially when guests are sampling different cakes, cookies or homemade treats.
Use your Cricut to cut small cards with spaces for dessert names, flavour ratings and comments.
For a cake competition, you could include simple rating categories such as taste, texture and appearance.
Guests can complete their cards as they sample each dessert, giving the host a fun way to compare the results.
Keep the layout simple enough to complete while standing or sitting at the table. Use clear labels, enough writing space and a separate pencil for each guest or table.
If the desserts have different names or ingredients, print those details clearly rather than expecting guests to guess what they are tasting.
Useful supplies: Cardstock, Cricut pens, paper trimmer and small pencils.
Keepsakes and Personal Touches
16. Birthday Memory Booklets
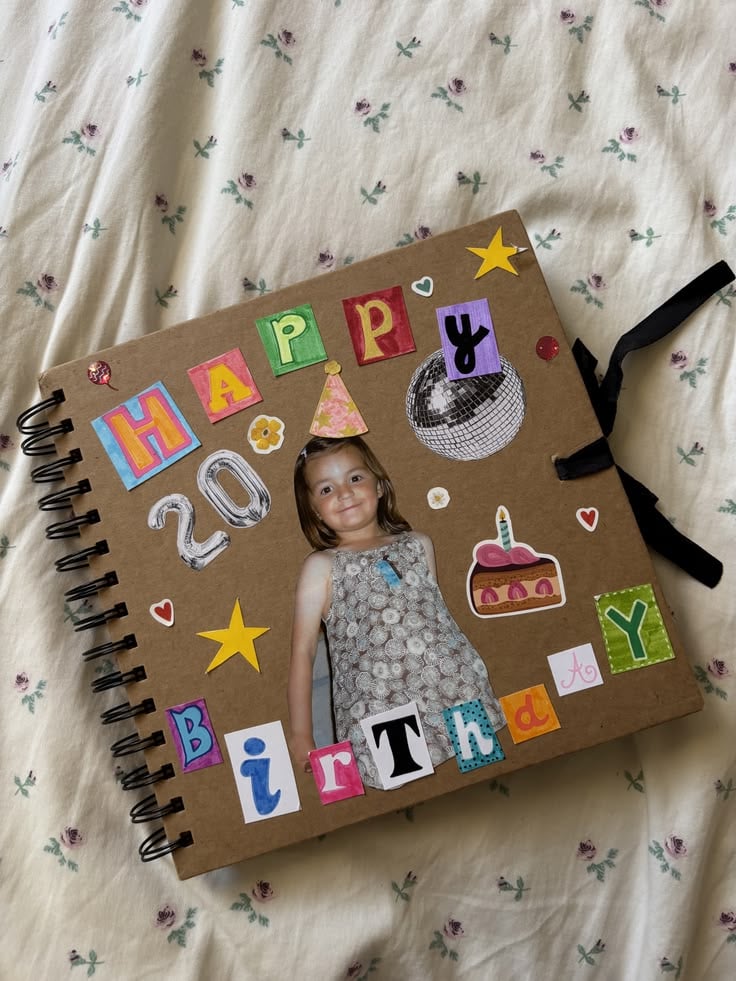
Photographs capture how a birthday looked, but a small memory booklet can preserve what people said and the moments they shared.
Create a folded booklet with a personalised cover and pages where guests can add short messages, photographs or a favourite memory of the celebrant.
For a milestone birthday, the pages could follow different stages of the person’s life, with space for family and friends to contribute something from each period.
Use printer paper for the inside pages and heavier cardstock for the cover.
Before cutting the full batch, fold one sample to check that the pages line up and the booklet opens comfortably. Binding rings make it easier to add pages later, while a simple stapled fold works for a slimmer booklet.
Useful supplies: Cardstock, printer paper, binding rings or suitable bookbinding materials, and adhesive.
Beginners interested in making products for customers can get more inspiration from 21 Simple Cricut Projects for Beginners That Actually Sell.
17. Birthday Wishes Message Slips
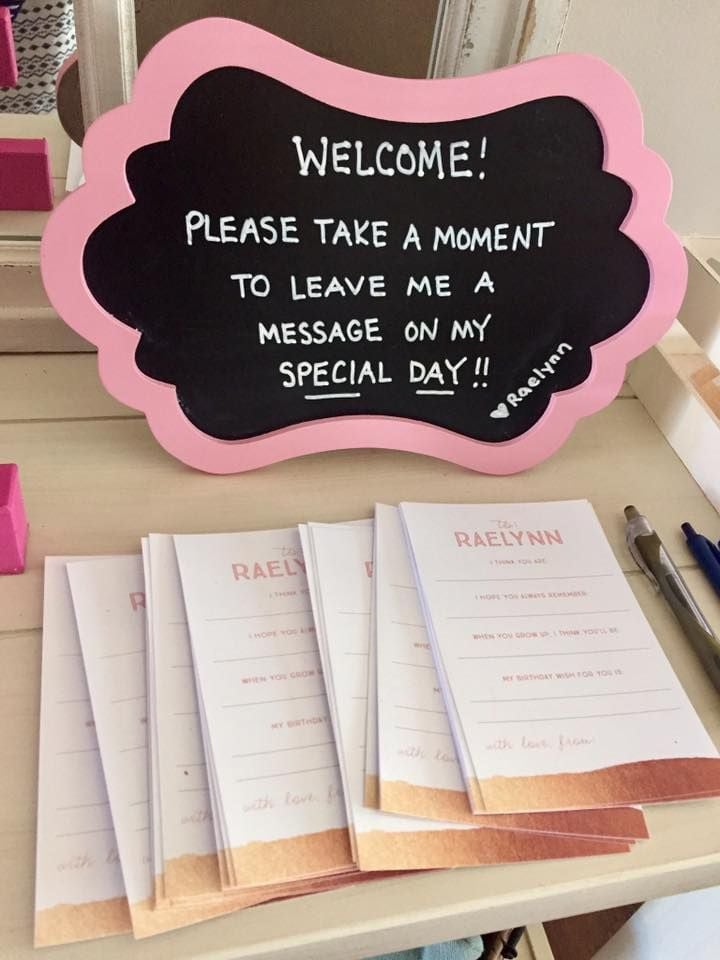
Not every guest will know what to write in a birthday card, especially when they have only a few minutes to contribute.
Prepare matching message slips with a simple prompt such as “One memory I will always treasure…” or “Something I hope you experience this year…”.
Guests can complete them during the celebration and place them in a keepsake box for the celebrant to read afterwards.
Cut the slips large enough for a few sentences rather than just a signature. You can add the celebrant’s name or birthday date to each one, but leave most of the space blank so the messages feel personal.
Avoid too many questions on one slip; a single thoughtful prompt usually gives people more room to write.
Useful supplies: Cardstock, paper trimmer, markers and a keepsake container.
Simple projects are a good starting point when learning to use a Cricut machine. 22 Easy Cricut Projects for Beginners You Can Make at Home provides more ideas to practise with.
18. Custom Temporary Tattoos
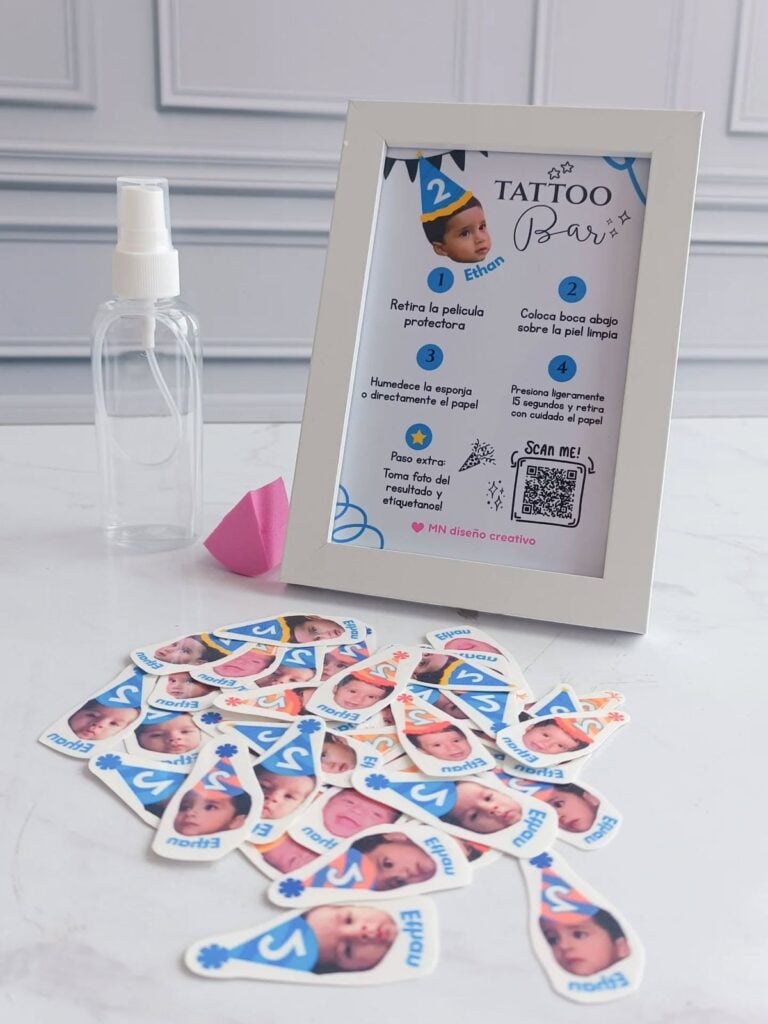
Custom temporary tattoos can give guests a small party detail to wear during the celebration. Create designs using the birthday person’s initials, the event date, a short phrase or a simple symbol that matches the theme.
They can be placed on a small display tray so guests can choose one, rather than handing everyone the same design.
Use printable temporary tattoo sheets that are compatible with your inkjet printer and Cricut machine.
The original Cricut Joy does not support Print Then Cut, so check machine compatibility before buying the sheets.
Follow the product instructions for printing, sealing, cutting and application. Temporary tattoos should not be applied to broken or irritated skin, and the manufacturer’s age restrictions should be followed.
Useful supplies: Compatible printable temporary tattoo paper, inkjet printer and a Print Then Cut-compatible Cricut machine.
19. Matching Party Crew Bandanas
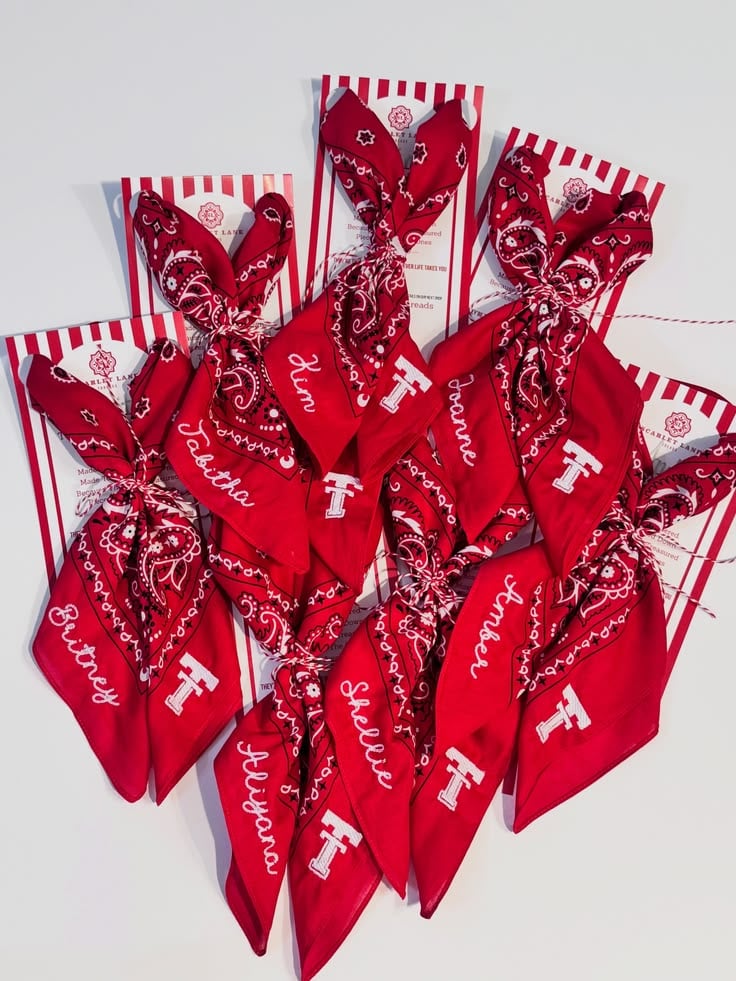
When several relatives or friends are helping with a large birthday celebration, matching bandanas can make it easier to identify the people assisting guests. Add a small name, role or shared symbol using iron-on vinyl.
For example, different bandanas could identify the people handling refreshments, welcoming guests or coordinating games.
Choose cotton bandanas that can tolerate the required heat and check the vinyl manufacturer’s instructions before pressing. Wash the fabric first if the blank’s care instructions and transfer guidance recommend it, and avoid fabric softener during preparation.
Test the design on one bandana before making the rest, especially when working with different fabric colours or thicknesses.
Useful supplies: Cotton bandanas, HTV, weeding tools and a suitable heat press.
20. Personalised Thank-You Postcards
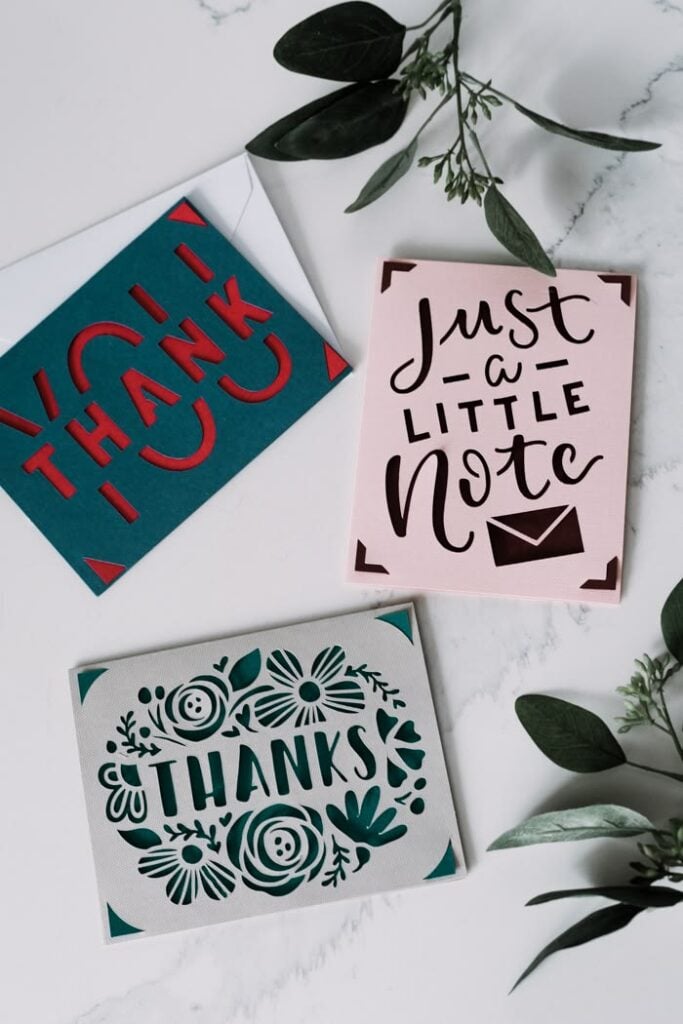
After a birthday celebration, a short thank-you message gives the celebrant or organiser a chance to acknowledge guests who attended, helped or sent gifts.
Use your Cricut to decorate postcards with the birthday person’s name, a small photograph, the event date or a simple design that matches the celebration. The handwritten message can then mention a particular gift, contribution or moment shared with the recipient.
Choose heavyweight cardstock that will hold up during handling and mailing. Leave a clear area for the recipient’s address and postage, and check the postal service’s postcard size and thickness requirements before cutting a large batch.
A design that looks attractive on screen may leave too little room for the details needed to send it.
Useful supplies: Heavyweight cardstock, Cricut pens, envelopes and a compatible cutting tool.
Holiday crafting can be a lovely way to make personalised decorations and presents. 31 Easy Cricut Projects for Christmas shares more festive projects to create with your machine.
Getting Clean, Professional Results from Your Cricut Party Decorations

A party decoration can have a lovely design and still look untidy when the lettering is too small, the layers do not line up or the finished piece does not fit its intended space.
Getting good results with a Cricut machine involves more than choosing a design and pressing the cut button. A little preparation can save materials and prevent avoidable mistakes.
Choose materials for the job. Cardstock works well for invitations, table numbers and paper centrepieces, while adhesive vinyl is suitable for smooth surfaces such as glass, acrylic and plastic.
Iron-on vinyl is intended for fabric projects. Check the material requirements for your Cricut model, blade and tools before cutting, rather than assuming every material will work with every machine.
Check the size before cutting. A name that looks clear on the Design Space screen may become difficult to read when reduced to fit a small favour tag.
Measure the surface or display area first, then adjust the lettering and spacing. For decorations that guests will read from across a room, make the text large enough to be seen without moving closer.
Make one sample before producing several. This is particularly useful for invitations, party crowns, table decorations and matching accessories. A test cut lets you check the fit, folding, alignment and overall appearance. It also helps identify details that are too small to weed or paper sections that tear easily.
Pay attention to assembly. Clean cuts are only part of the finished project. Remove excess vinyl carefully, align layered pieces before applying adhesive and use a scoring tool when a paper project requires a neat fold.
Allow glue, paint and other finishes to dry according to their product instructions before handling or displaying the decorations.
Consider the party environment. Paper decorations may soften around moisture, while lightweight pieces can move easily outdoors. Keep hanging decorations away from fans, lights and walkways, and check venue rules before attaching anything to walls or ceilings.
For food displays, use only materials approved for food contact; decorative cardstock and ordinary adhesive should not touch food directly.
A well-made Cricut decoration does not have to be complicated. Accurate measurements, suitable materials and a test sample often make more difference than adding extra layers or intricate details.
Halloween is another great occasion for making themed decorations, accessories, and party details. 33 Easy Cricut Projects for Halloween offers more seasonal ideas to try with your machine.
Conclusion
Birthday celebrations are remembered through the people, conversations and little details that make the day special.
These easy Cricut projects for birthdays and parties offer plenty of ways to add a personal touch, from the invitations guests receive to the keepsakes they take home.
Choose projects that suit the celebration, the available time and the materials on hand. Even a simple handmade detail can make a birthday feel more thoughtful and personal.