See how dollar-store finds can become frosted window designs, painted fabric, paper displays and personalised pieces with these beginner-friendly Cricut projects.
Buying something because you can already picture what you could turn it into is part of the fun of owning a Cricut.
A trip to the dollar store can give you plenty of ideas, especially when you start looking beyond an item’s original purpose. And a little personalisation can make an inexpensive find more useful, more recognisable or better suited to the person who will use it.
You don’t have to turn every purchase into an elaborate craft project, either. Sometimes a well-cut design is all it takes.
Here are 29 Cricut projects for beginners using dollar store items, with ideas worth trying and details to help you choose the right materials for each one.
Organised spaces can be easier to maintain when everyday items have a clear place, and personalised labels or storage accessories can make that system more practical. Find more ideas in 31 Easy Cricut Projects for Gifts.
Which Dollar Store Items Are Worth Turning into Cricut Projects?
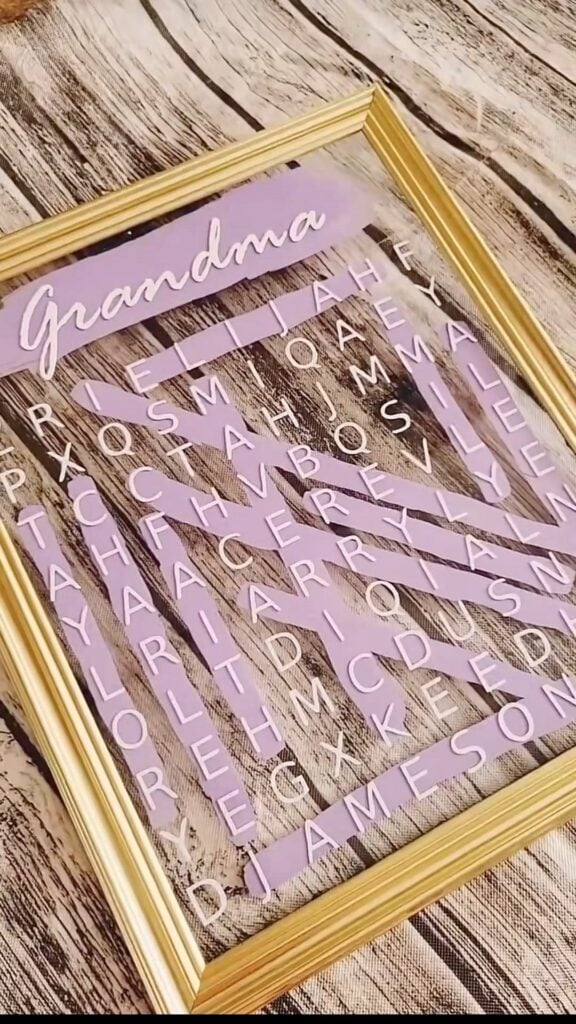
Before filling your shopping basket, pay attention to what an item is made of.
The material matters more than its price because it determines whether vinyl will stick, whether iron-on can be applied or whether the Cricut can cut it at all. Here are some worthwhile finds to look out for:
Smooth plastic: Pencil cases, small storage containers, plastic tags and hard cases are good candidates for adhesive vinyl. Look for relatively flat surfaces without heavy textures or flexible areas that bend repeatedly.
Glass: Plain glass jars, small vases and photo frames can be personalised with adhesive vinyl. Choose smooth glass and clean it thoroughly before applying the design. Avoid assuming that a vinyl-decorated glass item is dishwasher-safe.
Metal: Small decorative buckets, tins and metal tags can take adhesive vinyl when their surfaces are smooth and clean. Check for rust, peeling paint and rough coatings, as these can affect adhesion.
Paper products: Notebooks, folders, cardstock and paper bags offer plenty of possibilities for cut-out designs, decorative labels and paper embellishments. Check the thickness of the material before cutting, especially when working with layered paper.
Fabric: Cotton pouches, tote bags and bandanas can be personalised with compatible iron-on vinyl. Check the fabric composition and care label first, since not every fabric can withstand the heat required for application.
Thin craft materials: Acetate, craft foam and magnetic sheets may be useful for projects involving inserts, decorative shapes and bookmarks. However, their thickness and composition must be compatible with your particular Cricut machine and blade.
One shopping mistake worth avoiding is choosing an item simply because it looks easy to decorate. Deep grooves, uneven coatings, textured finishes and sharply curved surfaces can make vinyl application difficult.
Check the actual surface where your design will sit, and when possible, buy one item to test before purchasing several.
Personalised storage labels, desk accessories and room organisers can also suit a teenager’s space. 30 Cute Cricut Projects for Teen Girls has more ideas with a youthful style.
Cricut Projects for Beginners Using Dollar Store Items
Paper and Stationery Finds
1. Fold-Flat Gift Boxes With Locking Tabs
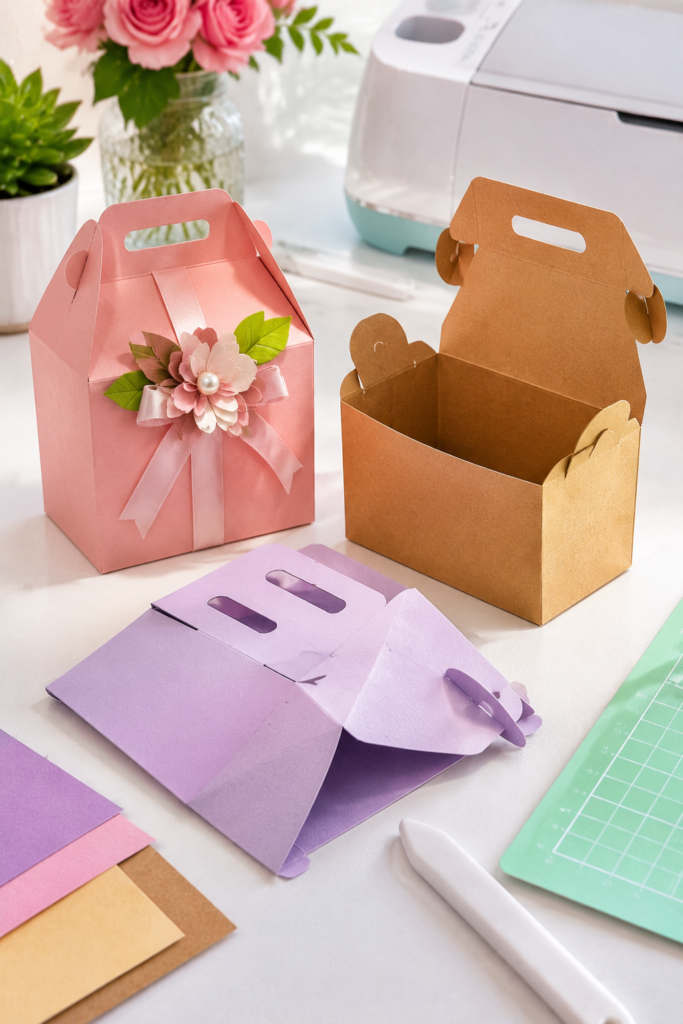
A gift box does not have to come from a packaging shop. With a sheet of cardstock and a suitable box template, you can cut and assemble a small gift box using your Cricut.
This design is particularly useful for presenting jewellery, small accessories, gift cards or other lightweight presents when you want the packaging to look more considered.
Look for medium-weight cardstock at the dollar store rather than very thin paper or construction paper. In Cricut Design Space, choose a box template with cut lines and designated fold lines.
The Cricut cuts the outside shape, the slots and the tabs, while a compatible scoring tool creates the creases needed to fold the sides neatly.
The tabs then tuck into their corresponding slots to hold the box together without requiring glue at every corner.
For a beginner, a small square or rectangular box with a straightforward locking mechanism is a good starting point.
Pay attention to the dimensions of the finished box, not just the flat template, so your intended gift will fit inside. Also, make a test cut before using your decorative cardstock, as paper thickness and stiffness affect how easily the tabs fit.
What you need:
- Dollar-store medium-weight cardstock
- Cricut cutting machine and compatible cutting mat
- Fine-Point Blade
- Compatible scoring tool or scoring stylus
- Bone folder (optional, for sharpening the folds)
A detail worth knowing: Scoring tools are not interchangeable across all Cricut machines.
For example, Cricut’s Scoring Wheel is designed for Maker machines, while the Scoring Stylus works with specified Explore and Maker generations. Check your machine’s compatibility before choosing a box template that requires scoring.
This project is also a useful introduction to the difference between cutting and scoring: cutting separates the cardstock, while scoring creates a crease that makes controlled folding easier.
Small leftover pieces of vinyl and cardstock can be put to work on drawer labels, folder tabs and other compact organising details. 23 Cricut Projects You Can Make with Scrap Materials shares more ways to use those supplies.
2. Pull-Tab Money Gift Cards
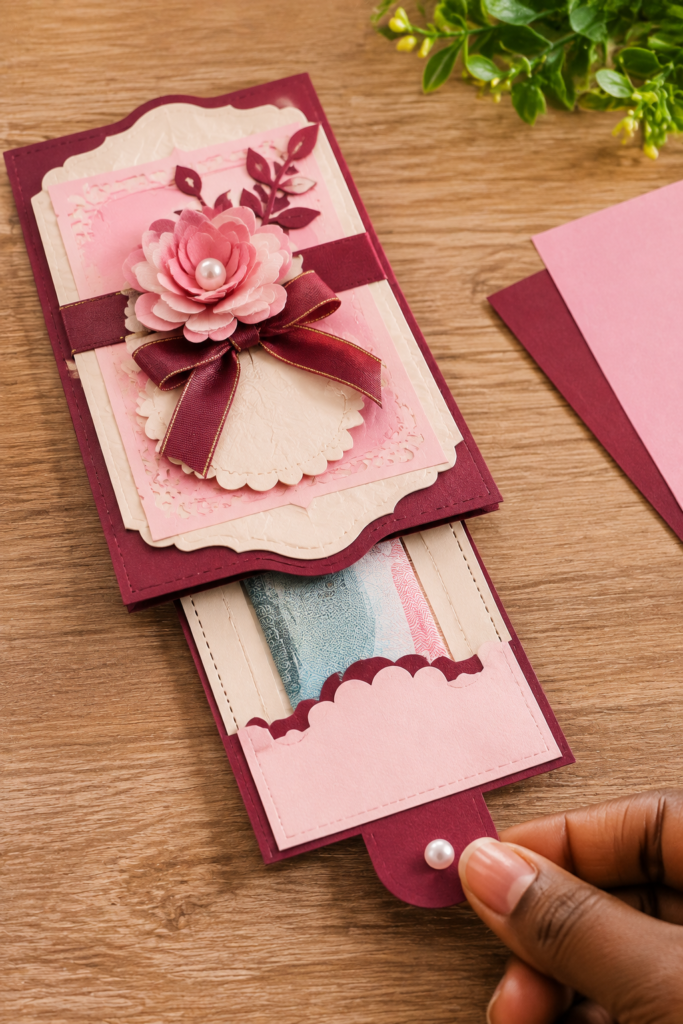
Giving money for a birthday, graduation or wedding can feel a little impersonal when it is handed over in a plain envelope.
A pull-tab card offers another way to present the gift: the recipient pulls a small tab to reveal the cash or a message hidden inside the card. It adds an element of surprise without requiring expensive packaging.
The mechanism usually consists of a card base, a pocket that holds the banknote and a sliding strip attached to the pull tab. The Cricut cuts these individual pieces from cardstock, but you assemble the mechanism yourself.
The sliding strip must move freely through its guide or pocket, so avoid applying glue across the area where it needs to travel. Position the banknote securely without allowing it to obstruct the slider.
For a first attempt, use a template designed specifically for a pull-tab money card rather than adapting an ordinary greeting card.
Test the movement with scrap paper before cutting your final cardstock. Also, measure the banknote you intend to give and compare it with the pocket dimensions.
Different currencies have different note sizes, so a template designed for one country’s banknotes may not fit another.
What you need:
- Dollar-store cardstock in two or more colours
- Cricut cutting machine, compatible mat and Fine-Point Blade
- Scrap cardstock for testing
- Double-sided tape or paper glue
- Ruler for checking the pocket and slider dimensions
A detail worth knowing: Not every pull-tab card template is designed to hold cash. Some reveal only a paper message or decorative image.
Check the template’s construction and finished dimensions before cutting, especially when the card will contain actual money.
Storage does not have to look purely functional; decorative signs, framed quotes and coordinated accents can bring personality to a room. See 29 Easy Cricut Projects for Home Decor for more inspiration.
3. Decorative Envelope Liners
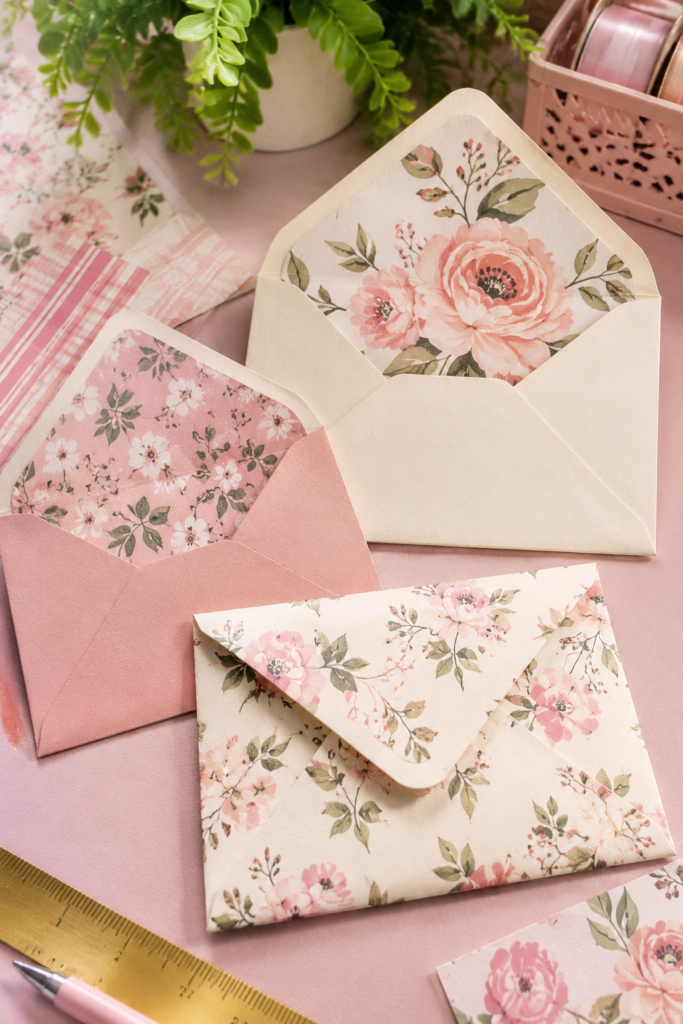
An invitation can contain all the right details and still feel unfinished when it arrives in a plain envelope.
A decorative liner adds colour inside without requiring you to buy matching printed envelopes. This is particularly useful when preparing invitations for a birthday, wedding, baby shower or church event.
Begin by measuring the envelope rather than relying on a generic liner template. Open one envelope carefully and trace its inner shape, including the angle or curve of the flap.
Your liner should fit inside the envelope without covering its adhesive strip. Cut a test version from ordinary paper, slide it into the envelope and check that the flap closes without resistance.
Use lightweight patterned paper for the liner. Thick cardstock can make the envelope bulky, especially when it already contains an invitation or several inserts. Your Cricut can cut the liner outline, but you will need to position and secure it by hand.
A small amount of double-sided tape along the edges is usually enough; covering the entire back with adhesive is unnecessary.
What you need:
- Dollar-store envelopes
- Lightweight patterned paper
- Cricut cutting machine, compatible mat and Fine-Point Blade
- Double-sided tape or paper glue
- Ruler and pencil for measuring
A detail worth knowing: Leave the envelope’s sealing area free of the liner. Also consider the finished thickness before mailing.
An envelope that becomes too thick, rigid or uneven may not qualify for the same postal rate as an ordinary letter.
4. Pop-Up Greeting Card Inserts
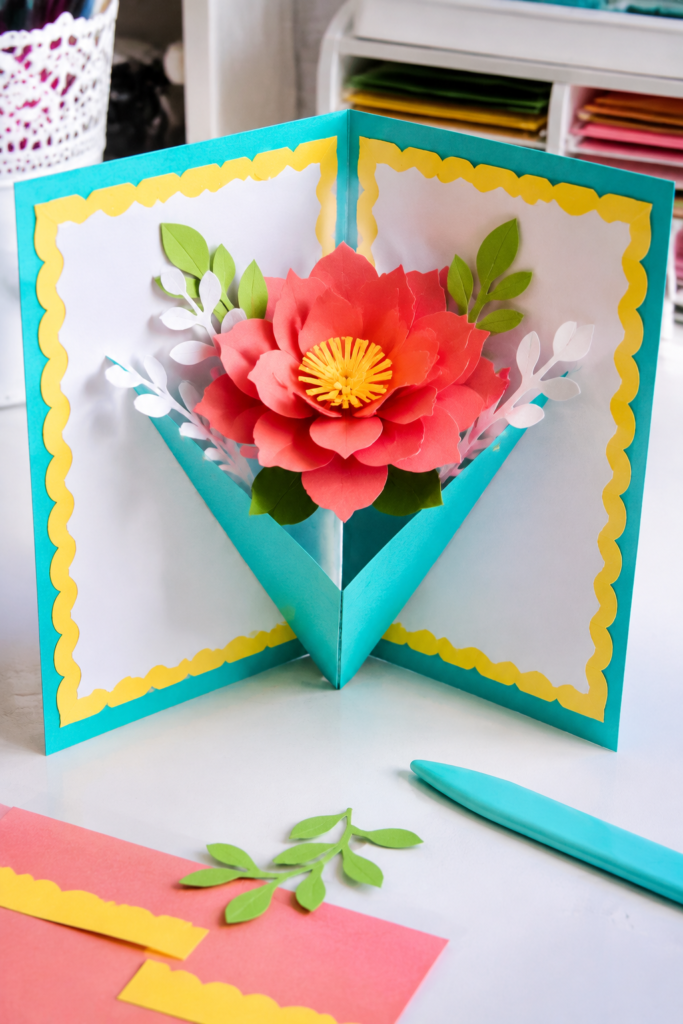
Flat greeting cards can become more interesting when the message is accompanied by something that rises as the card opens.
A pop-up insert is useful for birthday cards, thank-you notes and holiday greetings, particularly when you want to create a small surprise without buying a complicated card-making kit.
Start with a basic V-fold mechanism. This uses a folded paper support attached inside the card, with a decorative shape fixed to the raised section.
Opening the card pushes the support outward, lifting the decoration; closing it brings the shape back down.
The Cricut cuts the insert and decorative pieces, while you create the folds and attach the mechanism manually.
Choose a small design for your first attempt. A simple flower, heart or birthday cake is easier to position than a large scene with several moving sections. Use lightweight cardstock for the moving support and test the fold with scrap paper.
When the card is closed, the decoration should lie flat inside without extending beyond the card edges.
What you need:
- Dollar-store cardstock in contrasting colours
- Cricut cutting machine, compatible mat and Fine-Point Blade
- Compatible scoring tool, if the template includes score lines
- Paper glue or double-sided tape
- Scrap paper for testing the mechanism
A detail worth knowing: The pop-up shape and its supporting fold must be positioned carefully.
Glue the mechanism in place only after testing it inside the folded card. Otherwise, the decoration may catch against the front panel or prevent the card from closing properly.
Cardstock is useful for drawer dividers, labelled tabs, file markers and other lightweight organising pieces. More paper-based projects are featured in 27 Easy Cricut Projects Using Cardstock.
5. Decorative Bouquet Wrapping Collars
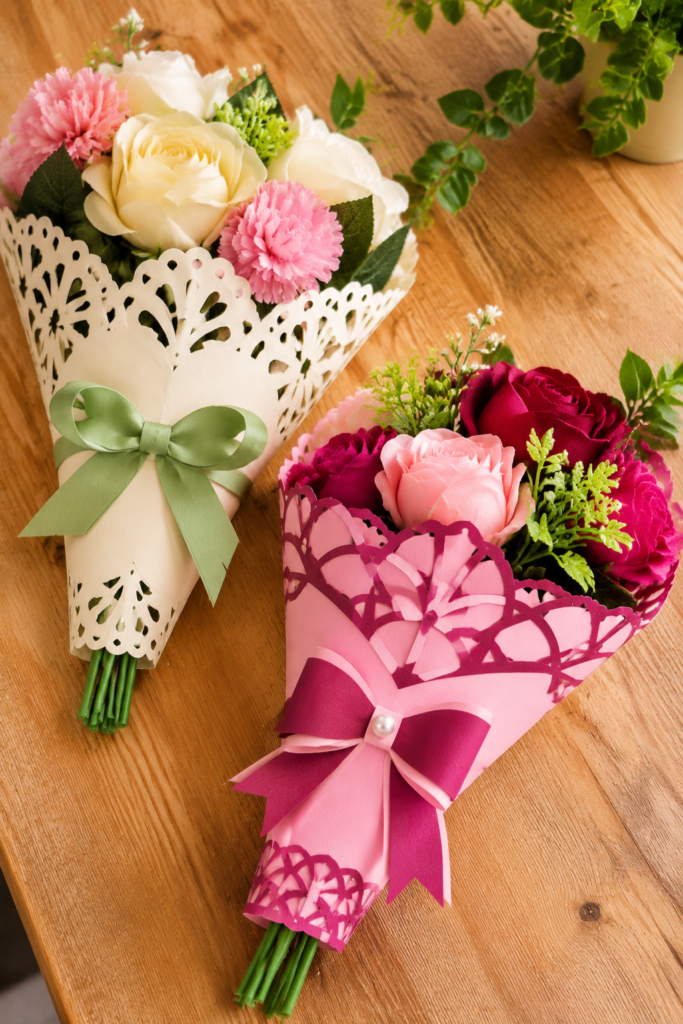
Loose artificial flowers can be difficult to present neatly, particularly when the stems are exposed and the bouquet has no matching wrapper.
A cardstock collar provides a simple way to gather the arrangement visually and add a personalised finish. It is suitable for small thank-you gifts, birthday bouquets and table decorations.
Measure around the gathered stems first so the collar will fit without crushing them. In Cricut Design Space, create a wide band with a shaped upper edge.
Scallops, curves or pointed edges can give it a different appearance, while a name or short message can be added to the front.
Cut the design from sturdy cardstock, wrap it around the stems and secure the overlapping ends at the back.
The collar should sit below the flower heads, leaving enough room for the arrangement to retain its shape.
Avoid making it too tight, as this can distort the bouquet or make the paper difficult to fasten. A ribbon can be added around the outside for decoration, but it is not necessary for the collar to work.
What you need:
- Dollar-store cardstock
- Small artificial flower bouquet
- Cricut cutting machine, compatible mat and Fine-Point Blade
- Double-sided tape or paper glue
- Ribbon (optional)
A detail worth knowing: This collar is intended for artificial or dry arrangements.
Cardstock can soften or become damaged when exposed to water, so it should not be used as a substitute for a waterproof flower wrapper or vase.
6. Mini Paper Party Crackers
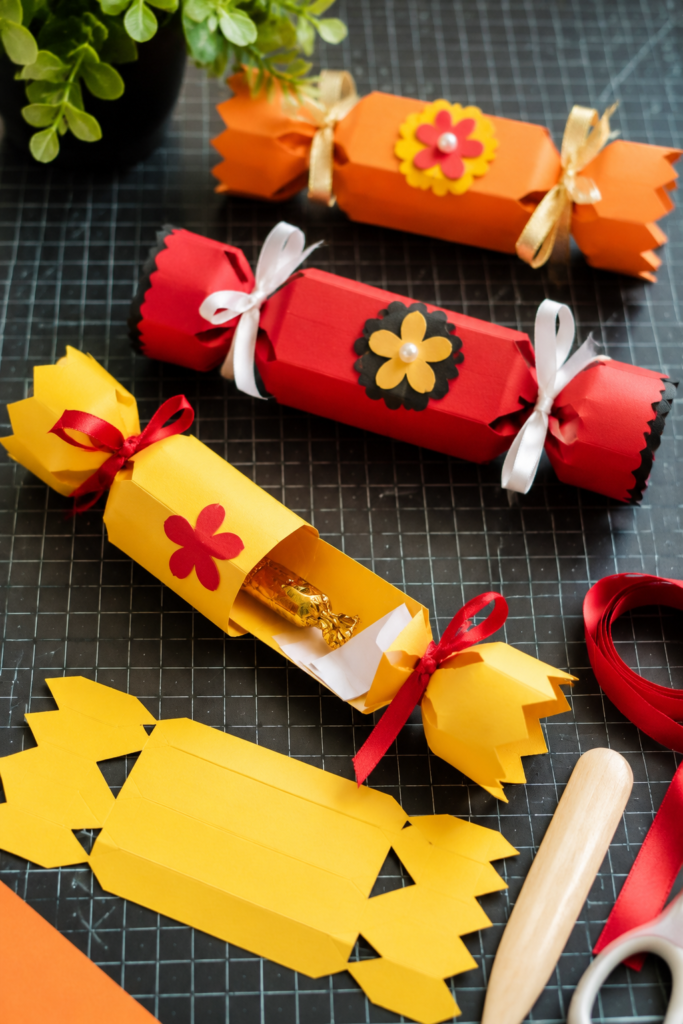
Party favours do not always need to be separate gift bags or plastic containers. Mini paper crackers can hold folded jokes, conversation prompts, small notes or lightweight treats at each place setting.
They are particularly useful for Christmas gatherings, birthday tables and family celebrations where you want guests to have a small item to open.
Choose a template with a central compartment and narrower ends. The Cricut cuts the paper shape and any decorative details, but you roll or fold the body and secure it yourself.
The centre needs enough space for the chosen contents, while the ends must be narrow enough to give the cracker its recognisable shape. Lightweight cardstock or sturdy craft paper is easier to form than thick board.
Before making several, assemble one and test the contents. A folded note or small wrapped sweet may fit comfortably, while a bulky favour can stretch the paper or prevent the ends from closing.
Ribbon or twine can secure the ends, and a small name tag can identify each guest’s cracker.
What you need:
- Dollar-store cardstock or sturdy craft paper
- Cricut cutting machine, compatible mat and Fine-Point Blade
- Double-sided tape or paper glue
- Ribbon or thin twine
- Small, lightweight favours or folded messages
A detail worth knowing: This paper version is a decorative favour holder, not automatically a traditional cracker. It will not make a popping sound unless a suitable commercial cracker mechanism is included.
Keep small contents appropriate for the intended recipients, especially when children will be handling them.
Personalised fabric accessories can help organise smaller belongings, especially when made with materials compatible with Infusible Ink. 25 Easy Cricut Projects Using Cricut Infusible Ink offers more ideas using this technique.
7. Hanging Paper Treat Cones
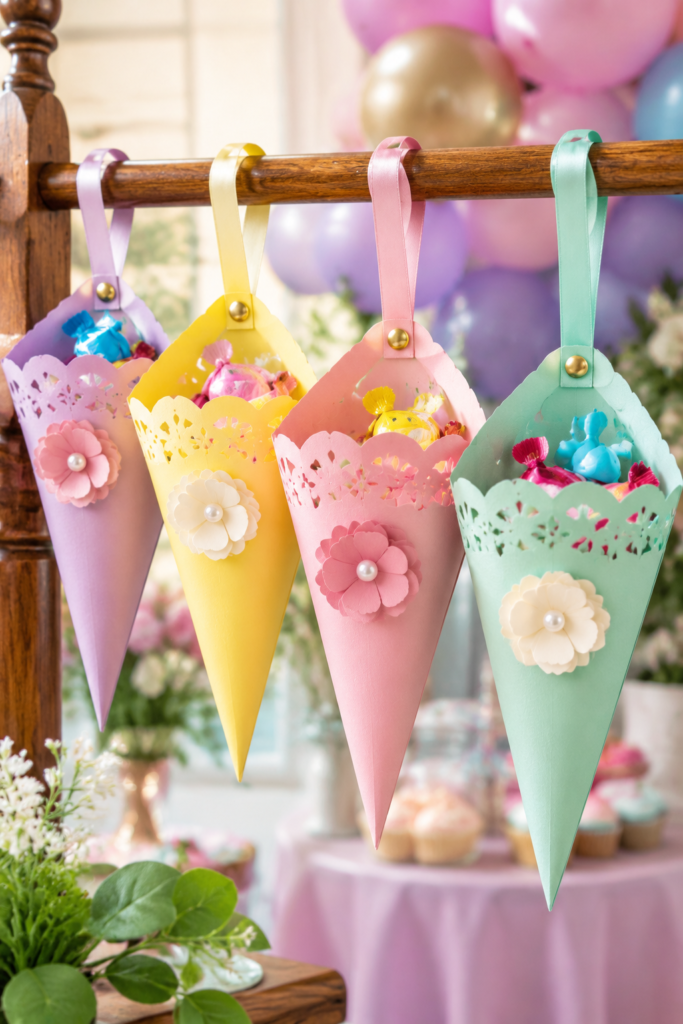
Party favour bags can take up considerable space on a crowded table.
Hanging treat cones offer another arrangement: each cone can be suspended from a display, placed on a wall-mounted holder or hung along a party backdrop. They also make it easier to label favours for individual guests.
The project starts with a cone-shaped paper template. The Cricut cuts the curved body and any decorative details, but you roll the paper into shape and secure the overlapping edge by hand.
Pay attention to the bottom point: an opening or poorly joined seam can allow small contents to fall out. A small cardstock circle fitted inside the base can reinforce it.
For hanging, include a hole near the top edge and thread ribbon or twine through it. Avoid placing the hole too close to the edge, where the paper could tear under the weight.
Test the cone with the actual contents before making a batch. Individually wrapped sweets, folded notes and lightweight party favours are better choices than heavy gifts.
What you need:
- Dollar-store cardstock
- Cricut cutting machine, compatible mat and Fine-Point Blade
- Double-sided tape or paper glue
- Ribbon or twine
- Hole punch, if the template does not include hanging holes
- Small wrapped treats or lightweight favours
A detail worth knowing: A hanging cone needs a secure top fastening as well as a closed base.
Reinforce the hanging hole when necessary, and keep the contents light enough that the paper will not tear when suspended.
8. Layered Paper Shadow-Box Scenes
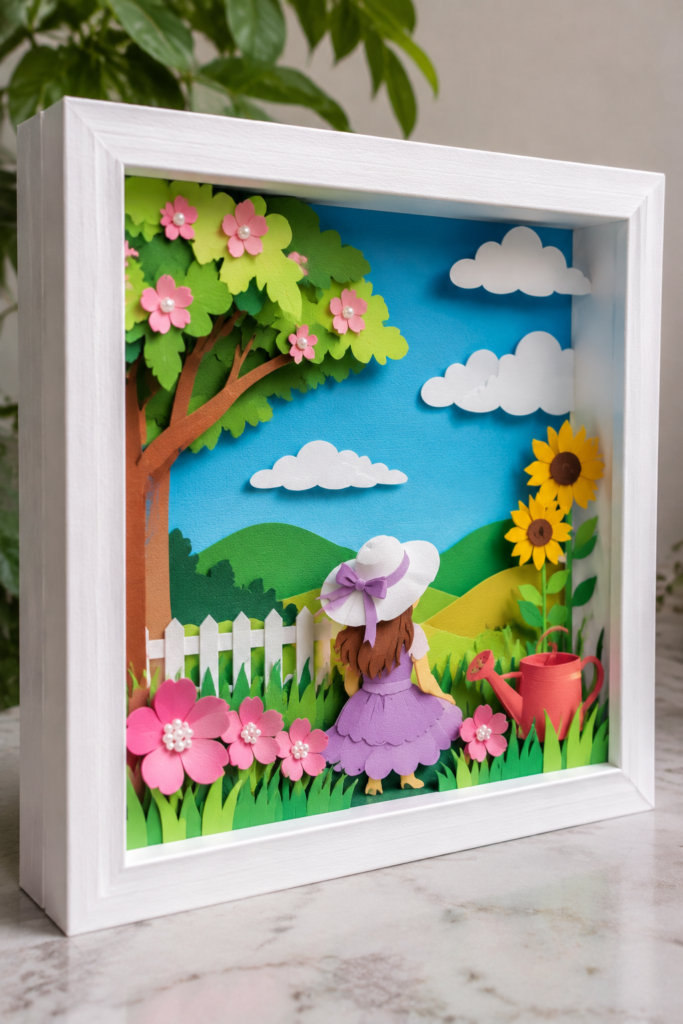
A photograph or printed picture placed in a frame gives you one flat image. Layered paper creates a different effect by placing cut shapes at varying distances from the background, producing visible depth.
This is a useful way to personalise an inexpensive shadow box with a family name, a meaningful date, a favourite landscape or a seasonal scene.
First, measure the frame’s usable interior space and its depth. The inside dimensions determine the size of each paper layer, while the depth determines how many layers and spacers you can accommodate.
Create a background panel, then add two or three foreground designs with openings or silhouettes that reveal the shapes behind them. Foam adhesive squares or folded cardstock strips can separate the layers.
A beginner does not need a complicated design with dozens of tiny cut-outs. A simple sunset with a foreground of trees, a skyline or a garden scene can create depth with only a few layers.
Choose shapes that are large enough to cut and remove from the mat without tearing. Assemble the scene gradually, checking the alignment and spacing before fixing each layer permanently.
What you need:
- Dollar-store shadow box
- Cardstock in several colours
- Cricut cutting machine, compatible mat and Fine-Point Blade
- Foam adhesive squares or strips, or folded cardstock spacers
- Paper glue or double-sided tape
- Ruler for measuring the frame
A detail worth knowing: The glass and backing reduce the space available for your paper layers. Measure the internal depth before choosing your design, and leave clearance so the finished scene does not press against the glass.
If the frame is shallow, fewer layers will give a neater result than trying to squeeze in a complicated design.
Vinyl is particularly useful for adding names and category labels to containers, folders and storage bins. Readers can find more ways to use it in 23 Cricut Projects for Beginners Using Vinyl.
Party and Event Pieces With a Clear Purpose
9. Custom Paper Party Crowns
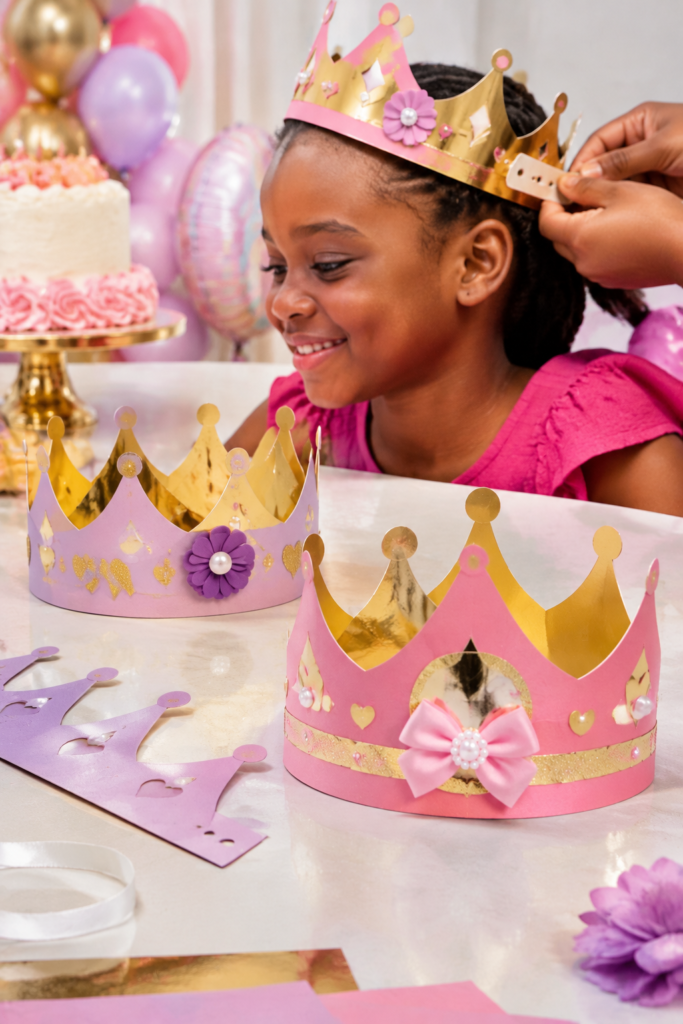
Children’s party hats do not always fit comfortably, especially when they come in one fixed size.
Making paper crowns with adjustable fastening gives you more control over the fit and lets you personalise each one with a child’s name, age or party theme.
This is one of the more useful Cricut projects for beginners using dollar store items because the main material is inexpensive cardstock, and the design can be kept simple.
Choose a crown template with a long band and fastening tabs at the ends. The Cricut cuts the crown shape, decorative points and any lettering, while you assemble the band by hand.
Add a short row of slots or several fastening positions at one end so the crown can be adjusted. Alternatively, attach a length of elastic or ribbon to the ends, making sure it is comfortable and not tight around the head.
Measure the intended wearer’s head before deciding on the band length. Leave a little room for adjustment, and test the fastening before decorating several crowns.
Lightweight cardstock is easier to shape around the head than thick board, while very thin paper may bend or tear during wear. Rounded crown points and smooth edges also make the finished piece more comfortable.
What you need:
- Dollar-store cardstock
- Cricut cutting machine, compatible mat and Fine-Point Blade
- Double-sided tape or paper glue
- Ribbon, elastic or a paper fastening tab
- Decorative cardstock or adhesive vinyl for names and numbers
A detail worth knowing: Do not assume one crown size will fit every child. Make the band adjustable and check the fit before the party.
Avoid tight elastic, sharp corners and small detachable decorations for very young children.
Kitchen cupboards, pantry shelves and food-storage areas are often easier to manage with clear labels and designated containers. Find kitchen-specific projects in 25 Easy Cricut Projects for Your Kitchen.
10. Photo Booth Speech-Bubble Props
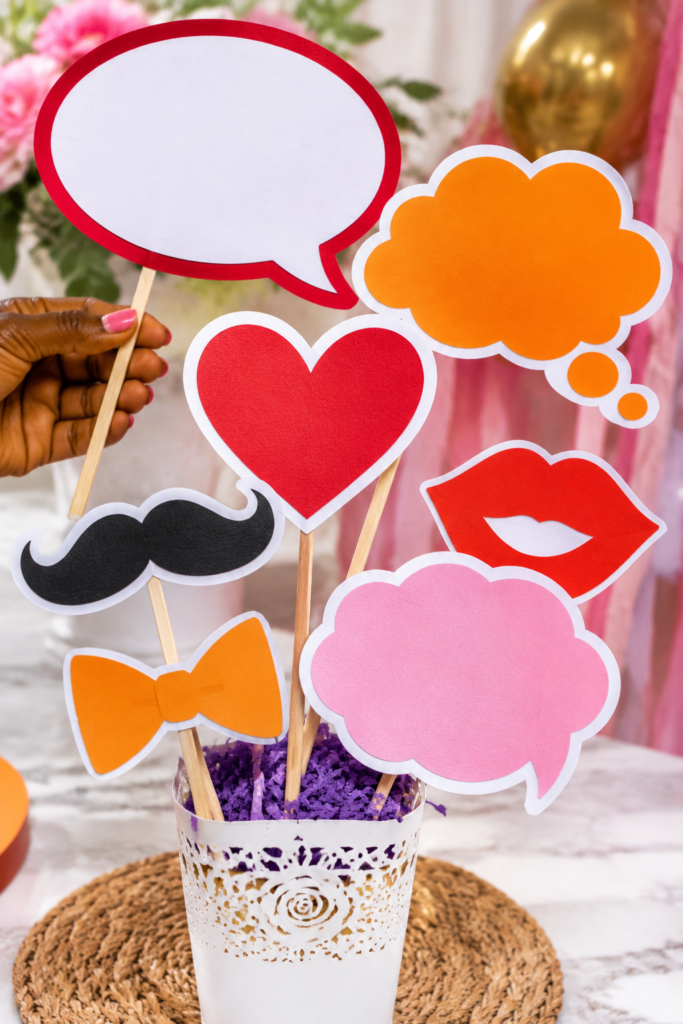
Guests often have to think of something to say or pose with when they step in front of a photo booth camera.
Speech-bubble props solve that little problem by giving them ready-made phrases, questions or themed messages to hold.
For a birthday, family reunion, graduation or church celebration, you can cut phrases such as “It’s my day,” “Team Bride,” “Blessed” or the event year from inexpensive cardstock.
Create speech bubbles, thought clouds and simple shapes in Cricut Design Space, then add short text that can be read clearly in photographs.
Keep the wording large and avoid long sentences, since small lettering may become difficult to read when the prop is held at a distance.
Cut each design from cardstock and attach it to a wooden craft stick with strong craft glue or adhesive. Reinforce the back with a second cardstock layer if the prop feels flimsy.
Before cutting the full set, make one sample and hold it at the distance guests are likely to stand from the camera.
Check that the wording is readable and that the stick is positioned where it will not cover the text or make the prop difficult to hold.
What you need:
- Dollar-store cardstock
- Wooden craft sticks
- Cricut cutting machine, compatible mat and Fine-Point Blade
- Strong craft glue or suitable adhesive
- Optional second cardstock layer for reinforcement
A detail worth knowing: Ordinary paper glue may not hold a craft stick securely during repeated handling.
Use an adhesive suitable for the materials, allow it to dry fully and check each prop before guests use it. Avoid very thin sticks or oversized shapes that make the prop awkward to hold.
Keeping party supplies organised is another useful application for labelled containers, favour boxes and personalised storage pieces. Readers planning celebrations can also visit 20 Easy Cricut Projects for Birthdays and Parties.
11. Layered Paper Rosette Decorations
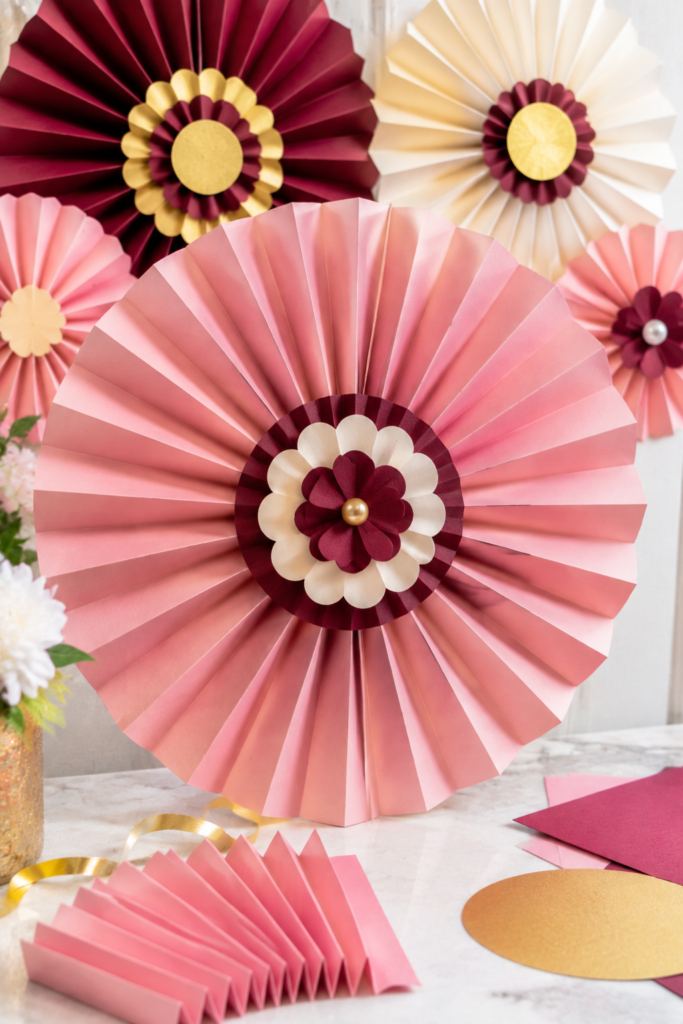
Large party decorations can become expensive when you need several pieces to fill a wall or backdrop.
Paper rosettes offer a way to create visual interest with inexpensive sheets of cardstock. They work well as individual wall decorations, behind a dessert table or as part of a birthday and celebration backdrop.
The rosette is made by joining scored paper strips into a continuous accordion-folded band, then bringing the ends together to form a ring. Pressing the ring inward creates the circular fan shape, which needs a firm backing in the centre to hold it open.
Your Cricut can cut the strips to size and create evenly spaced score lines when used with a compatible scoring tool. You can also score the strips manually with a ruler and a blunt scoring tool.
For a beginner, use two or three strips of the same width and make sure the score lines are evenly spaced. Join the short ends to form one continuous band before shaping it into a circle.
Secure the centre on both sides with cardstock circles or sturdy circular backing pieces. A small paper rosette can be made with lighter paper, while larger decorations need stronger support to prevent the centre from collapsing.
What you need:
- Dollar-store cardstock or sturdy craft paper
- Cricut cutting machine, compatible mat and Fine-Point Blade
- Compatible scoring tool or manual scoring board
- Paper glue or double-sided tape
- Extra cardstock for the centre backing
A detail worth knowing: Scoring helps the paper fold neatly, but it does not hold the rosette open. The centre backing is what keeps the circular shape in place.
For larger rosettes, use a secure backing on both sides rather than relying on a small dot of glue at the centre.
Cricut scoring-tool compatibility varies by machine, so check your model before selecting a scoring wheel or stylus.
Organising products such as labelled containers, personalised folders and desk accessories may also appeal to customers looking for practical handmade items. Explore 25 Easy Cricut Projects to Make and Sell for Extra Money for more business ideas.
12. Accordion Paper Fans
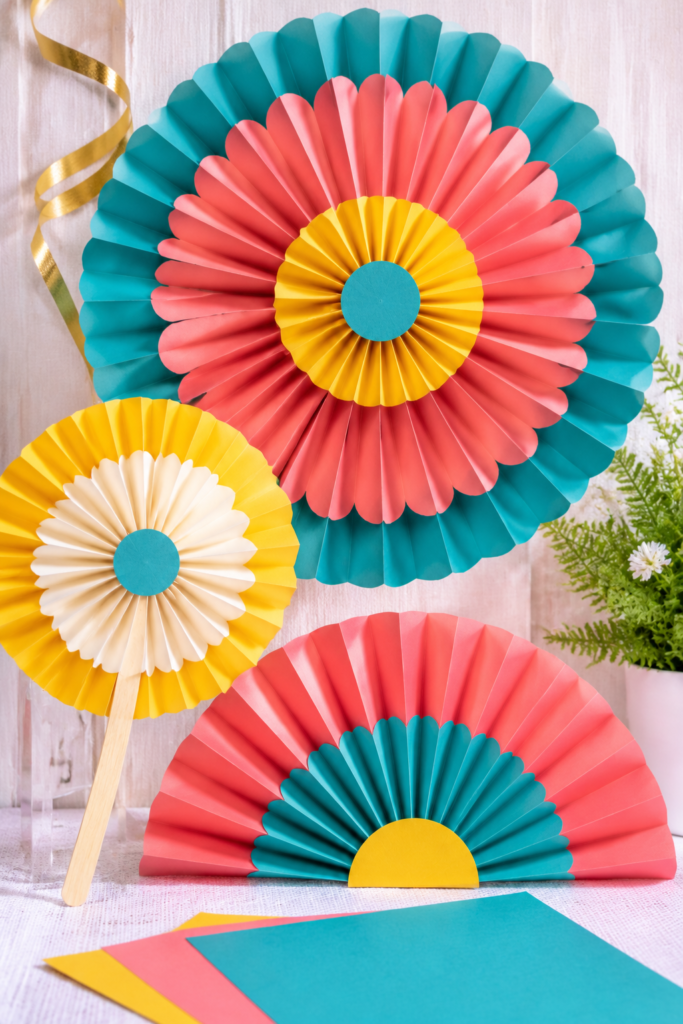
Paper decorations can look attractive on a party wall but may be awkward to display when they do not have a flat surface or a way to hang them.
Accordion fans solve this by folding a sheet into a pleated shape that can be opened into a fan and displayed on its own or arranged with other decorations.
They are a useful addition to Cricut projects for beginners using dollar store items, particularly when you want to make several decorations in matching colours.
Create a rectangular cardstock panel and add evenly spaced score lines across its width.
Fold along the lines, alternating between mountain and valley folds, until the entire sheet forms a narrow pleated strip. To make a circular fan, join two or more folded sections at their short ends, then bring the outer edges together and secure them.
A separate cardstock circle at the centre can help hold the fan open. For a handheld version, keep the fan narrower and attach a craft stick to the folded base.
The Cricut can cut the panels and score the fold lines when you have a compatible scoring tool. You can also use the machine to cut decorative edges or small shapes before folding.
Test the folds on ordinary paper first, because heavy cardstock can resist tight folds and may crack if it is folded without scoring.
What you need:
- Dollar-store cardstock or sturdy craft paper
- Cricut cutting machine, compatible mat and Fine-Point Blade
- Compatible scoring tool or ruler and manual scoring tool
- Double-sided tape or paper glue
- Extra cardstock for the centre support
- Craft stick (optional, for a handheld fan)
A detail worth knowing: Scoring and cutting are two different operations. Cutting separates the paper, while scoring creates a crease that makes folding easier.
Choose the scoring tool supported by your particular Cricut model, and use a test piece to check that the folds are clean before making the full decoration.
13. Layered Pennant Bunting
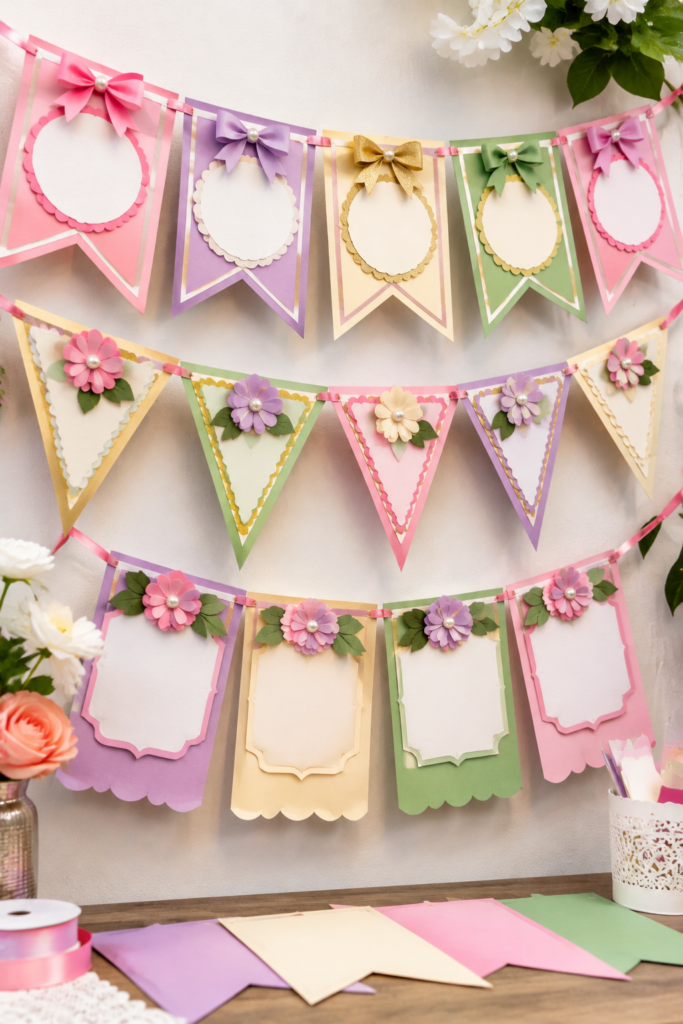
A party banner can become difficult to read when every letter is cut from a different material or attached unevenly.
Pennant bunting gives you a more organised layout: each letter or design sits on its own flag, making it easier to arrange names, short messages, ages or event themes across a wall or table display.
Cut matching triangles, rectangles or flag-shaped pieces from dollar-store cardstock.
Then create smaller shapes or letters to layer on top. For example, a birthday banner could have one letter on each pennant, while a graduation display could use alternating school colours and simple cap shapes.
The Cricut makes it easier to keep the flags and lettering consistent, but you will need to assemble each piece and attach it to a length of ribbon, twine or string.
Before cutting the whole banner, decide how many flags the message needs and check the available hanging space. Leave a gap between each pennant so the shapes do not overlap when displayed.
Make small holes near the top corners and thread the string through, or fold a narrow strip over the string and glue it to the back of each flag. The second method avoids visible holes but needs secure fastening.
What you need:
- Dollar-store cardstock in coordinating colours
- Cricut cutting machine, compatible mat and Fine-Point Blade
- Ribbon, twine or string
- Hole punch, if using threaded pennants
- Paper glue or double-sided tape
- Ruler for spacing the flags
A detail worth knowing: Do not make the pennants too heavy for the string or fastening method.
Large layered letters and several cardstock pieces can add weight, so use a stronger hanging cord and secure the flags properly. For an outdoor display, remember that ordinary cardstock can bend or become damaged by moisture.
A few useful organising products can be a good way to test what customers want before investing in larger quantities of materials. 21 Simple Cricut Projects for Beginners That Actually Sell shares more ideas for beginner sellers.
14. Three-Dimensional Hanging Paper Stars
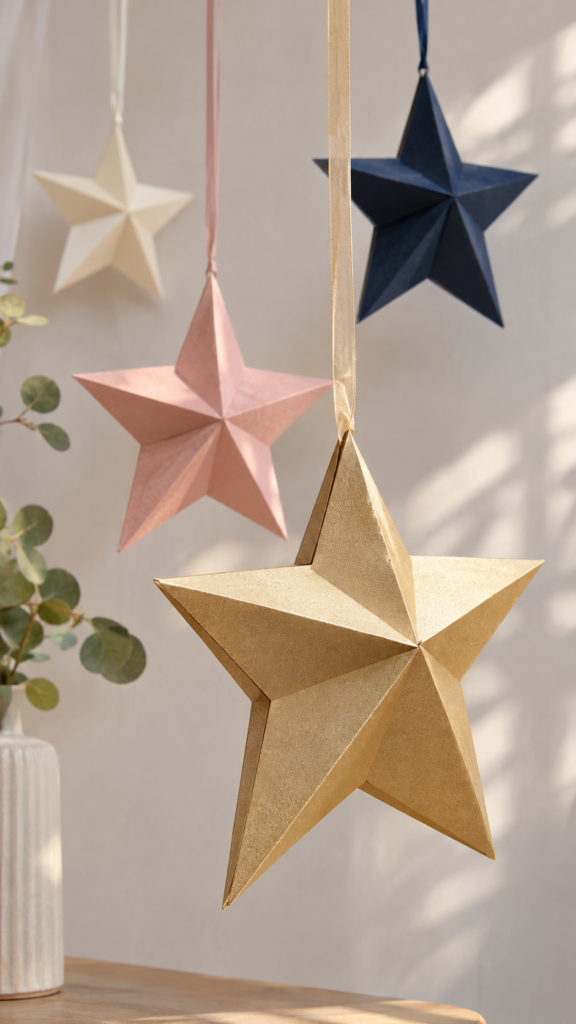
Flat paper stars can be useful for decorating a wall, but they do not always provide the dimensional effect needed for a hanging display.
Folded paper stars add depth and can be suspended individually, arranged in a garland or used as decorations for Christmas, birthdays and other celebrations.
For a beginner-friendly version, choose a template with two matching star shapes and clear fold lines. The Cricut cuts the outlines and scores the creases when the design calls for machine scoring.
Fold each star along its marked lines to create the raised points, then join the two pieces along their matching edges. Add a small hole or paper loop before closing the final section if you intend to hang the star.
Use cardstock that can hold a crease without becoming too difficult to fold. Very thick material may make the points bulky, while thin paper can lose its shape.
Make one sample first to check how the two halves align and whether the finished star hangs evenly.
A simple five-point star is easier to assemble than a design with many narrow points or several interlocking sections.
What you need:
- Dollar-store cardstock
- Cricut cutting machine, compatible mat and Fine-Point Blade
- Compatible scoring tool, if the template includes score lines
- Paper glue or double-sided tape
- Ribbon, thread or twine for hanging
A detail worth knowing: Not every star template uses the same construction. Some designs fold from one piece, while others require two or more separate sections.
Check the assembly instructions before cutting, and make sure the hanging loop is attached securely so the star does not come apart when suspended.
Cricut scoring tools vary by machine, so confirm compatibility before selecting a template that requires scoring.
15. Folded Table Number Stands
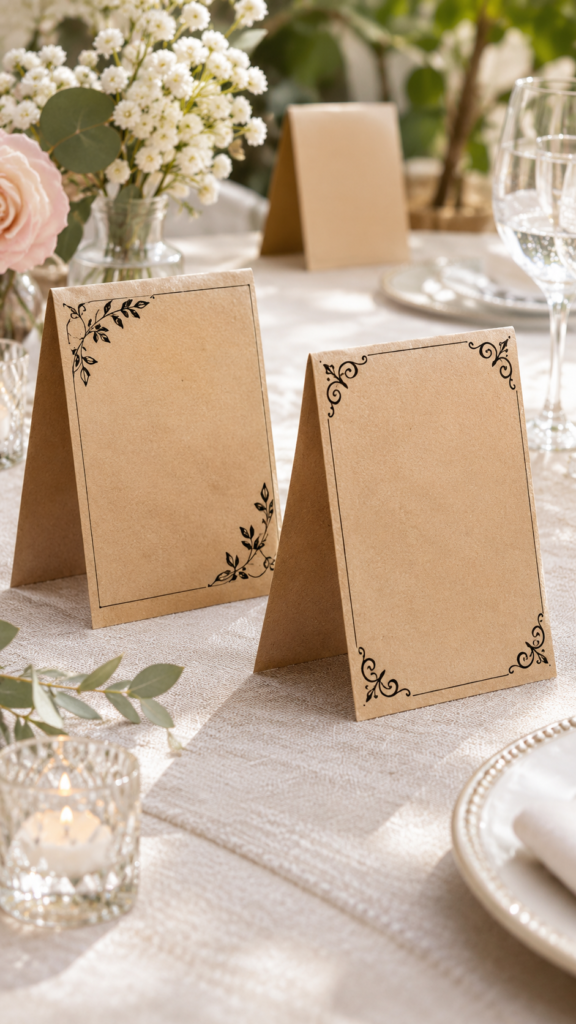
Guests can waste time looking for their assigned seats when tables are not clearly identified. Freestanding table numbers make it easier to locate the right table at weddings, dinners, workshops, church events and other gatherings.
Instead of purchasing printed stands, you can make matching numbered cards with dollar-store cardstock and your Cricut.
Create a rectangular card with a central fold so it can stand in a tent shape. Cut the number separately from a contrasting cardstock colour or use the Cricut to draw it with a compatible pen.
You can also add a small heading such as “Table” above the number. Score the centre fold before assembling, then open the card into an inverted V so the two sides support each other.
Choose a size that can be read from across the table without taking up too much space. A number that is too small may be difficult for guests to spot, while an oversized stand can interfere with serving dishes and table arrangements.
Test one stand on a table before producing the full set, particularly if the cardstock is lightweight and may need a wider base or an additional support panel.
What you need:
- Dollar-store cardstock
- Cricut cutting machine, compatible mat and Fine-Point Blade
- Compatible scoring tool or ruler and manual scoring tool
- Paper glue or double-sided tape, if using a separate support
- Cricut-compatible pen (optional)
A detail worth knowing: The fold alone does not guarantee that the stand will remain upright. Make sure both sides meet evenly and that the base is wide enough to support the card.
For outdoor events or tables where people may brush against the signs, use a heavier cardstock or reinforce the base.
16. Buffet Allergen Information Markers
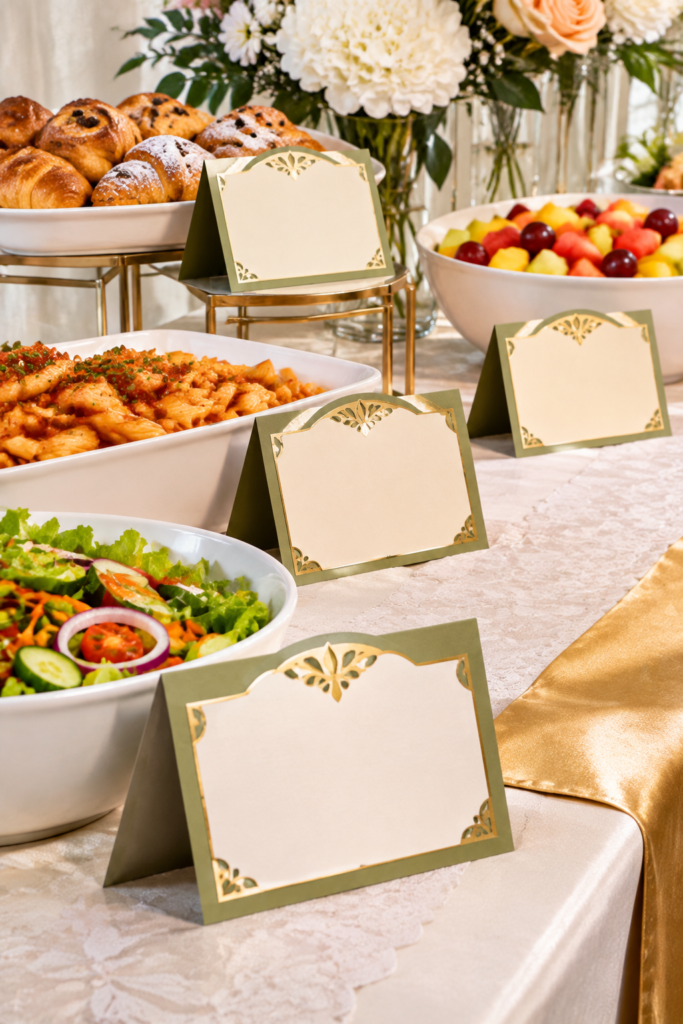
Guests with food allergies should not have to guess what a buffet dish contains. Small information cards placed beside each dish can help communicate known ingredients and direct guests to someone who can answer further questions.
This makes allergen markers one of the more purposeful Cricut projects for beginners using dollar store items: the finished cards are decorative, but their main job is to make important food information easier to see.
Use folded cardstock to create tent-style labels that stand beside serving dishes. The Cricut can cut the card shapes and add headings such as “Contains,” “Ingredients” or “Please Ask About Allergens.”
You can also use a compatible pen to write or draw the information, or cut larger text from adhesive vinyl. Keep the lettering clear and large enough to read without picking up the card. Leave enough space to identify the dish and list the relevant ingredients or allergens.
The information must come from the actual recipe and the ingredients used to prepare the food. Check packaging labels for manufactured ingredients, and ask the person who prepared each dish about substitutions, sauces, toppings and other additions.
Where there is a risk of cross-contact, such as shared utensils, preparation surfaces or serving spoons, that information should also be communicated. Do not assume a dish is allergen-free simply because the ingredient is not visible.
What you need:
- Dollar-store cardstock
- Cricut cutting machine, compatible mat and Fine-Point Blade
- Cricut-compatible pen or adhesive vinyl for the wording
- Compatible scoring tool, if you want machine-scored folds
- Ruler and paper glue, if assembling separate panels
A detail worth knowing: These cards help display information; they do not make food safe for someone with an allergy or replace careful food handling.
Verify every label against the dish as served, update it whenever ingredients change, and provide a way for guests to ask questions.
UK food-safety guidance, for example, recommends clear, accurate allergen information for buffet dishes individually, rather than relying on a general sign for the whole table. Local food-labelling requirements may differ.
Beginners can start with straightforward labels and storage accessories before attempting more detailed organising systems. 22 Easy Cricut Projects for Beginners You Can Make at Home provides more projects to practise.
Small Display Projects for Events and Small Businesses
17. Mini Easel Price Signs
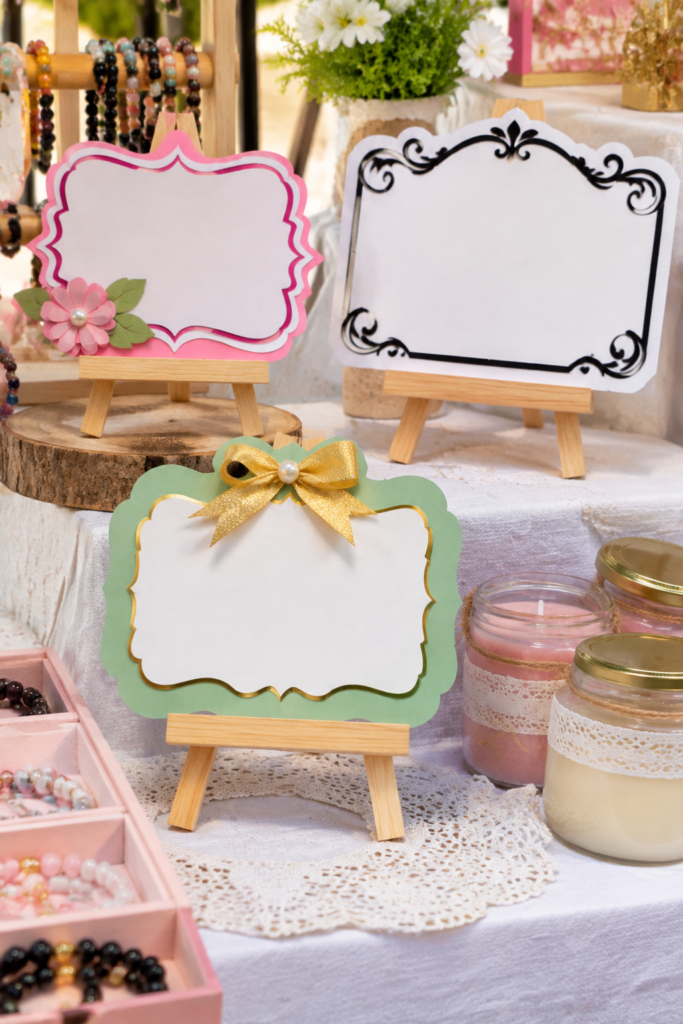
Customers should not have to ask the price of every item at a craft fair or market stall. Small price signs make that information visible while allowing you to keep serving other customers or arranging your display.
Mini dollar-store easels and sign blanks offer an inexpensive base for creating reusable signs that match your stall’s style.
Choose a smooth, flat sign blank that can sit securely on the easel. Cut the price and product description from adhesive vinyl, then apply the lettering to the blank using transfer tape.
For example, a sign might display the product name, price and a short detail such as “Handmade” or “Available in three colours.” Keep the price prominent and avoid squeezing too much information onto a small surface.
Measure the sign blank before designing the lettering in Cricut Design Space. Leave a margin around the edges so the words do not look crowded, and check that the text is large enough to read from a customer’s normal viewing distance.
You can also create interchangeable price inserts from cardstock, which is useful when prices change regularly.
What you need:
- Dollar-store mini easel and smooth sign blank
- Adhesive vinyl
- Cricut cutting machine, compatible mat and Fine-Point Blade
- Transfer tape
- Weeding tool
- Scraper or burnishing tool
A detail worth knowing: Adhesive vinyl works best on a clean, smooth surface. Dust, textured paint and rough wood can prevent it from sticking evenly.
Clean and dry the sign blank before application, and test a small vinyl piece if you are unsure about the finish.
18. Tabletop QR Code Displays
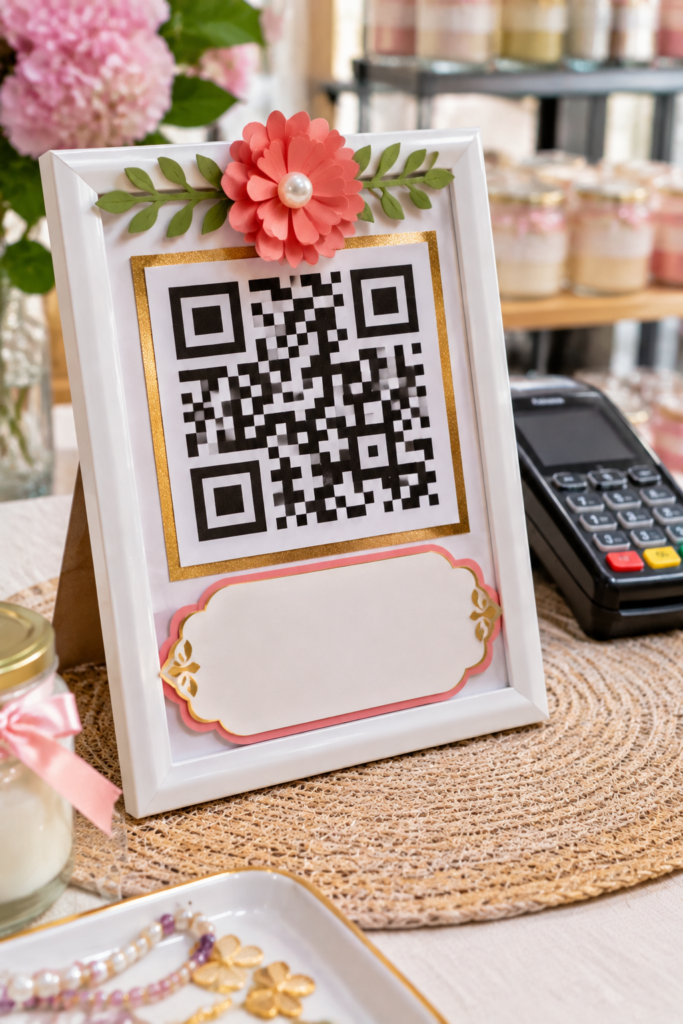
Customers sometimes want to view a menu, make a payment, follow a business page or access a product catalogue without asking for a printed copy.
A tabletop QR code display gives them a convenient way to scan the information using their phone. It can be particularly useful at market stalls, small businesses, food counters and event registration tables.
Start by generating the QR code using a reputable QR code generator and entering the correct destination link. Download the code and print it separately; your Cricut is useful for cutting a decorative frame or adding a heading such as “Scan to Pay,” “View Our Menu” or “Follow Us.”
Place the printed code inside a small dollar-store photo frame, then add the heading to the frame or a separate cardstock panel.
Before displaying it, scan the printed code with more than one phone if possible. Check that it opens the intended page, payment destination or business profile.
Make sure the code is large enough to scan from the distance at which customers will stand, and leave a clear margin around it. Avoid placing decorative vinyl, text or borders over the code itself.
What you need:
- Small dollar-store photo frame
- Printed QR code
- Cardstock for a heading or decorative backing
- Cricut cutting machine, compatible mat and Fine-Point Blade
- Adhesive vinyl and transfer tape (optional)
- QR code generator and printer
A detail worth knowing: A QR code can stop being useful when its destination link changes or the linked page is removed.
Use a destination you expect to keep active, and test the actual printed code after placing it in the frame. A decorative Cricut design cannot correct a faulty QR code or guarantee that it will scan.
Simple cutting projects also help beginners become familiar with sizing, material selection and assembly. Find additional starter ideas in 19 Easy Cricut Projects for Beginners.
19. Reserved Seating Table Signs
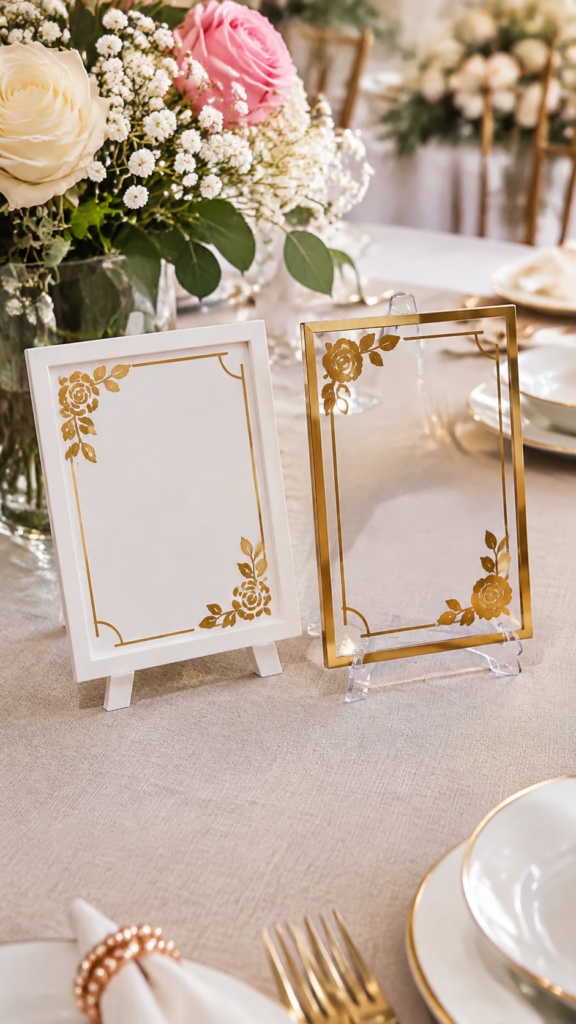
At weddings, conferences, family dinners and church events, guests may be unsure which seats are available and which have been assigned.
Small reserved signs help prevent people from accidentally taking designated seats, especially when organisers need to keep places for speakers, guests of honour, family members or people with specific seating arrangements.
Use a small dollar-store photo frame, acrylic sign blank or other freestanding display as the base. Cut the words “Reserved,” a guest’s name or a short message from adhesive vinyl and apply them to the front.
For a more formal event, keep the lettering simple and use a contrasting colour so the message can be read easily. You can also make removable cardstock inserts for signs that will be reused with different names.
Measure the display area before cutting the lettering. Leave enough space around the words and avoid decorative fonts that are difficult to read at a glance.
Make one sample first to check the size and placement before producing a full set for an event.
What you need:
- Dollar-store mini photo frame or sign blank
- Adhesive vinyl
- Cricut cutting machine, compatible mat and Fine-Point Blade
- Transfer tape and weeding tool
- Cardstock (optional, for removable inserts)
A detail worth knowing: A reserved sign only communicates the seating arrangement; it does not physically prevent someone from taking the seat.
Position it where arriving guests can see it, and make sure the event team knows which seats have been assigned.
20. Craft-Fair Product Category Displays
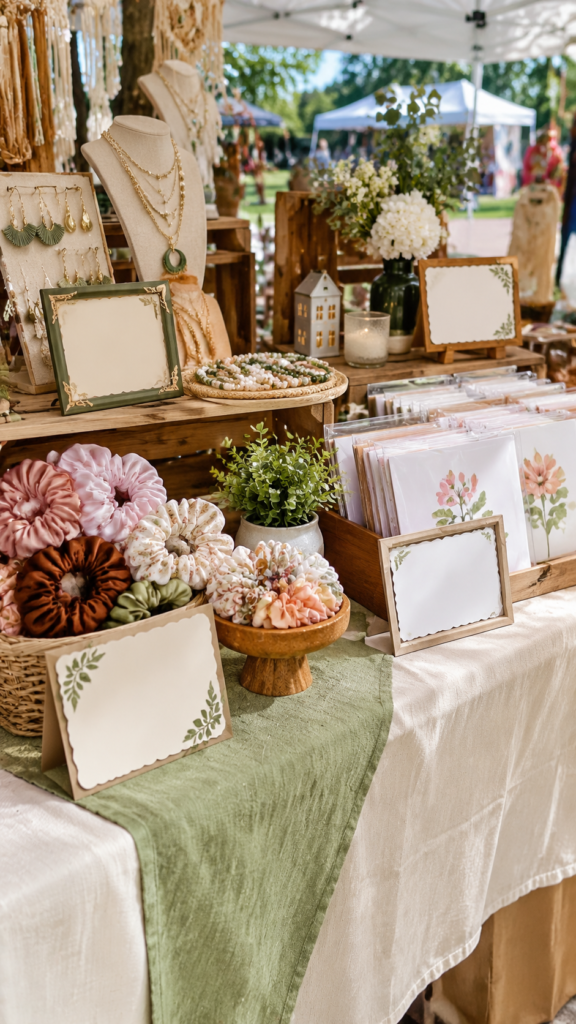
When several types of handmade products are arranged on one table, customers may find it difficult to identify where one category ends and another begins.
Small category signs help divide the display into clear sections, making it easier to browse without repeatedly asking the seller where particular items are located.
Use dollar-store mini frames, small wooden sign blanks or folded cardstock stands as the bases. Create headings such as “Jewellery,” “Hair Accessories,” “Greeting Cards,” “Home Accessories” or “Personalised Gifts,” depending on what you sell.
Cut the lettering from adhesive vinyl and apply it to smooth sign surfaces, or use your Cricut to cut the headings from contrasting cardstock and place them inside photo frames.
Consistency makes the display easier to follow. Use the same sign size, lettering style and general layout across the different categories.
Keep the words short and readable, and position each sign directly beside the products it identifies.
Before making the complete set, arrange a sample sign among your products to check whether its size and height are suitable for the display.
What you need:
- Dollar-store mini frames, wooden sign blanks or small easels
- Adhesive vinyl or cardstock
- Cricut cutting machine, compatible mat and Fine-Point Blade
- Transfer tape (for adhesive vinyl)
- Weeding tool
- Paper glue or double-sided tape (if using cardstock)
A detail worth knowing: Category signs should help customers navigate the display, not compete with the products for attention.
Avoid lengthy descriptions and decorative lettering that is difficult to read. Also, choose stable stands that will remain upright when customers handle items nearby.
Personalised organisers can make useful presents for people setting up a new home, office or study space. More handmade present ideas are available in 33 Cricut Projects for Beginners That Make Great Personalized Gifts.
Window, Light and Decorative Projects
21. Frosted Window Privacy Bands

Street-facing windows can make a room feel exposed, particularly when people walking past can see directly inside.
Frosted adhesive vinyl offers a way to cover a selected section of glass while still allowing daylight through. For this project, cut a horizontal band with a simple border, geometric pattern or small decorative details, then apply it across the lower part of a suitable window.
Measure the glass carefully and decide how much coverage you want before cutting. Leave enough space around the edges to keep the design balanced, and use a smooth, clean glass surface for application.
A long design may be easier to position when divided into manageable sections, but line up the pieces carefully to avoid visible gaps or uneven joins.
What you need:
- Compatible frosted adhesive vinyl
- Cricut machine, cutting mat and Fine-Point Blade
- Weeding tool and transfer tape, if recommended for the vinyl
- Ruler or measuring tape and a scraper
A detail worth knowing: Frosted vinyl provides visual screening, not guaranteed privacy.
Shapes and movement may still be visible through it, and visibility can change when the room is illuminated at night.
For sensitive areas, use proper blinds or curtains as well. Check that the vinyl is suitable for the type of glass and intended application.
22. Removable Window Silhouette Sets
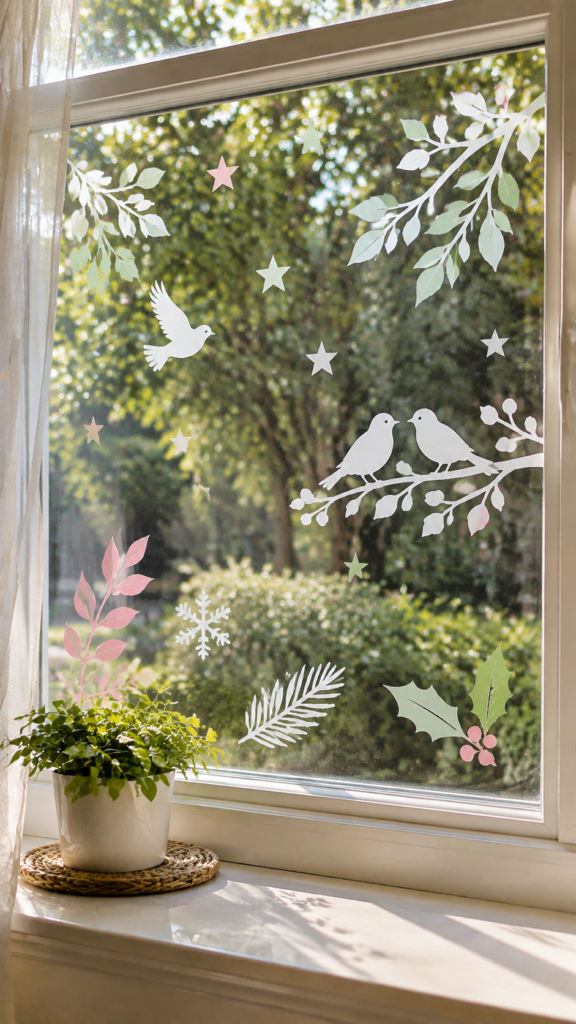
Seasonal window decorations can be enjoyable, but scraping permanent stickers from glass after a celebration is an unnecessary chore.
Removable window-compatible vinyl makes it possible to create silhouettes that can be taken down when the season changes. Try a small set of leaves, stars, snowflakes, birds or simple animal shapes that can be arranged across a window.
Choose designs with broad shapes and open spaces rather than intricate details. Tiny cutouts can be difficult to weed, and narrow points may lift when the vinyl is removed.
Measure the available glass area, cut a few different sizes and test one design on the window first.
This is one of the simpler Cricut projects for beginners using dollar store items, provided the vinyl is genuinely removable and suitable for glass.
What you need:
- Removable adhesive vinyl labelled as suitable for windows
- Cricut machine, cutting mat and Fine-Point Blade
- Weeding tool and transfer tape, if required
- Clean cloth and ruler
A detail worth knowing: Removable vinyl is not automatically reusable. Its ability to come off cleanly or be repositioned depends on the product, the glass surface and how long it has been applied.
Follow the manufacturer’s removal instructions and test a small piece first.
23. Faux Stained-Glass Suncatchers
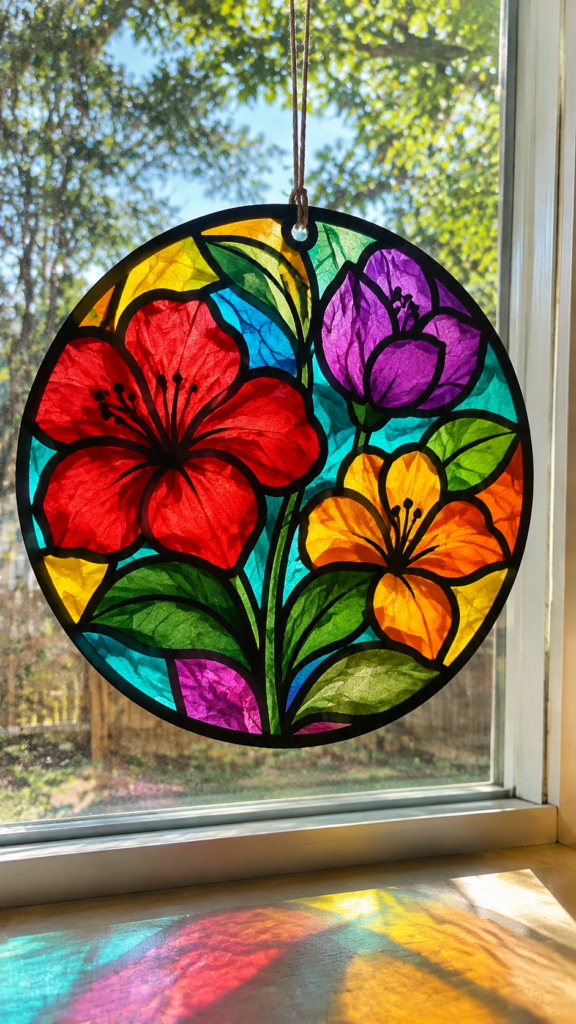
Plain windows can look more colourful with a suncatcher, but genuine stained glass requires specialised materials and techniques.
This paper-and-acetate version creates a similar visual effect without glass cutting or soldering.
Cut a decorative frame with open sections from cardstock, place coloured translucent tissue paper behind the openings, and use a suitable clear acetate sheet as the supporting layer.
The Cricut cuts the frame and its openings; the coloured sections are positioned and attached by hand. Keep the frame wide enough to support the tissue paper, especially around narrow corners.
Test the acetate separately before using it because not every plastic sheet is suitable for every Cricut machine or blade. A material being sold at a dollar store does not automatically mean it is machine-compatible.
What you need:
- Cardstock
- Translucent tissue paper in different colours
- Clear acetate confirmed as compatible with your machine
- Cricut machine, appropriate blade and mat
- Glue or double-sided tape
- Scissors and a ruler
A detail worth knowing: Do not assume that thick transparency sheets, laminating pouches or packaging plastic can be cut safely with a Fine-Point Blade.
Check Cricut’s current material guidance for your machine, blade and material thickness. Keep the finished decoration away from heat sources.
Children can help organise their own spaces with simple labelled boxes, book markers and craft-storage containers. 35 Easy Cricut Projects for Kids has more age-appropriate ideas.
24. Decorative LED Lantern Sleeves
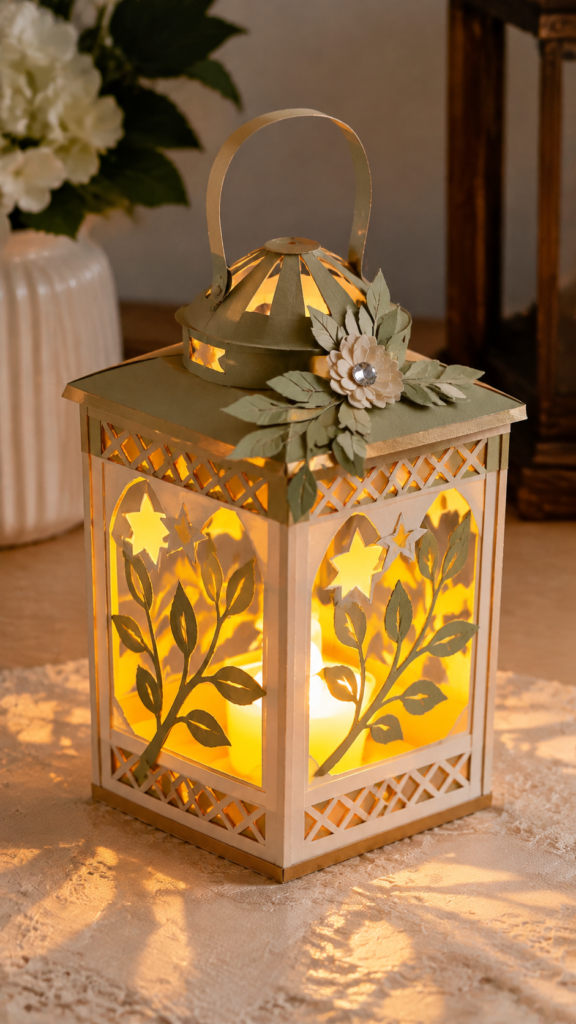
Battery-operated LED tea lights can make inexpensive dollar-store lanterns look more personal. Instead of replacing the lantern, create a removable cardstock sleeve with cut-out stars, leaves, hearts or geometric patterns.
The openings allow the LED light to show through, while the paper adds colour and a decorative finish.
Measure the lantern’s outside circumference and height, then create a sleeve that fits without covering its ventilation openings or interfering with the battery compartment.
Cut the design into cardstock and join the edges with a small overlap or suitable adhesive.
Test the sleeve on the lantern before decorating several of them, since lantern sizes and shapes can vary.
What you need:
- Dollar-store lantern or suitable container
- Cardstock
- Cricut machine, cutting mat and Fine-Point Blade
- Glue or double-sided tape
- Battery-operated LED tea light
A detail worth knowing: Use LED lights only. Never place paper or cardstock around a candle with an exposed flame, even when the paper has decorative openings.
Check the LED light’s fit and keep access to its switch and battery compartment clear.
25. Layered Window Scene Panels
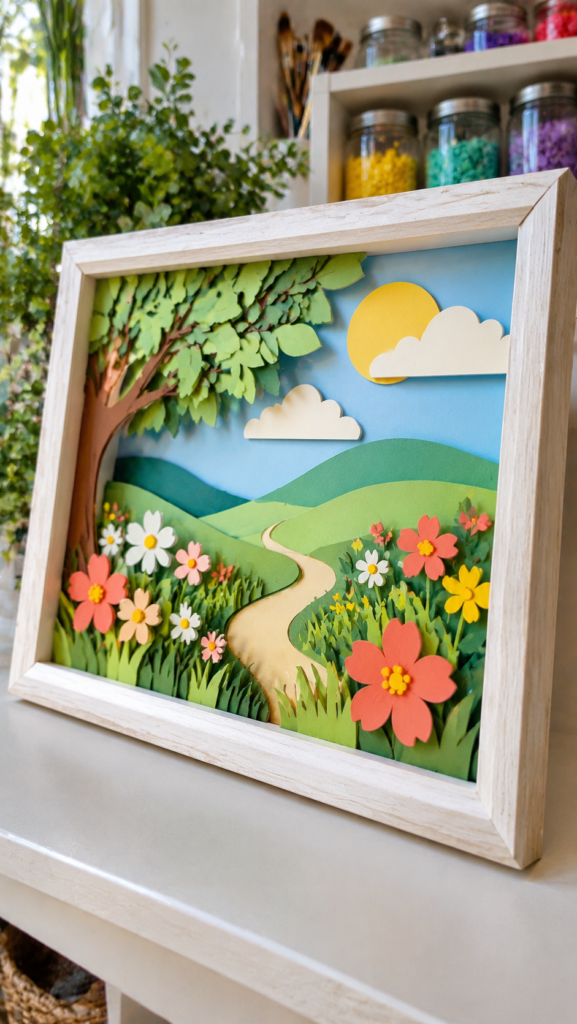
Creating a layered scene does not always require a deep shadow box. A standard dollar-store picture frame can hold a simpler arrangement of cardstock silhouettes that gives a little depth when viewed through the glass.
You could make a garden with flowers in the foreground, a skyline with buildings at different distances, or a landscape with hills and trees.
Measure the frame’s visible area and cut each layer slightly smaller than the space available. Place small spacers between the layers so the shapes do not sit directly on top of one another.
Keep the foreground details distinct from the background, and avoid making every layer equally busy; otherwise, the scene can become difficult to read.
The Cricut handles the shapes, while the spacing and assembly are done by hand.
What you need:
- Dollar-store picture frame
- Cardstock in complementary colours
- Cricut machine, cutting mat and Fine-Point Blade
- Foam adhesive dots or thin spacers
- Glue or double-sided tape
- Ruler and craft knife, if needed for trimming
A detail worth knowing: Check the frame’s internal depth before choosing thick foam spacers. The layers must fit without pressing against the glass or bending the cardstock.
Seasonal storage becomes easier to manage when decorations and supplies are clearly labelled before being packed away. 31 Easy Cricut Projects for Christmas offers more festive projects to make.
Painting, Stencilling and Material Experimentation
26. Stencilled Cotton Apron
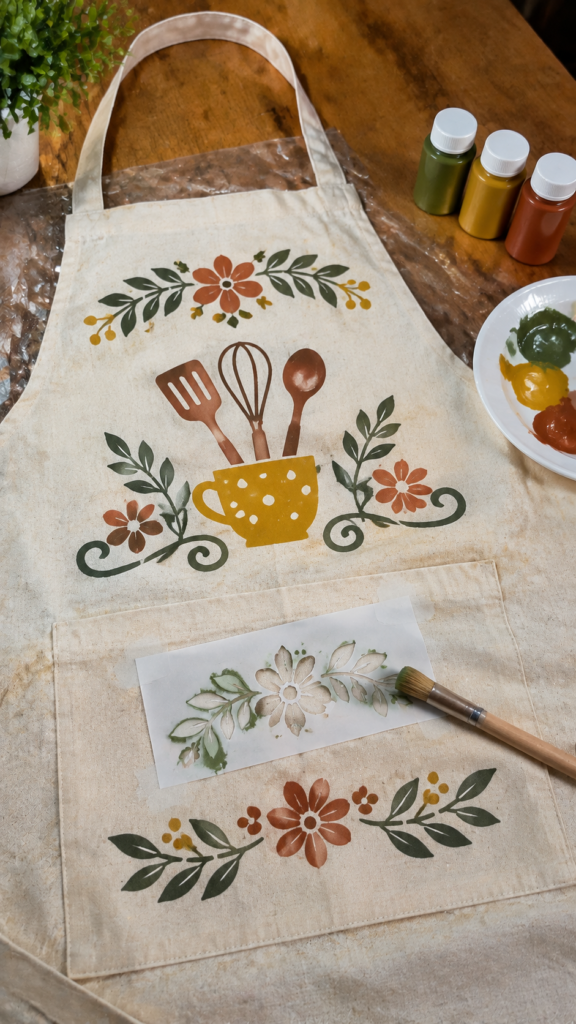
Cooking, gardening and messy craft sessions can leave plain aprons looking rather ordinary. A simple stencil lets you add a name, border, kitchen motif or small illustration without needing to draw the design by hand.
Cut the stencil from suitable stencil film, position it on a plain cotton apron and apply fabric paint with a stencil brush or sponge.
Wash and dry the apron first if the fabric-care instructions recommend it, then smooth it out on a protected work surface.
Press the stencil edges down firmly, especially around lettering and small shapes where paint can seep underneath.
Apply paint in light layers rather than loading the brush heavily. Remove the stencil carefully while following the paint and stencil material instructions.
What you need:
- Plain cotton apron
- Compatible stencil film
- Cricut machine, cutting mat and Fine-Point Blade
- Weeding tool
- Fabric paint and stencil brush or sponge
- Protective card or plastic to place inside the apron
A detail worth knowing: Use stencil film intended for the surface and check its machine compatibility. Cricut’s stencil-film instructions list different material options for different machine families, with some stencil films requiring a mat.
Fabric paint also needs to dry and cure according to its manufacturer’s directions before the apron is washed.
27. Patterned Cotton Tea Towels
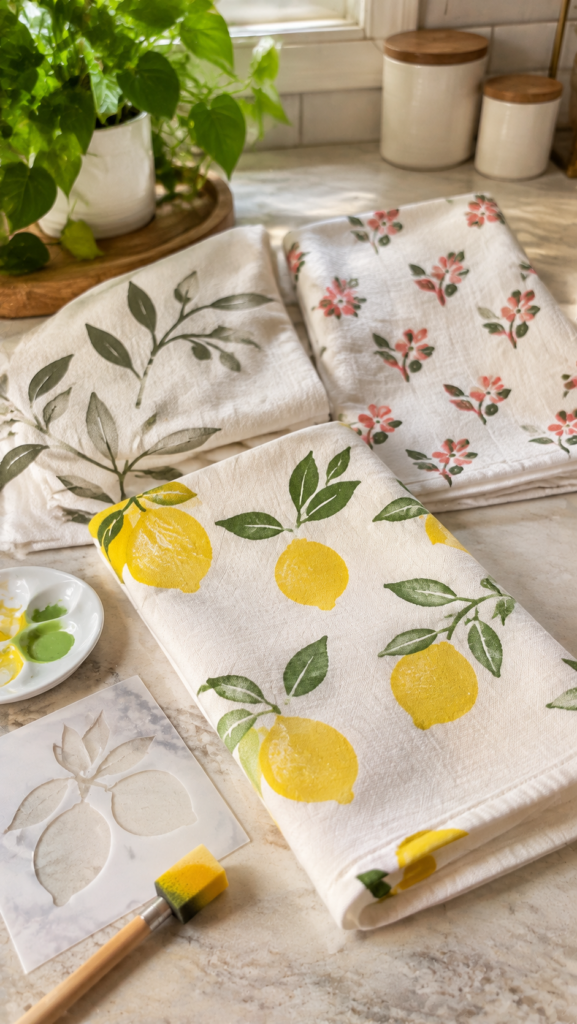
Plain tea towels are useful, but repeating patterns can make them easier to recognise in a busy kitchen or give them a coordinated look when displayed together.
Instead of applying separate vinyl shapes, cut a reusable stencil with a small repeating motif, such as lemons, leaves, simple flowers or kitchen utensils. Position the stencil at intervals and apply fabric paint to create a pattern across the towel.
Start with a towel that has a reasonably smooth surface, since deep loops and raised textures can make it harder to get clean stencil edges.
Secure the fabric so it does not shift while painting, and use a light amount of paint to reduce bleeding beneath the stencil. Allow each section to dry as directed before moving or folding the towel.
What you need:
- Plain cotton tea towel
- Suitable reusable stencil material
- Cricut machine, mat and compatible blade
- Fabric paint
- Stencil brush or sponge
- Masking tape or other suitable method for securing the fabric
A detail worth knowing: A painted tea towel should not be used until the paint has been fully dried and cured according to its manufacturer’s instructions.
Check the paint label for fabric suitability, heat-setting requirements and washing guidance. Keep painted areas away from direct food contact, particularly when the paint is not specifically approved for that use.
28. Stencilled Mini Wooden Signs
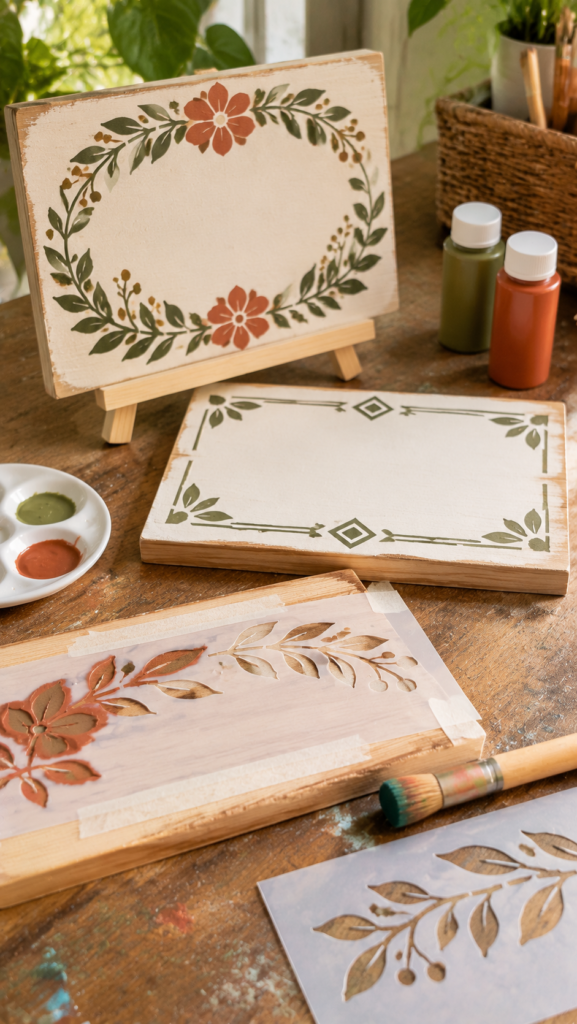
Small wooden blanks are often sold as unfinished craft supplies, but their rough surfaces can make painted lettering look untidy.
A stencil gives you more control over the layout of a short word, name or simple design. Cut the stencil with your Cricut, place it on the prepared wood and apply paint carefully to create a small sign for a desk, shelf, market stall or gift display.
Check the wood before applying the stencil. Light sanding can smooth raised grain and splinters, while a suitable primer or base coat may help create a more even painting surface. Let any preparation coat dry fully.
Press the stencil down around the design, then use a nearly dry brush or sponge and build up the colour gradually.
Heavy paint can seep beneath the stencil, particularly where the wood has grooves or an uneven grain.
What you need:
- Unfinished wooden sign blank
- Suitable stencil film
- Cricut machine, cutting mat and Fine-Point Blade
- Weeding tool
- Fine sandpaper, where needed
- Paint and stencil brush or sponge
A detail worth knowing: Stencil film can lift paint or leave residue on some finishes, so test it on an inconspicuous part of the blank first. Very rough or deeply textured wood may not give clean lettering, even when the stencil is cut accurately.
Halloween decorations, costume accessories and treat supplies can also benefit from labelled storage. See 33 Easy Cricut Projects for Halloween for more seasonal ideas.
29. Handmade Foam Printing Stamps
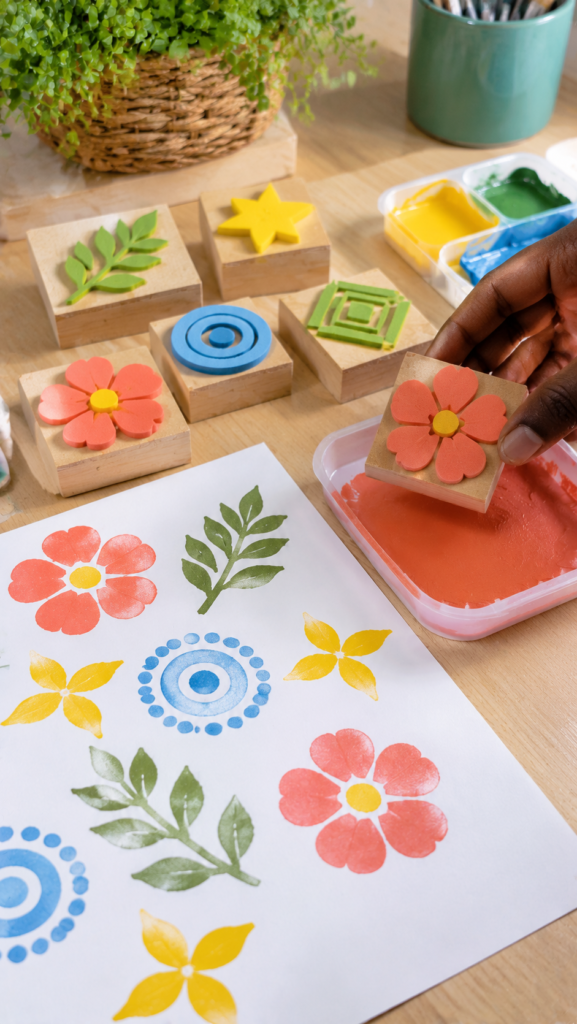
Repeating the same design by hand can be time-consuming, especially when decorating several sheets of paper, gift tags or handmade cards.
Foam printing stamps offer a simple way to repeat a motif: cut a bold shape from compatible craft foam, attach it to a firm backing, apply a thin layer of paint and press it onto paper. Circles, leaves, stars and other uncomplicated shapes are good starting points.
The backing gives the foam something firm to hold, making it easier to press the design evenly. Keep the shapes large and avoid narrow lines or tiny details, which may not transfer clearly.
Test the stamp on scrap paper first to find the right amount of paint and pressure. Clean the foam according to the material and paint instructions before the paint dries.
What you need:
- Cricut-compatible craft foam
- Firm backing, such as a small piece of sturdy cardstock or suitable craft board
- Cricut machine and compatible blade
- Strong adhesive suitable for foam and the backing material
- Paint and a shallow tray or sponge
- Scrap paper for testing
A detail worth knowing: This is not a standard Fine-Point Blade project. Cricut’s craft-foam instructions specify compatible machine families and a craft-foam material setting; the required blade and mat depend on the machine and foam being used.
Check the current instructions for your exact model, and test the foam before cutting the full design.
Many organising projects can be made with adhesive vinyl, cardstock or other materials that do not require a heat press. 21 Cricut Projects for Beginners Without a Heat Press has more options.
Conclusion
The real value of using dollar-store supplies is learning to recognise what a material can become beyond its original purpose.
A picture frame can become a layered display, plain glass can take on a decorative finish, and an inexpensive piece of fabric can become a personalised apron.
The difference often comes down to choosing the right cutting method, understanding the material and knowing when a project needs hand finishing.
You do not have to buy everything on one shopping trip. Look at the craft supplies available, consider which ones suit your Cricut machine, and choose projects that make sense for what you want to create.
A little material testing can save wasted supplies and give you a better result than rushing into a complicated design.