See what your Cricut can make beyond everyday crafts with 27 cricut projects with high profit margins and fresh ideas for your next product range.
A Cricut machine opens up more selling opportunities than making personalised shirts, mugs and decals.
The products you choose can make a big difference to how much you earn, especially when you move beyond common crafts and find items customers need for specific purposes. Some projects also allow you to produce several pieces from one design, saving time on repeat orders.
This collection of cricut projects with high profit margins brings together less obvious products with practical uses and potential buyers.
You’ll find ideas to consider for your next product range, along with details that can help you work out whether each one is worth making and selling.
Want to start selling Cricut crafts without feeling overwhelmed? These 23 Easy Cricut Crafts To Sell For Beginners are a great place to begin.
Understanding Profit Margins When Selling Cricut Products
Profit margin helps you measure how much money your business keeps from each sale after covering the costs involved.
It is an important figure to understand before setting prices because a product selling for a good amount does not necessarily mean you are making a good return.
For Cricut sellers, the calculation should account for more than the material placed on the cutting mat. Consider these expenses:
Profit margin shows how much of the selling price remains as profit, expressed as a percentage. It is different from markup, which is the amount added to the cost of making a product to arrive at its selling price.
A product can have a high markup but a lower profit margin once all its costs are considered.
For Cricut sellers, the calculation should account for more than the material placed on the cutting mat. Consider these expenses:
- Materials: Vinyl, cardstock, transfer tape, blanks, adhesive, packaging inserts and other supplies used for the finished product.
- Labour: Time spent preparing the design, cutting, weeding, assembling, personalising and checking the order. Your own working time should have a cost, even when you do not pay yourself a regular wage.
- Packaging: Boxes, protective sleeves, labels and other materials needed to prepare the product for delivery.
- Selling fees: Marketplace commissions, listing charges and payment processing fees. These depend on the platform and the seller’s location.
- Overheads: Equipment maintenance, replacement blades, electricity, internet, workspace costs and other expenses involved in running the business.
Once you have recorded these costs, you can work out how much an order contributes to your business. For a simple estimate, use:
Profit margin = (Selling price − Total costs) ÷ Selling price × 100
For example, imagine you sell a personalised product for 30 currency units. The materials cost 5 units, your labour costs 8 units, packaging costs 2 units, selling fees are 3 units, and you allocate another 2 units towards business overheads.
Your estimated profit is 10 units.
This means approximately 33.3% of the selling price remains as profit after the costs included in this example. The figures are illustrative, not a typical margin or recommended selling price for Cricut products.
One detail worth remembering is that gross profit margin and net profit margin are not the same. Gross profit generally considers the direct costs of producing the item, while net profit takes account of wider business expenses as well.
For a small Cricut business, tracking both can help you see whether a product is inexpensive to produce and whether the business is making money overall.
A product with low material costs may still be a poor choice when it requires lengthy weeding, several rounds of personalisation or complicated assembly.
On the other hand, a product that takes longer to make initially may become more worthwhile when you can reuse a tested design for repeat orders. Etsy’s seller guidance also recommends reviewing materials, labour, overheads and selling fees when setting prices.
Before adding a project to your product range, calculate its costs using the time and supplies required for an actual finished sample.
This gives you a more realistic picture of its earning potential than judging it by appearance or material price alone.
Personalised products can make your shop stand out. See these 21 Personalized Cricut Items People Actually Buy.
Cricut Projects With High Profit Margins
Custom Event Products with a Higher-Value Finish
Custom event stationery and decorative pieces can be worthwhile Cricut projects with high profit margins when customers want coordinated designs, precise personalisation and carefully finished details.
Wedding planners, event stylists and couples may order matching products in batches, giving you opportunities to charge for design work, custom sizing and assembly as well as materials.
1. Custom Envelope Liners for Wedding Invitations
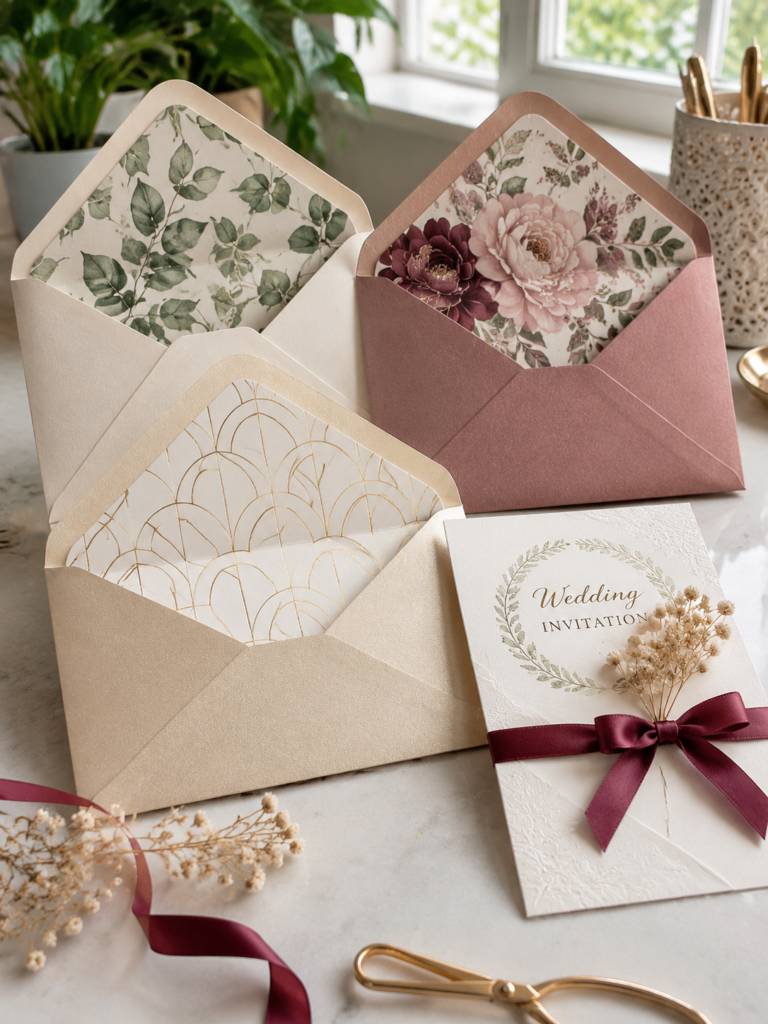
Custom envelope liners add a decorative finish to wedding invitations, making even a simple envelope feel more considered.
You can create them with patterned paper, metallic cardstock or layered designs that match the couple’s wedding colours and invitation style.
Use your Cricut to cut each liner to fit the chosen envelope size, then offer designs that coordinate with invitation cards, RSVP envelopes and other stationery.
Couples may order them as part of a complete wedding invitation suite, while wedding stationers can purchase them for their own clients.
For accurate results, measure the envelope’s interior and create a test liner before cutting a full batch. Leave enough room around the flap and edges so the liner fits neatly without interfering with the envelope’s closure.
Preparing for your next market day? Find products customers may love in these 20 Cricut Products to Sell at Craft Fairs.
2. Layered Wedding Ceremony Programme Fans
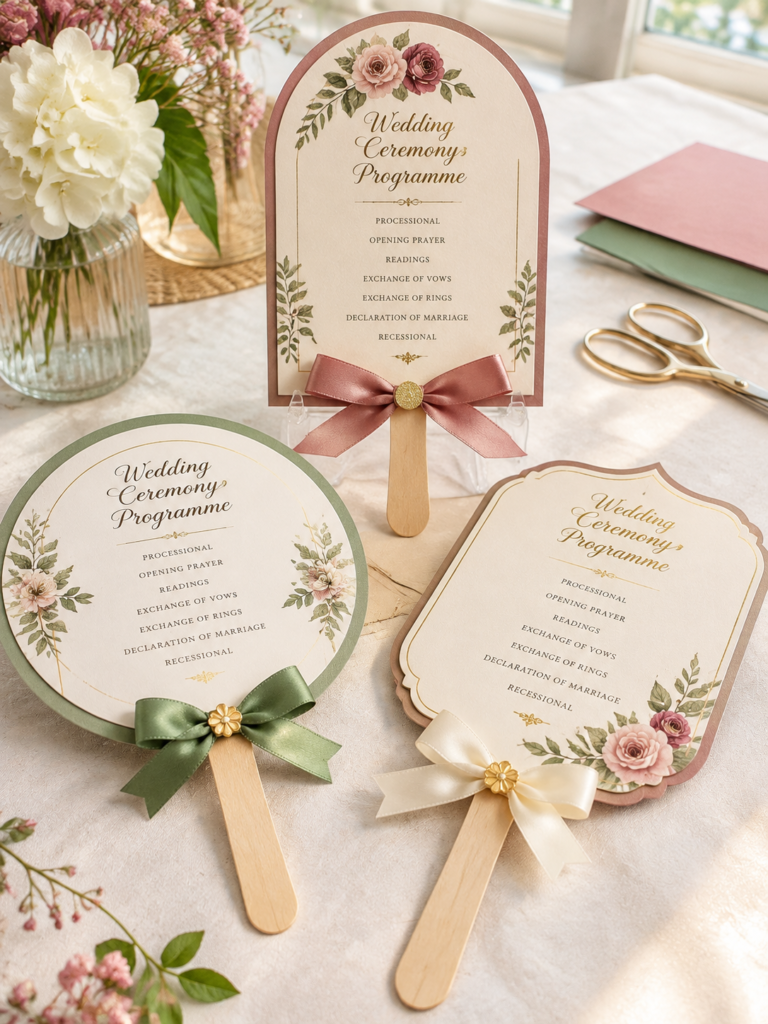
Wedding programme fans combine the ceremony schedule with a handheld fan, making them useful for outdoor weddings and warm-weather venues.
Cut the handle from sturdy cardstock and attach a printed programme featuring the order of service, names of the wedding party, readings and other ceremony details.
You can offer different shapes, such as rounded, paddle-style or arch-shaped fans.
The printed content needs to be supplied and approved before production, particularly where names, ceremony details or readings are involved.
Choose cardstock that can support the printed sheet without bending easily, and test the handle attachment to make sure the fan stays together when held.
Want to create without spending much on supplies? These 29 Cricut Projects for Beginners Using Dollar Store Items show what a small budget can achieve.
3. Personalised Place-Name and Menu Combinations
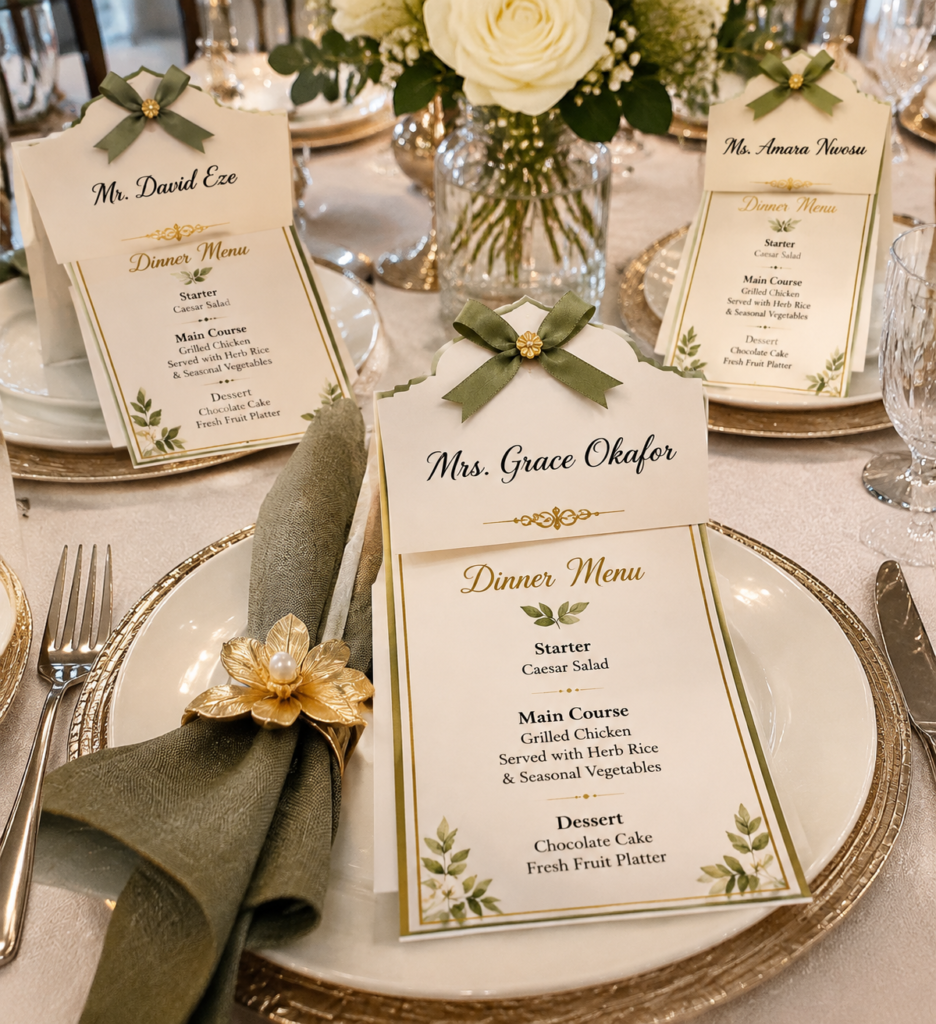
Combine each guest’s place card with a small menu showing the dishes being served at the event.
The guest’s name can be cut from cardstock or added as a separate layer, while the menu is printed on a coordinating card. This gives wedding planners and event stylists one coordinated table item instead of two separate pieces.
Offer options for different menu layouts, including multi-course dinners and events with dietary choices.
Before production, confirm the final guest list, name spellings and menu wording. Since every card is personalised, late changes can mean recutting or reprinting individual pieces.
Dreaming of running a craft business from home? Explore these 35 Profitable Cricut Projects You Can Make From Home.
4. Individual Seating-Chart Name Strips
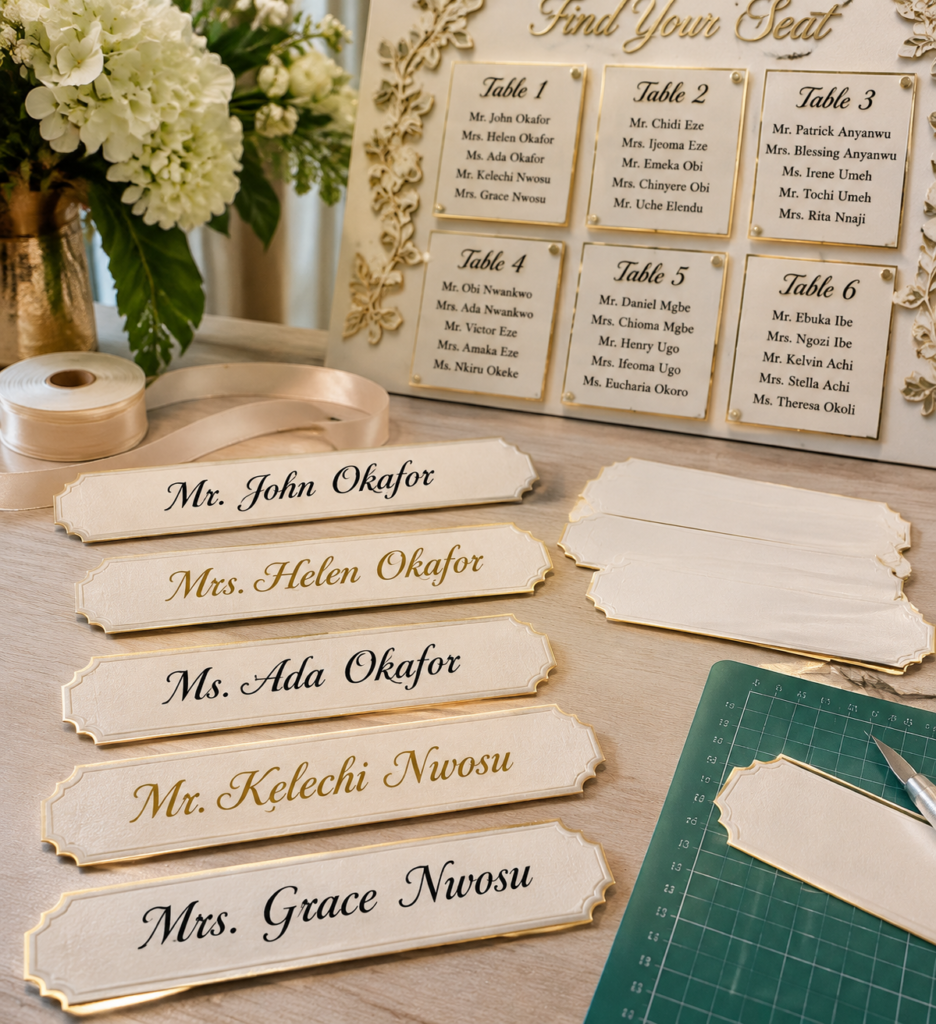
Seating-chart name strips are individual cardstock or vinyl names designed to be arranged on a larger display board, mirror or sign.
Wedding planners can use them to create a seating plan without having to order a completely finished chart from one supplier.
You can sell the names as a complete guest list or in smaller groups arranged by table number. For vinyl versions, confirm the display surface before choosing the material, as not every adhesive is suitable for every board or painted finish.
Ask for the approved guest list and table assignments before cutting, especially for large weddings where a single spelling change can affect several pieces.
Not sure which creations are worth selling? Take a look at these 33 Cricut Projects That Actually Sell Well.
5. Custom Dance-Floor Monogram Stencils
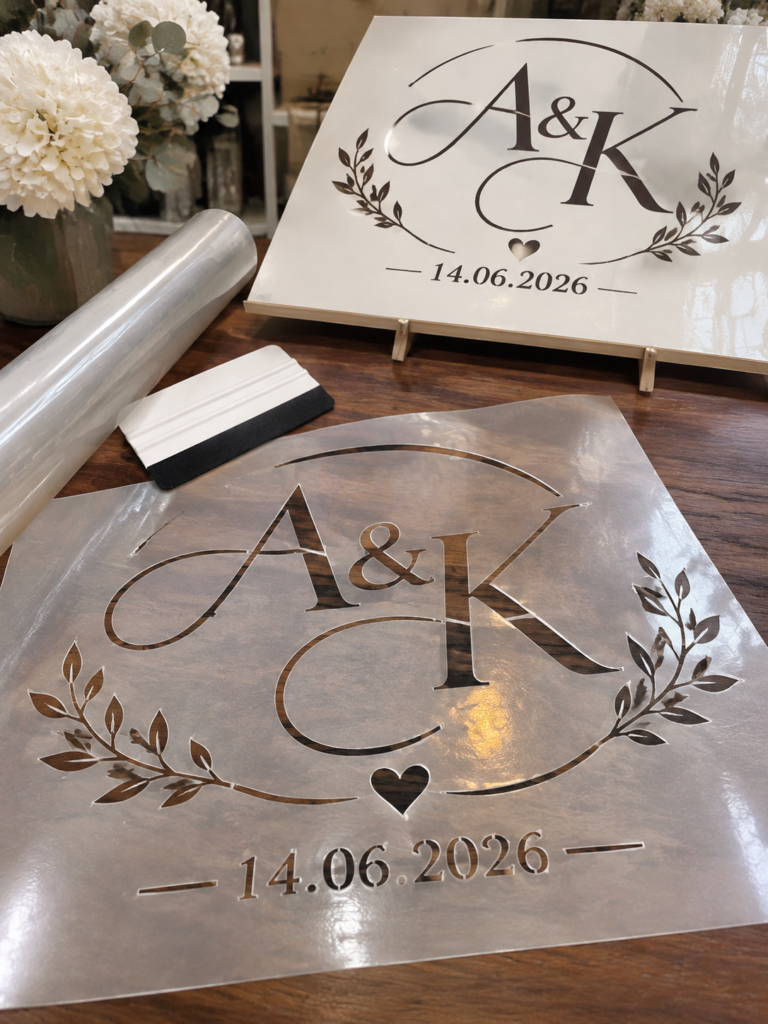
Event decorators can use custom monogram stencils to apply a couple’s initials, wedding date or decorative design to a dance floor.
Cut the design from a suitable stencil material, leaving the appropriate bridges in letters such as A, O and P so that the centres remain connected during application.
The stencil material must be compatible with the decorator’s chosen application method, whether it involves temporary paint or another floor-safe product.
Test it on a sample of the actual floor finish first to check that it stays in position and can be removed without leaving residue or damaging the surface.
Sell the stencil with clear dimensions and application guidance rather than assuming it will suit every venue.
Hoping to attract online buyers? These 33 Best Cricut Projects to Make and Sell Online offer ideas for your shop.
6. Mirror and Window Lettering for Event Venues
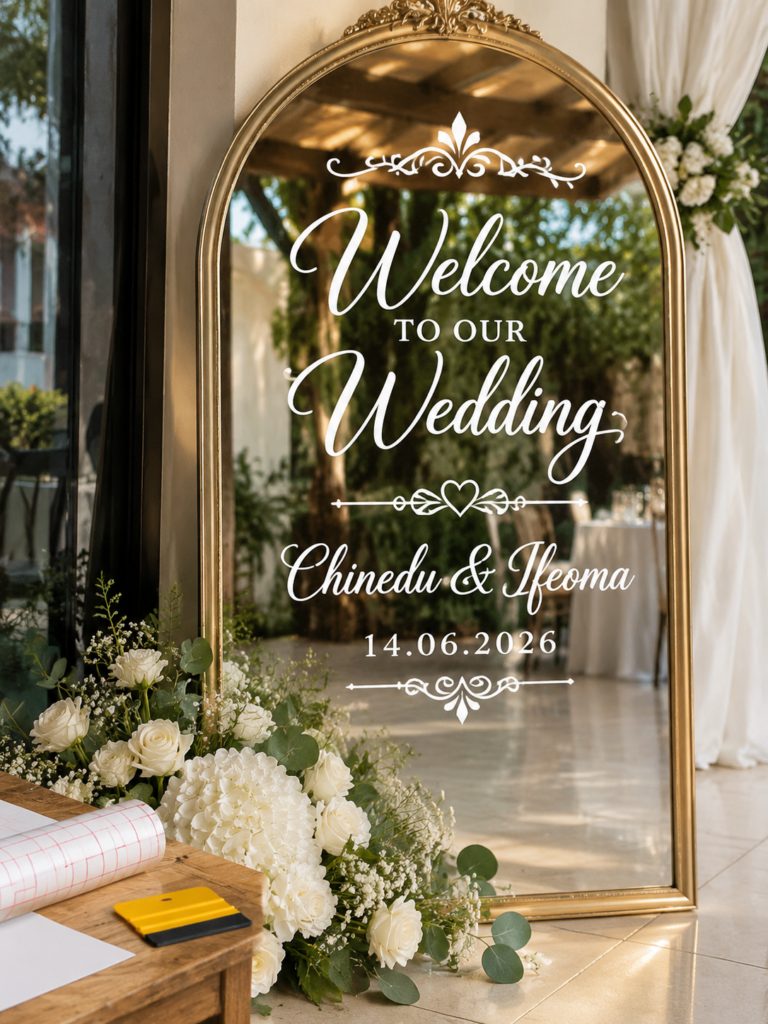
Create removable vinyl lettering for welcome messages, seating directions, wedding dates and other event signage on suitable mirrors or glass panels.
The designs can be supplied as ready-to-apply lettering or as separate words and decorative elements that an event stylist arranges on site.
Charge according to the design dimensions, lettering complexity and preparation involved. Fine lettering and small decorative details can be difficult to weed and transfer, so test the design at its intended size before producing the final version.
Also, confirm the type of glass and vinyl being used, and provide removal guidance to reduce the risk of damage or adhesive residue.
Need more ways to earn from your machine? Browse these 31 Easy Cricut Projects to Make and Sell for Extra Money.
7. Made-to-Size Favour Box Templates
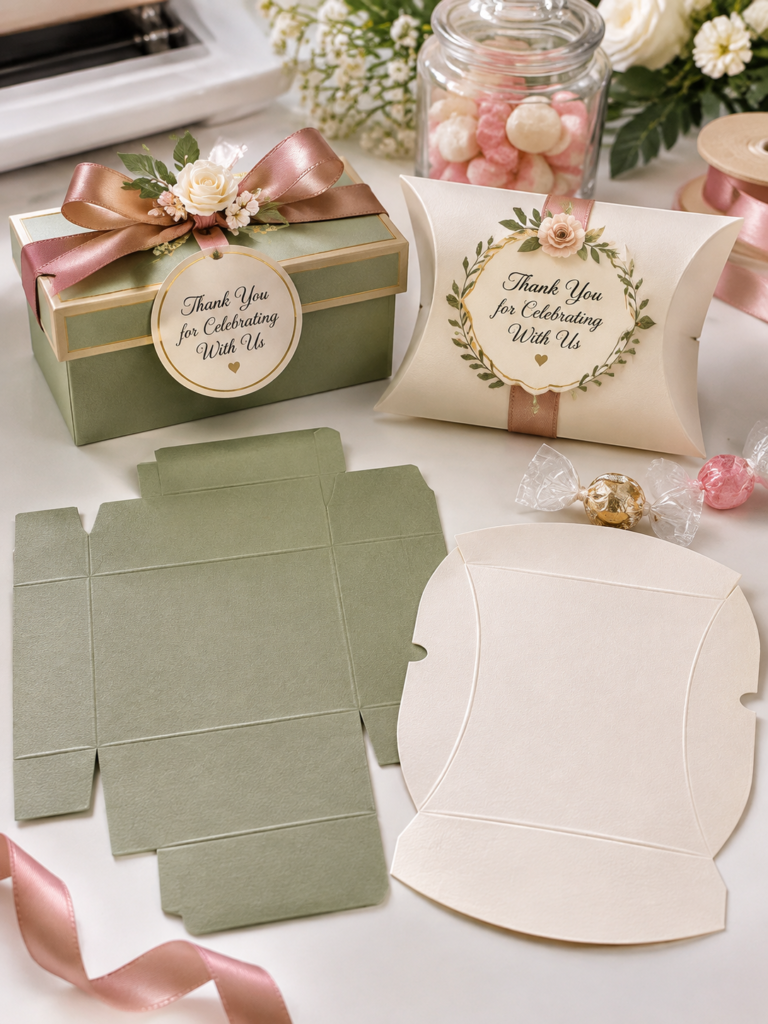
Made-to-size favour boxes give event planners and party suppliers packaging that fits their chosen gifts, sweets or small keepsakes.
You can create the cutting template, score lines and decorative panels for boxes in specific dimensions, then supply the finished boxes flat for assembly or sell the digital template where your design and licensing terms allow it.
The important part is getting the measurements right. Account for the thickness of the material, the size of the item going inside and the space needed for folds and tabs.
Make a complete sample before producing a batch, checking that the box closes securely and holds the intended contents without tearing at the folds.
Turn everyday storage needs into creative solutions. These 27 Easy Cricut Projects for Organizing Your Home are worth exploring.
8. Custom Event Photo-Display Overlays
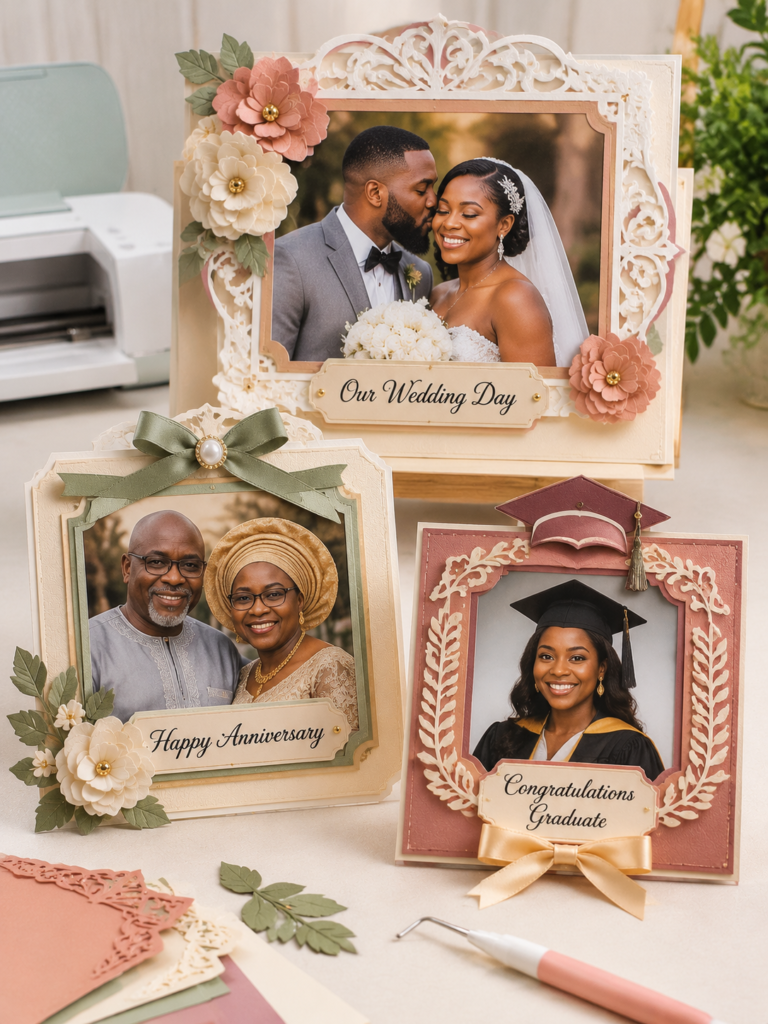
Create decorative cardstock frames and caption panels for displaying printed photographs at weddings, anniversaries, graduations and other celebrations.
For example, a display might feature a couple’s names and wedding date around a photograph, or a graduation year with a short message beneath the picture.
These pieces can be sold to event photographers, photo booth operators and planners who want a branded or themed presentation for their clients.
Design the openings around standard photo dimensions or offer custom sizing for specific print formats.
Leave enough clearance around the photograph so the frame does not cover important parts of the image, and test the backing or attachment method before supplying multiple pieces.
Give ordinary kitchen items a custom touch. Find inspiration in these 25 Easy Cricut Projects for Your Kitchen.
2. Products That Serve Other Small Businesses
Small businesses often need branded packaging, display materials and customer-facing stationery that match their products.
This creates opportunities to sell customised items in batches rather than relying entirely on one-off orders.
Some of these Cricut projects with high profit margins may become worthwhile when businesses reorder the same designs, provided you price the materials, production time and finishing correctly.
Have scraps left from previous projects? Put them to work with these 23 Cricut Projects You Can Make with Scrap Materials.
9. Branded Jewellery Display Cards
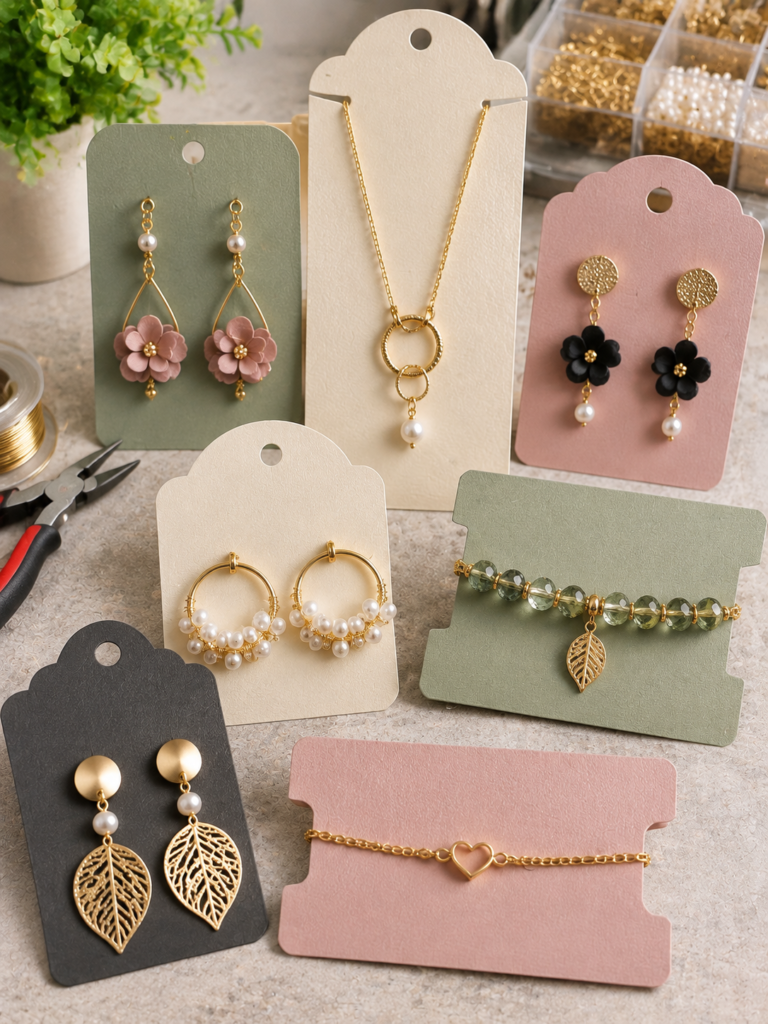
Create custom backing cards for jewellery sellers to display earrings, necklaces, bracelets and other small accessories.
Include the business logo, product name or care instructions, with holes or slots positioned to suit the actual jewellery.
Offer different card sizes and layouts for each product type. Test the holes with the jewellery before cutting a full batch to ensure the pieces sit securely without tearing the card.
Make celebrations more memorable with handmade details. Try these 20 Easy Cricut Projects for Birthdays and Parties.
10. Custom Packaging Insert Dividers
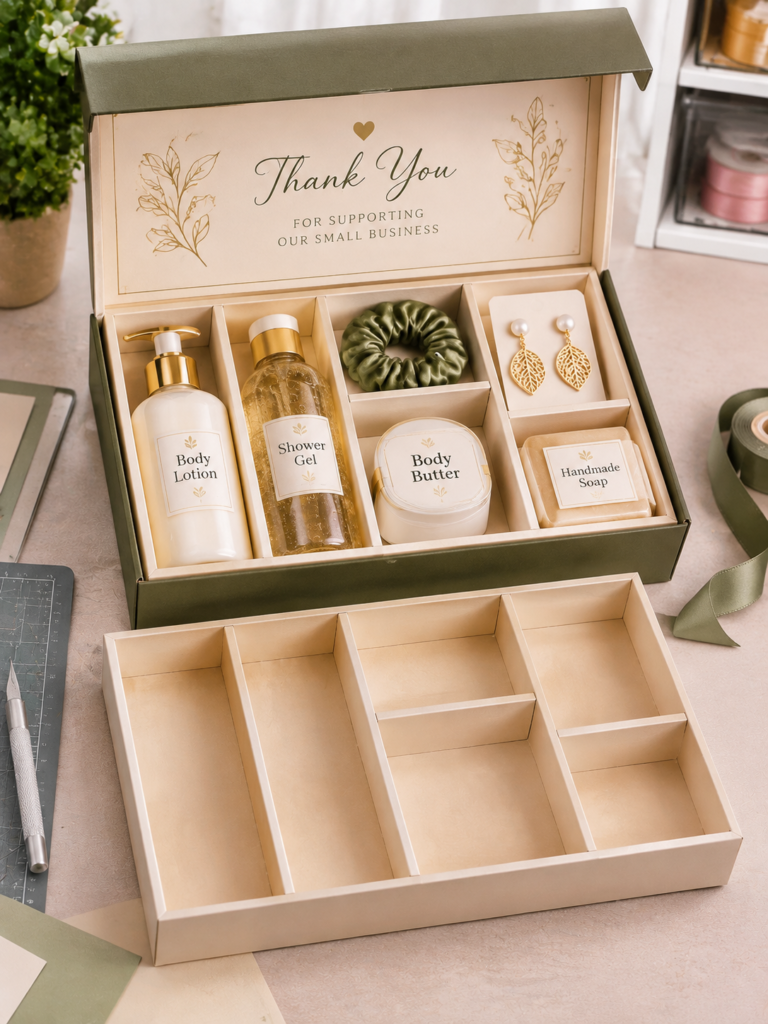
Packaging inserts keep products separated inside gift boxes, sample kits and multi-item orders.
Cut dividers from cardstock or another suitable material to create individual compartments for items such as cosmetics, handmade accessories or small gift products.
Measure the inside of the box and the products together, allowing enough clearance for easy packing and removal. A fitted sample is essential because even a small measurement error can make the insert unusable.
Looking for gifts people will treasure? These 31 Easy Cricut Projects for Gifts offer plenty of inspiration.
11. Reusable Logo Stencils for Small Businesses
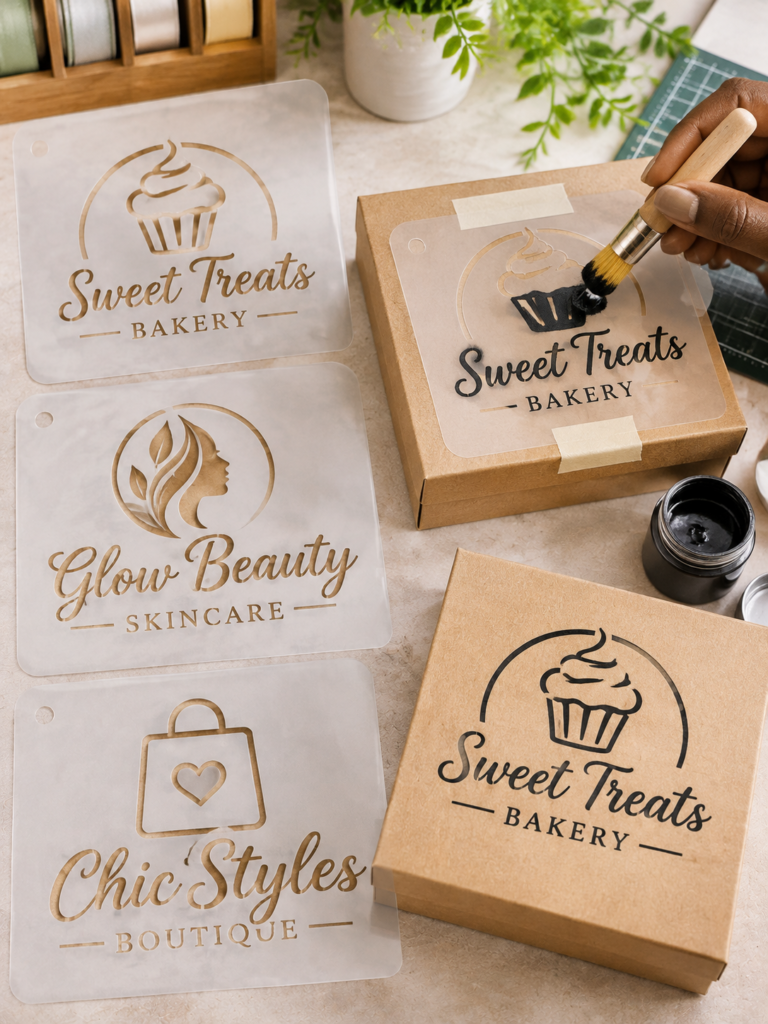
Produce reusable stencils featuring a business name, logo or simple graphic. Small businesses can use them to apply consistent branding to suitable packaging, signs, fabric projects or craft products.
Choose stencil material according to the intended surface and application method.
For intricate logos, simplify details that may detach during cutting, and check that the stencil remains intact after cleaning if it is intended for repeated use.
Need creative ideas for teenage girls? Take a look at these 30 Cute Cricut Projects for Teen Girls.
12. Custom Paint Masks for Sign Painters
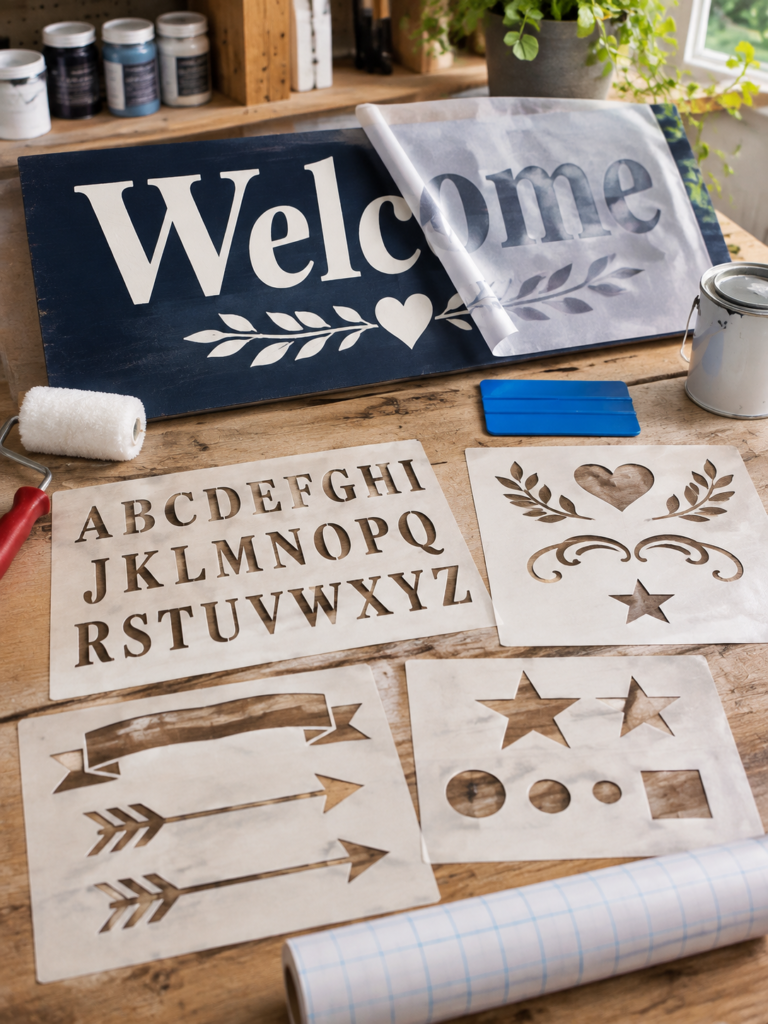
Sign makers use paint masks to create clean lettering, symbols and graphics on selected surfaces. You can cut custom masks from suitable adhesive stencil film, using the customer’s artwork and required dimensions.
The choice of film depends on the paint, surface texture and application process.
Test a sample to check that the edges stay in place during painting and that the mask removes cleanly without lifting the paint beneath it.
Plain spaces can become more personal with handmade details. Explore these 29 Easy Cricut Projects for Home Decor.
13. Ceramic Glazing Stencil Sets
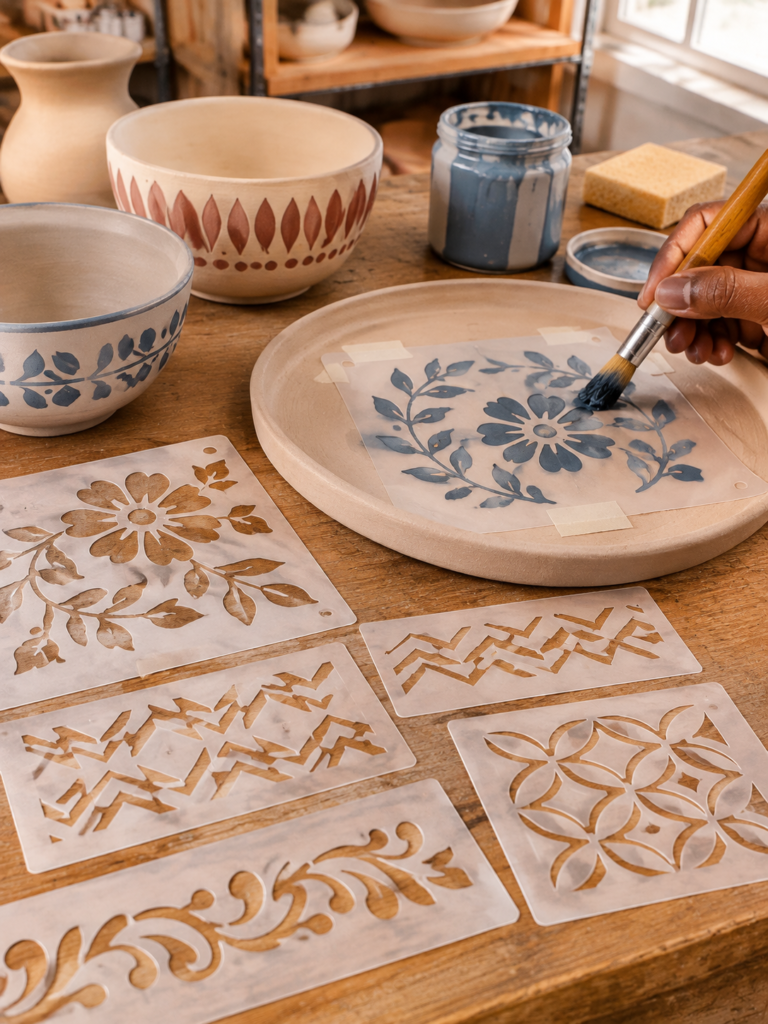
Pottery makers can use stencil sets to apply repeated decorative patterns to ceramic pieces during the glazing process.
Cut the designs from material suitable for the particular decorating technique, allowing potters to position motifs consistently on bowls, plates and other pottery.
These stencils are for use before firing and must be removed at the appropriate stage.
Never advertise ordinary Cricut-cut stencil material as kiln-safe; the material must not enter the kiln unless its manufacturer explicitly confirms that it is designed for that purpose.
14. Small-Batch Product Launch Presentation Kits

Put together coordinated presentation materials for independent brands introducing a new product. A kit might include a branded product information card, a launch announcement insert, a sample label and a small display card.
Each piece should have a clear purpose and follow the same visual identity.
You can offer different quantities for product launches, press packages or limited promotional campaigns, with pricing based on the number of pieces and the amount of custom design work involved.
Have cardstock but need fresh ideas? These 27 Easy Cricut Projects Using Cardstock are a great starting point.
15. Custom Loyalty Punch-Card Systems
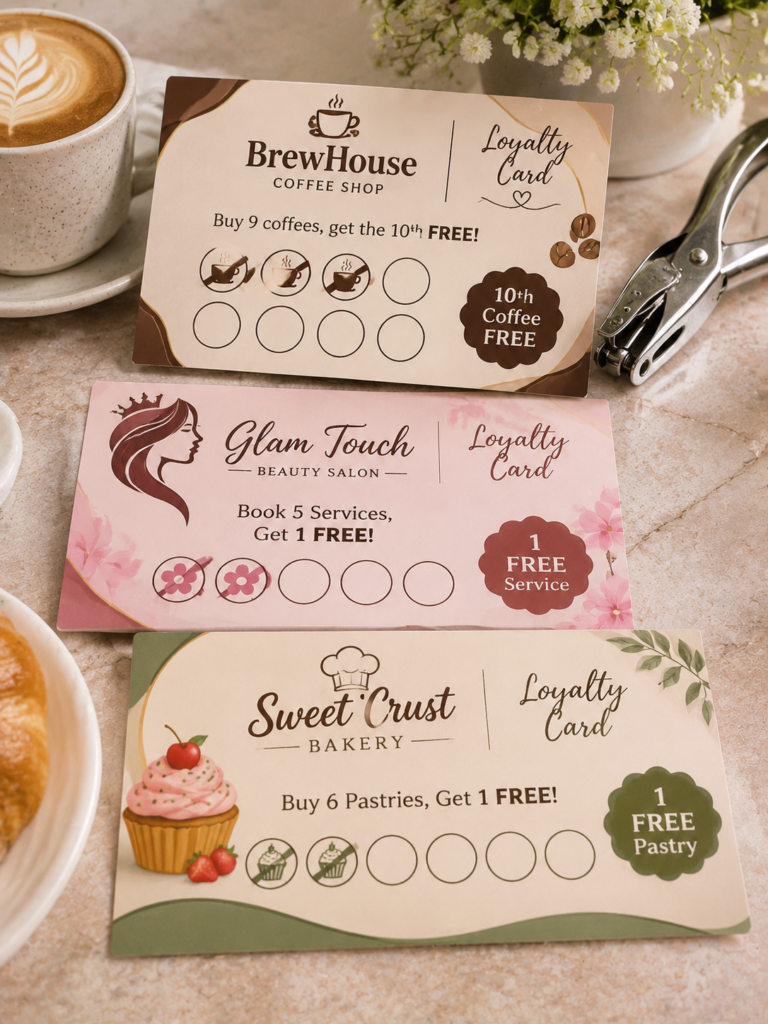
Create branded loyalty cards for cafés, salons, bakeries and independent retailers. Each card can include the business name, reward details and evenly spaced circles or boxes for recording customer visits or purchases.
The business should approve the reward conditions and number of visits before printing.
Use a layout that leaves enough room for the punch or stamp without damaging nearby text, and calculate the price based on the print quantity and finishing required.
16. Made-to-Measure Retail Display Backers
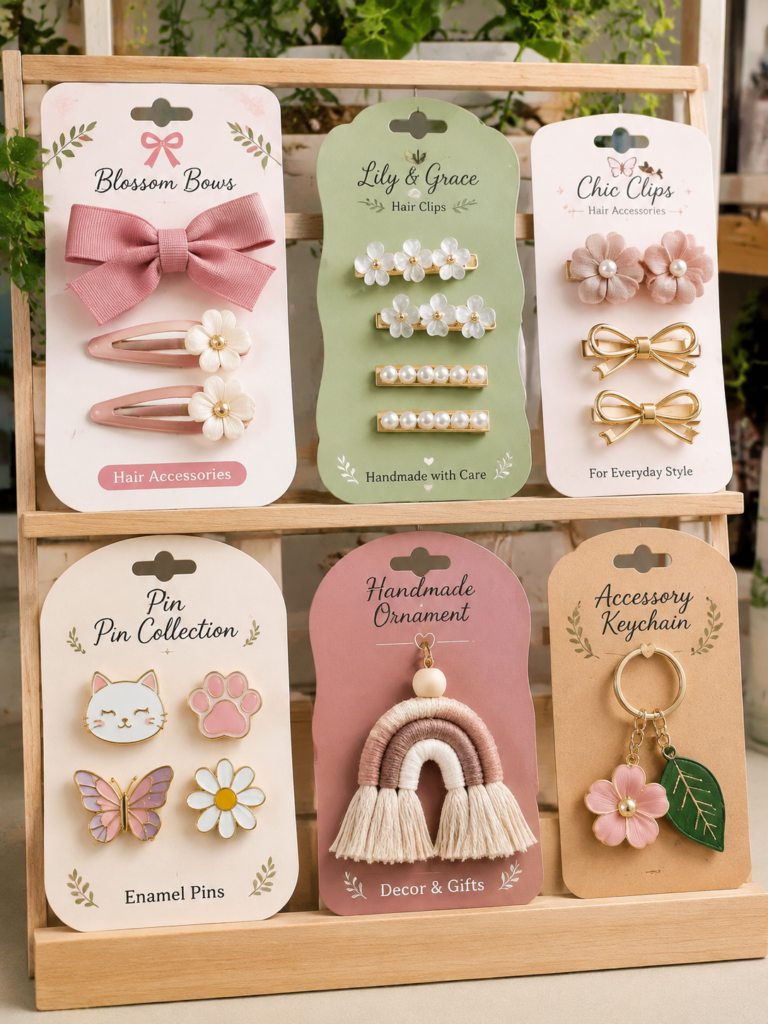
Retail display backers provide a neat background for products such as hair clips, enamel pins, handmade ornaments and small accessories.
Cut branded panels with the appropriate holes, slots or attachment points so products can be displayed consistently on shelves and market tables. Ask the seller for the exact product dimensions and preferred display method.
A backer designed for hanging earrings, for example, may not work for a product that needs to stand upright.
Curious about what you can create with Infusible Ink? Discover these 25 Easy Cricut Projects Using Cricut Infusible Ink.
17. Custom Product Sample Folders
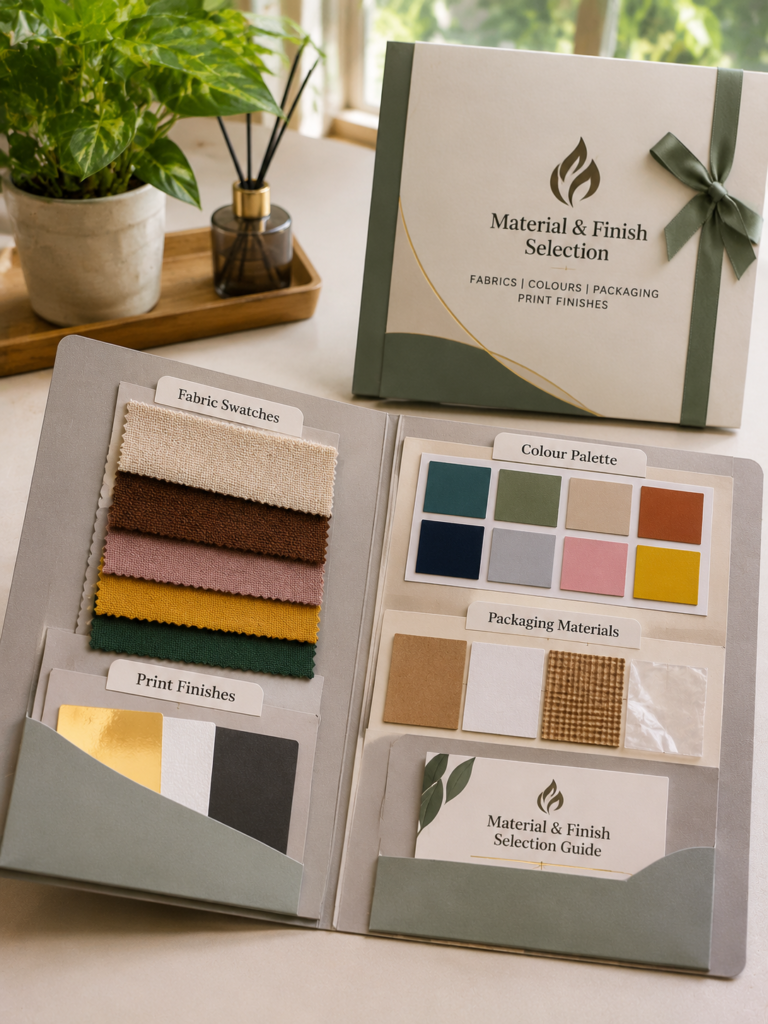
Design folders that help businesses organise and present samples of materials, colours or finishes to prospective customers.
They can be useful for fabric sellers, print studios, packaging suppliers and businesses offering different product finishes.
Include labelled sections, pockets or sample slots sized for the actual materials being presented.
Make sure the folder holds the samples securely and that labels identify each option accurately, since customers may use them to make purchasing decisions.
Ready to try more than basic vinyl decals? Explore these 23 Cricut Projects for Beginners Using Vinyl.
3. Specialist Tools and Templates for Hobby Businesses
Specialist makers often need patterns, guides and reusable components that are difficult to find in standard craft shops.
creates a more focused market for Cricut projects with high profit margins, particularly when the product solves a specific production problem.
The key is to understand the customer’s equipment, measurements and working process before making the item.
Looking for more products with selling potential? These 25 Easy Cricut Projects to Make and Sell for Extra Money are worth a read.
18. Leathercraft Pattern Templates
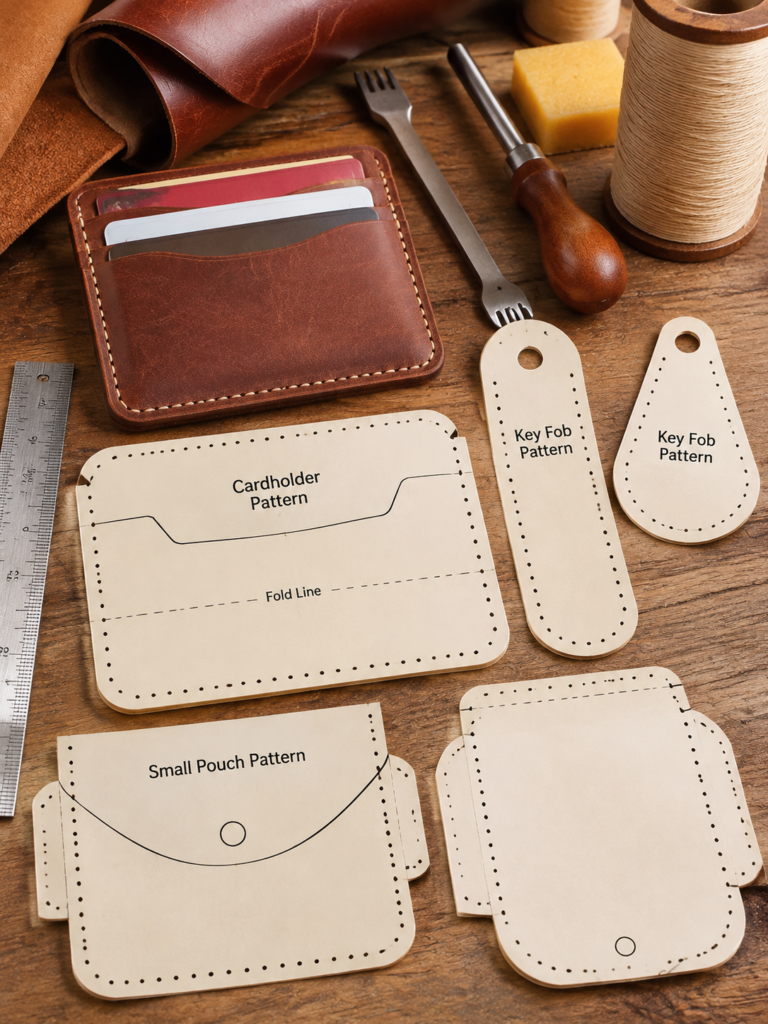
Leatherworkers use patterns to mark out pieces before cutting and assembling items such as card holders, key fobs and small pouches.
You can cut reusable templates from suitable thin plastic or stencil material, including the stitching holes, fold lines and corner shapes needed for a particular design.
The template helps the maker mark out consistent pieces, but does not replace leather-cutting tools or stitching equipment. Specify the finished project’s dimensions and check that the template material can withstand repeated tracing.
Also, check your Cricut model’s material compatibility before attempting to cut thicker template stock; leather-cutting capability varies by machine and blade.
Want to start small with products customers may buy? See these 21 Simple Cricut Projects for Beginners That Actually Sell.
19 Architectural Model-Making Templates
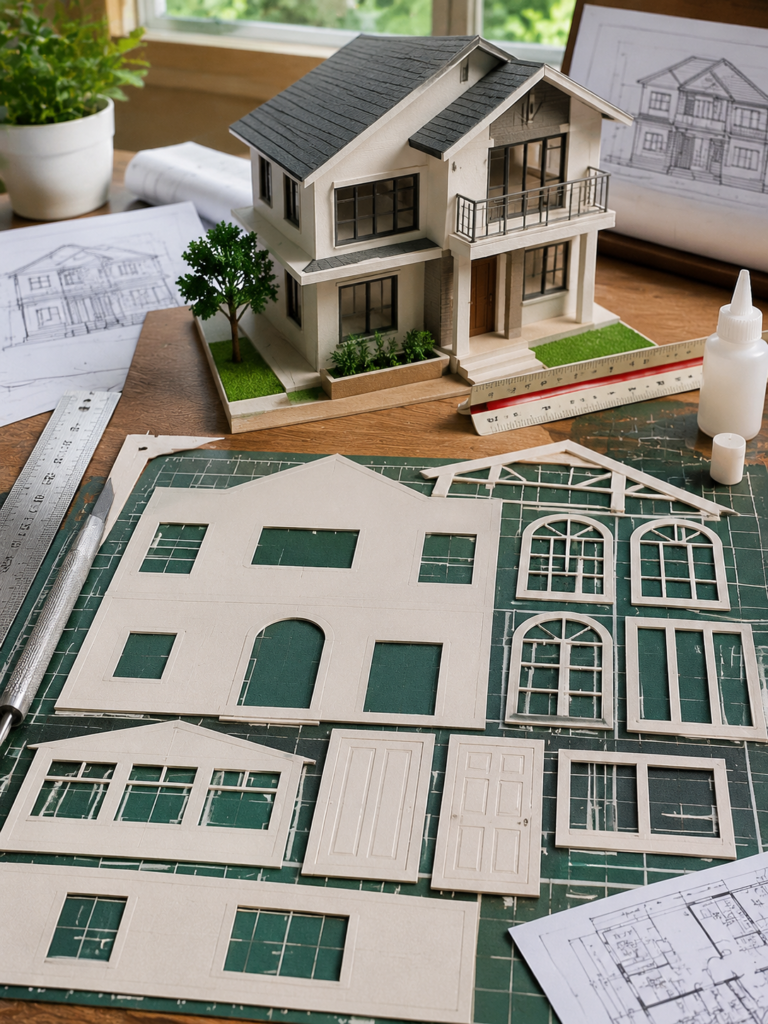
Architecture students and model makers can use scale-specific templates for repeated details such as windows, doors, roof sections and façade patterns.
For example, you could create a set of window openings for a building model at 1:100 scale, with each piece sized to match the same drawing standard.
The important detail is scale accuracy: at 1:100, one metre in the real building represents 10 millimetres in the model.
State the scale on the template and include the material thickness it was designed for, since thick card can affect how assembled parts fit together.
Prefer to practise at home first? Get started with these 22 Easy Cricut Projects for Beginners You Can Make at Home.
20. Model Railway Scenery Templates
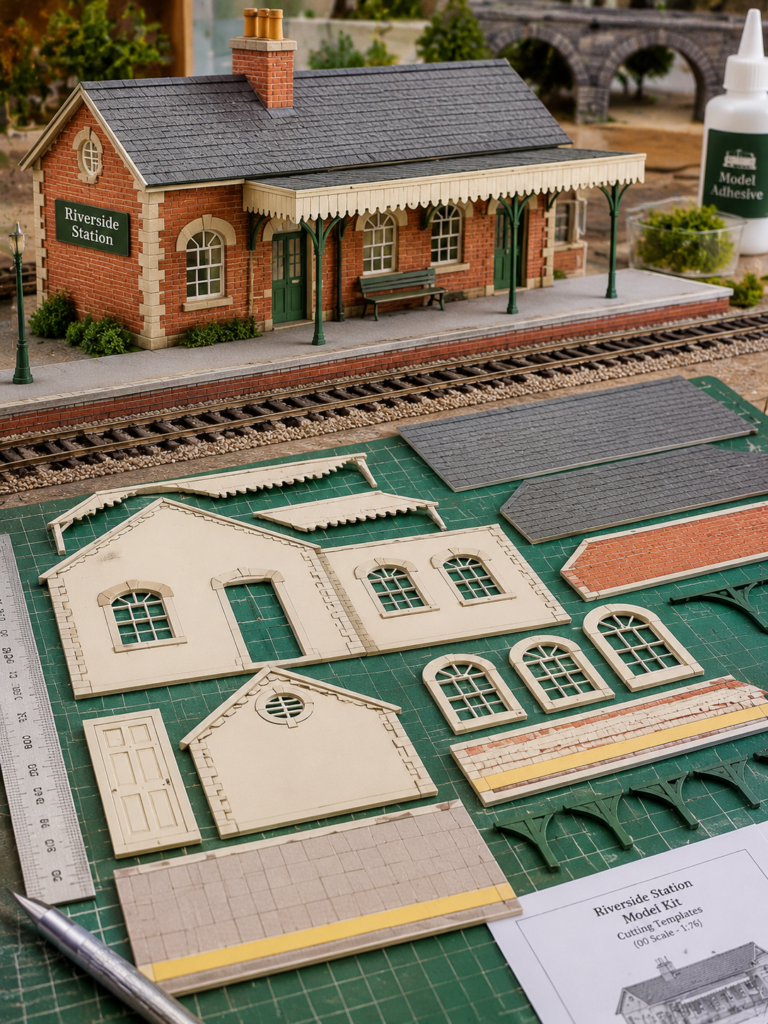
Model railway hobbyists build miniature stations, platforms, trackside structures and landscape details that need to match a particular railway scale.
You can produce cutting templates for platform edges, building walls, window openings, roof panels and other repeated architectural details.
Sell them as scale-specific sets, such as HO or N scale, rather than suggesting one template fits every layout. Include a measurement reference and test the pieces in a small model assembly.
A platform edge, for instance, needs to align with the intended track arrangement and rolling stock clearance.
New to Cricut and short on ideas? These 19 Easy Cricut Projects for Beginners can help you get started.
21. Tabletop Role-Playing Game Accessory Sets
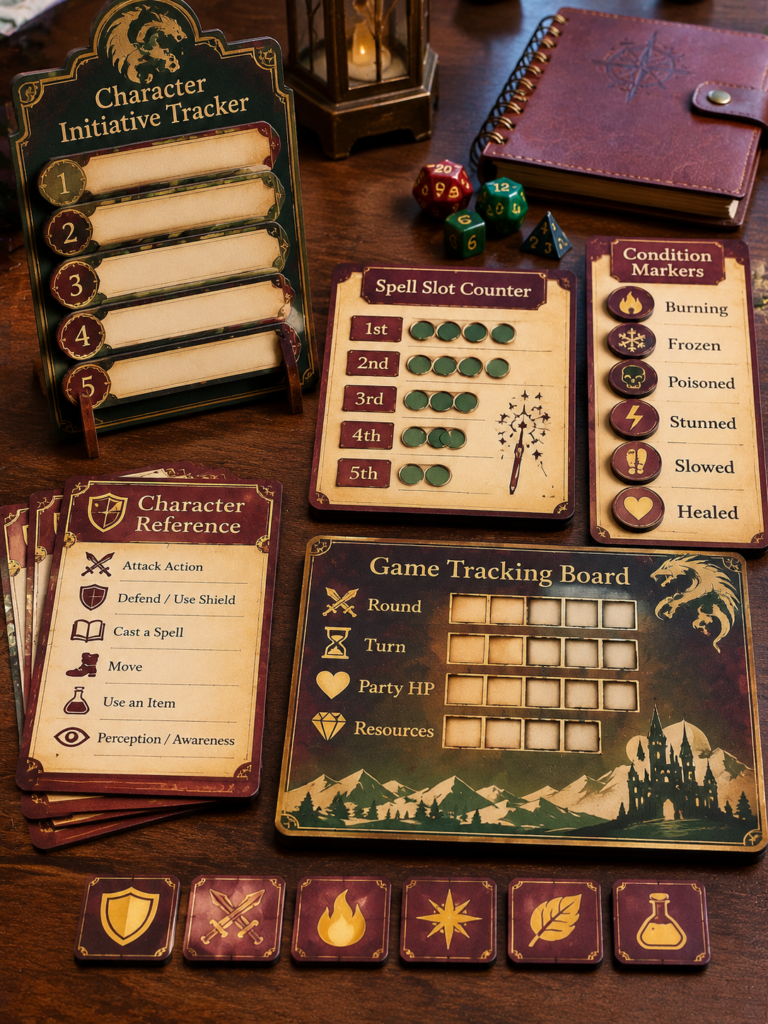
Game masters use visual aids to keep track of characters, turns and changing game conditions during a session. Create original sets containing initiative trackers, condition markers, spell-slot counters or character reference boards.
A useful detail is making the markers easy to identify at a glance, with clear symbols and labels rather than relying on colour alone.
Kniw that you could offer themed sets or custom versions with a game group’s name.
Use your own artwork and wording, and check the relevant publisher’s intellectual property policy before using game names, logos, characters or other protected material on products for sale.
Make gifts that feel personal and memorable. Browse these 33 Cricut Projects for Beginners That Make Great Personalized Gifts.
22. Escape-Room Puzzle Prop Sets
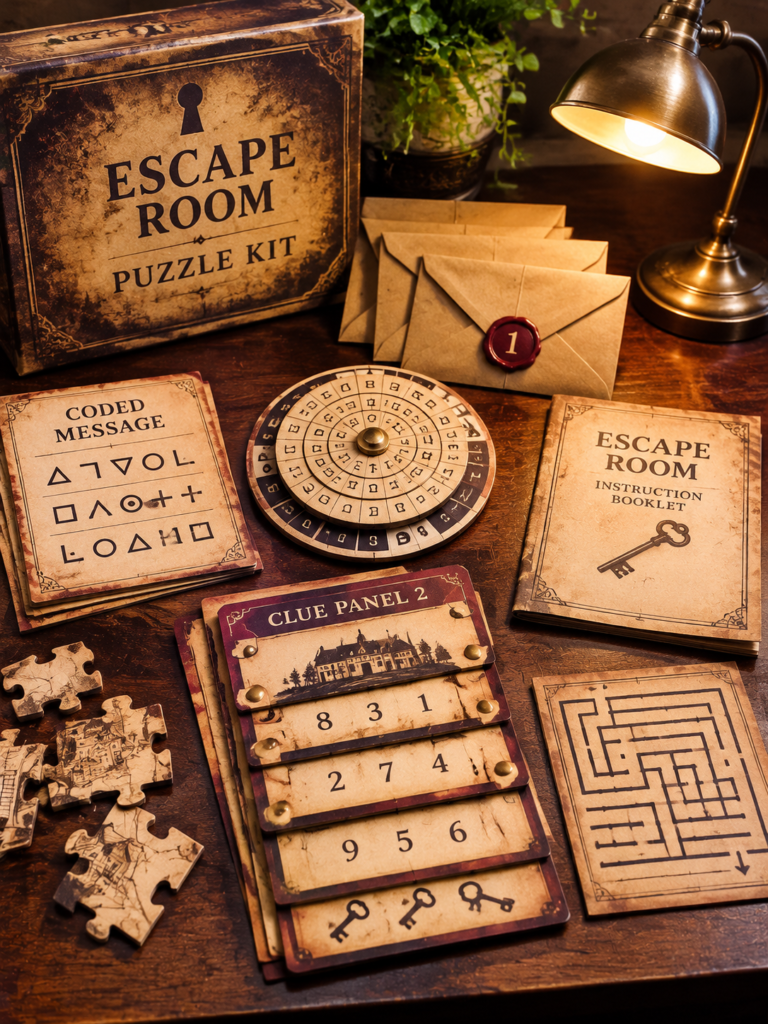
Escape-room operators and event organisers need physical clues that fit the story and connect with the puzzles players must solve.
As the creator, you can make themed sets containing coded message cards, layered clue panels, symbol wheels, numbered envelopes and paper puzzle pieces.
Rather than selling random props, design each set around a particular puzzle sequence, with clear instructions for the organiser. Test the clues with someone who has not seen the solution.
Check that the information provided is sufficient to solve each puzzle and that one clue leads logically to the next.
Want to get children involved in crafting? Find fun ideas in these 35 Easy Cricut Projects for Kids.
23. Music Lesson Rhythm and Notation Boards
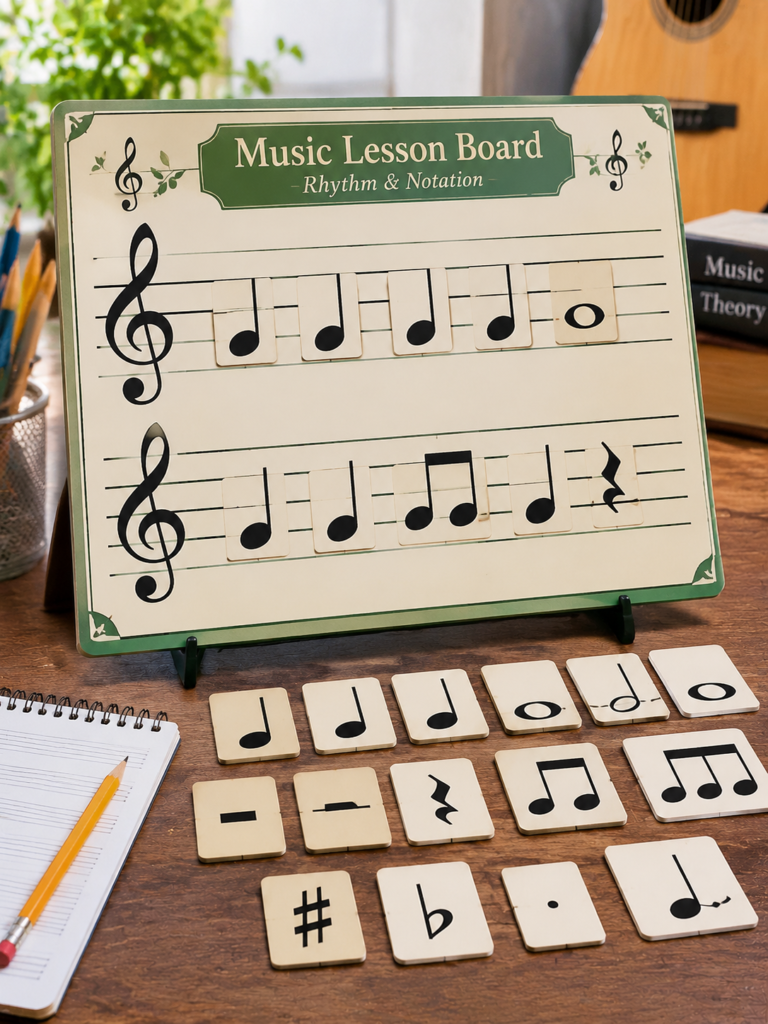
Music tutors can use reusable boards to teach note values, rests, time signatures and simple rhythm patterns. Cut large notation symbols and removable pieces that students can arrange on a staff or rhythm grid.
For example, a tutor could ask a beginner to build a four-beat measure using quarter notes and rests.
Make the symbols large enough to handle and label them correctly; a quarter note and a quarter rest represent the same duration but have different notation.
You can supply the board with a set of movable pieces, giving tutors a reusable teaching aid rather than a collection of loose worksheets.
Start planning your holiday creations with these 31 Easy Cricut Projects for Christmas.
24. Language-Learning Matching Boards
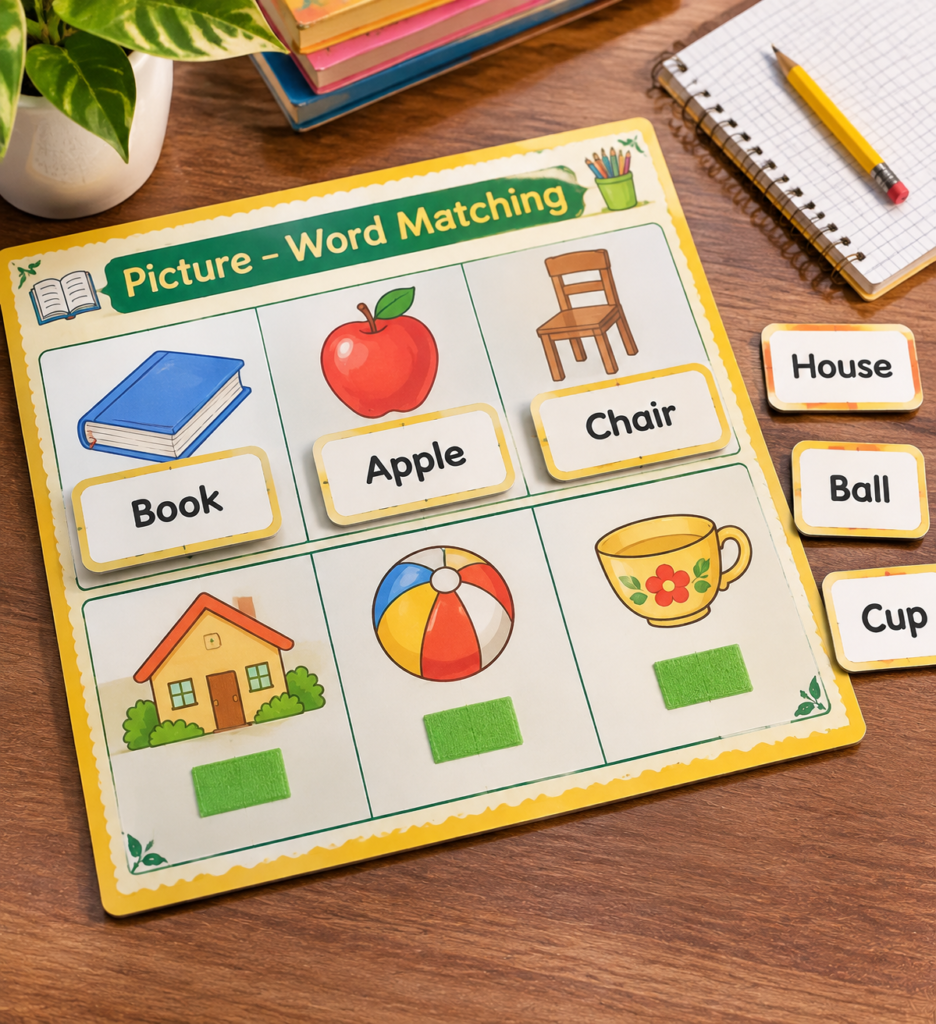
Create matching activities that help learners connect vocabulary with pictures, meanings or translations. One set might contain a board with labelled categories and separate cards for learners to place in the correct spaces.
You could make versions for beginner vocabulary, classroom topics or specific language-learning levels.
Keep each set focused on a manageable group of words so learners can use it without feeling overwhelmed.
Have a competent speaker check spelling, accents, pronunciation guides and translations before production, particularly where a word has different meanings depending on context.
Don’t own a heat press? You can still make plenty of creative items. See these 21 Cricut Projects for Beginners Without a Heat Press.
25. Screen-Printing Registration Guides
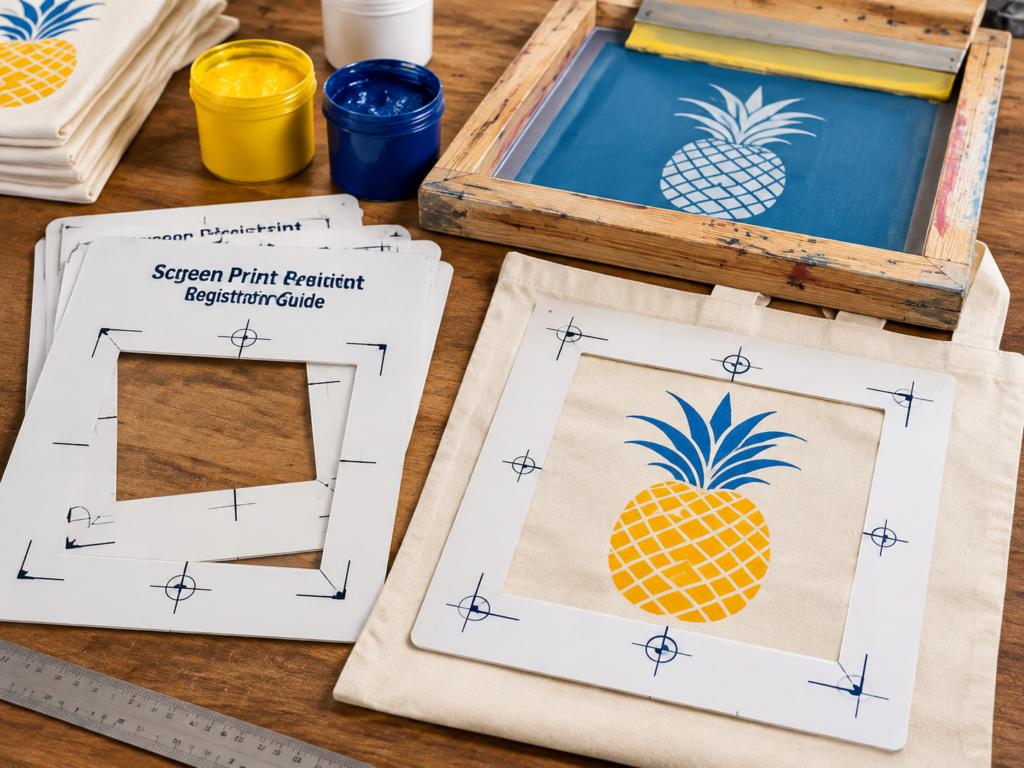
Small screen-printing studios need accurate alignment when printing designs with more than one colour.
You can make custom registration guides or positioning templates that help a printer place screens, artwork or substrates consistently during setup.
The guide must match the dimensions and registration method of the customer’s actual press; a template made for one setup may not work on another.
Registration marks must also remain in consistent positions across the colour separations. These guides support alignment but do not replace screen clamps, registration adjustments or test prints.
26. Heat-Transfer Placement Guides for Small Apparel Businesses
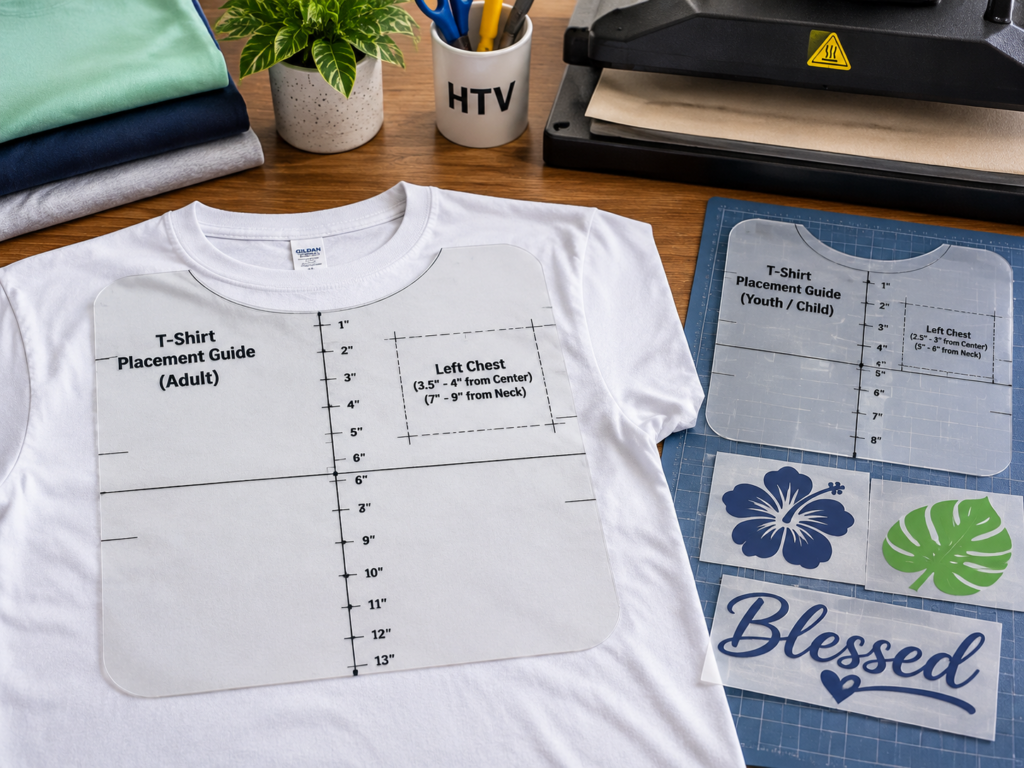
Create reusable placement guides that help garment decorators position names, numbers and logos consistently on shirts, sweatshirts and other clothing.
A guide could include centre lines, neckline reference points and marked positions for left-chest designs. You can offer separate versions for adult and children’s garments, or for particular garment styles.
Avoid presenting one measurement as suitable for every size: placement can change with garment dimensions, neckline shape and design size.
These guides help with positioning only; the heat press settings and transfer instructions must still come from the heat-transfer material manufacturer.
27. Custom Board-Game Prototype Components
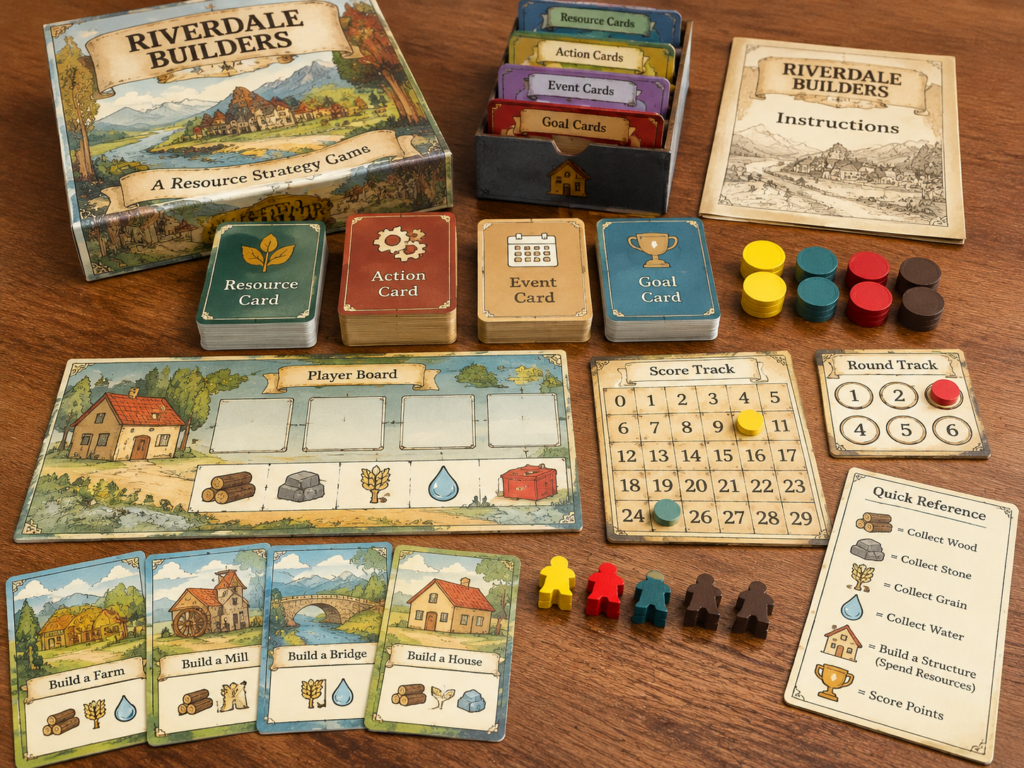
Independent game designers often need physical pieces to test how a new game plays before investing in a full production run.
You can cut prototype player boards, scoring tracks, token sheets, card dividers and reference aids that follow the designer’s specifications.
The advantage is offering a coordinated prototype package that lets the designer test the game with all its main components together. Keep labels, symbols and colours consistent across the set, and use materials that can withstand repeated handling during playtesting.
These are prototype supplies, so make clear that the components are not necessarily suitable for mass-market game production.
Can’t decide what to make next? Browse these 30 Cricut Projects to Make When You Don’t Know What to Make for fresh inspiration.
How to Identify Which of These Projects Has the Strongest Margin Potential
Not every attractive Cricut product is worth adding to your product range.
Before investing in materials or advertising, examine how much work each item requires, what it costs to produce and whether customers are likely to pay enough to make the effort worthwhile.
These checks can help you identify which Cricut projects with high profit margins deserve a place in your business.
-
Calculate the full production time
Record the time spent preparing the design, setting up the machine, cutting, weeding, assembling, personalising, checking and packaging each order.
A machine may finish cutting in minutes, but the work before and after that stage can take much longer. Assign a reasonable hourly rate to your labour so you can compare products fairly.
-
Measure material use per finished product
Work out how many usable pieces you can cut from a sheet or roll, rather than dividing the purchase price by the number of designs you intend to make.
Include offcuts that cannot be reused, test cuts, damaged pieces, transfer tape and backing materials. A design that wastes a large section of vinyl or cardstock may cost more to produce than its finished size suggests.
-
Separate setup costs from repeat-order costs
The first order may involve creating a design, testing dimensions and preparing a cutting file. Record these as initial design or setup work rather than assuming every future order will take the same amount of time.
When customers reorder an unchanged design, production may become faster. However, revisions, new names, different sizes and artwork changes still require time and should be priced accordingly.
-
Consider the order size and production capacity
Calculate the cost per item at different quantities, such as 1, 10 and 30 pieces. Some products become more economical in batches because machine setup and design preparation are shared across the order.
However, a larger order is not automatically more profitable if assembly takes too long or the machine becomes a production bottleneck. Check how many units you can realistically complete by the agreed deadline.
-
Check what customers will pay for the finished result
Compare similar products in the market where you intend to sell. Look beyond the advertised price to examine dimensions, material quality, personalisation, packaging and what is included in the order.
A basic paper template and a fully assembled custom product are not directly comparable. Etsy’s pricing guidance also recommends considering expenses, desired profit and market research when setting prices.
-
Account for selling and payment fees
Include marketplace commissions, payment processing, listing charges, advertising and any currency conversion costs that apply to your sales.
For example, Etsy currently charges a 6.5% transaction fee on the order total, while payment processing fees vary according to the seller’s bank-account country.
Listing, advertising and other applicable charges may also affect the final amount you receive. Check the current fee schedule for your selling platform rather than using one percentage for every marketplace.
-
Calculate your break-even point
Work out how many units you must sell to cover your fixed costs, such as equipment expenses, subscriptions or workspace costs. The basic formula is: fixed costs ÷ (selling price per unit − variable cost per unit).
This shows how many products you need to sell before covering those costs. The Small Business Administration uses this approach in its break-even guidance.
Mistakes That Can Turn a High-Margin Idea into a Low-Profit Product
A product may appear profitable on paper but still leave very little money after production and selling costs. Watch out for these common mistakes when choosing and pricing Cricut products:
- Ignoring labour costs: Pricing based only on vinyl, cardstock or blanks leaves out the time spent designing, cutting, assembling and finishing orders.
- Giving away design changes: Unlimited revisions, name changes and artwork adjustments can add hours to an order. Set clear limits and charge for additional work.
- Buying specialist materials too early: Test a small quantity and confirm customer interest before investing in materials suited to a narrow market.
- Choosing designs that take too long to finish: Intricate lettering, tiny cut-outs and complicated layers can increase weeding and assembly time without increasing the selling price.
- Skipping customer approval: Confirm names, spelling, dimensions and artwork in writing before production. This helps prevent costly mistakes on personalised orders.
- Failing to test the finished product: Check that boxes fold properly, stencils adhere and remove cleanly, and display pieces fit their intended products. A failed batch can wipe out the expected profit.
- Underestimating packaging and delivery: Fragile, bulky or unusually shaped products may require extra protection and higher postage costs. Include these expenses when setting prices.
- Using artwork without commercial permission: Copyrighted characters, brand logos, fonts and third-party graphics may have restrictions on commercial use. Check the relevant licence before selling products that incorporate them.
Personalised products can give ordinary items a special touch that customers are willing to pay for. Get ideas from 21 Personalized Cricut Items People Actually Buy.
How to Test a Product Before Investing in Materials
A product idea may sound promising, but testing it on a small scale helps you find out whether customers want it and whether you can produce it at a worthwhile cost. Use these steps before committing to large material purchases:
– Make one complete sample. Produce the item as a customer would receive it, including personalisation, assembly and packaging. Record the time spent on design preparation, cutting, finishing and quality checks. This reveals tasks that may be easy to overlook when estimating production time.
– Calculate the cost at different quantities. Work out the cost of making one item and a small batch, such as 5 or 10. Include material waste, labour, packaging and applicable selling fees. This helps you see whether producing several units reduces the cost per item enough to justify batch orders.
– Test the product under its intended conditions. Check that it performs the job it was designed for. For example, test whether a favour box holds its intended contents, a jewellery card supports the jewellery securely or a stencil works with the specified paint and surface. Correct any weaknesses before offering it for sale.
– Get feedback from likely customers. Show the sample to people who genuinely buy or use that type of product, such as event planners, jewellery sellers or craft business owners. Ask what they would use it for, whether the size and finish meet their needs and what they would change. Avoid relying only on compliments; ask whether they would consider buying it at your proposed price.
– Check willingness to pay. Compare your proposed price with similar products and ask potential customers whether the finished item offers enough value at that price. Expressions of interest are useful, but actual enquiries, paid orders and repeat purchases provide stronger evidence of demand.
– Use pre-orders carefully. You can collect orders before buying materials in bulk, but state the product specifications, price, payment terms and realistic delivery date clearly. Do not promise a deadline until you have checked material availability and production capacity. Follow any consumer protection and refund requirements that apply to your market.
– Review the first batch. Compare your estimated costs and production time with what actually happened. Include rejected pieces, customer changes, packaging and delivery expenses. Adjust the price, design or production method before accepting larger orders.
A successful test should establish three things: customers are willing to pay for the product, you can produce it consistently, and the amount left after all relevant costs makes the work worthwhile.
Conclusion
Finding profitable products to make with your Cricut takes more than choosing designs that look attractive.
The strongest opportunities often come from understanding a specific customer’s needs and offering a finished product that solves a real problem.
These Cricut projects with high profit margins give you several possibilities to consider, but the right choice depends on your skills, production costs and the customers you can reach.
Choose one idea that suits your business goals, develop a sample and see how it performs before expanding your product range. Which project will you try first?