You are about to learn how to sew a reversible tote bag in a fun and simple way from scratch!
Tote bags are one of the easiest sewing projects that beginners sewists can try and ace at the first trial. It is so easy that any creative person without a sewing background or prior knowledge of sewing can try their hands.
A few months ago, I found myself standing in a store, staring at a beautiful tote bag. It had a lovely floral print on one side and a solid color on the other. It was simple, yet so versatile. But then I checked the price tag and thought, Wait, I could totally make this myself, and even customize it using my choicest fabric and preferred size.
That’s the beauty of a reversible tote bag; you get two stylish looks in one. Reversible tote bags are super versatile and stylish. Here’s a list of practical and creative ways you can use them.
CREATIVE WAYS TO USE A REVERSIBLE TOTE BAG
- Grocery shopping – It is a sustainable, reusable alternative to plastic bags.
- Library trips – Perfect for carrying books and notebooks.
- Beach bags – Great for towels, sunscreen and snacks.
- Gym bag – Carry your workout clothes, water bottle and gear.
- Everyday handbag – Stylish enough to use as your daily carry-all
- Farmer’s market visits – For fresh produce and local goodies
- Craft project bag – This one is my personal favorite for storing yarn, left over fabrics or sewing supplies.
- Picnic bag – Pack snacks, drinks, and a blanket.
- Diaper bag – As a mum to a new born, I use my reversible tote bag as a diaper bag for my baby.
- Work or school bag – Holds your lunch, laptop, and notes.
- Gift bag – A hand made gift bag that can be reused.
- Travel bag – Keeps essentials handy while on the go.
- Kids’ activity bag– Store toys, coloring books, and crayons.
- Pet supplies bag – Carry treats, toys, or grooming tools.
- Errand bag – For quick trips around town.
So, if you’re ready to create something fun, functional, and uniquely yours, grab your favorite fabrics, and let’s get sewing!
What You’ll Need to sew a Reversible Tote bag
Before we get into the sewing proper, here’s everything you’ll need:
Main fabric: Half yard
Lining fabric: Half yard (pick a different pattern or color for the reversible effect)
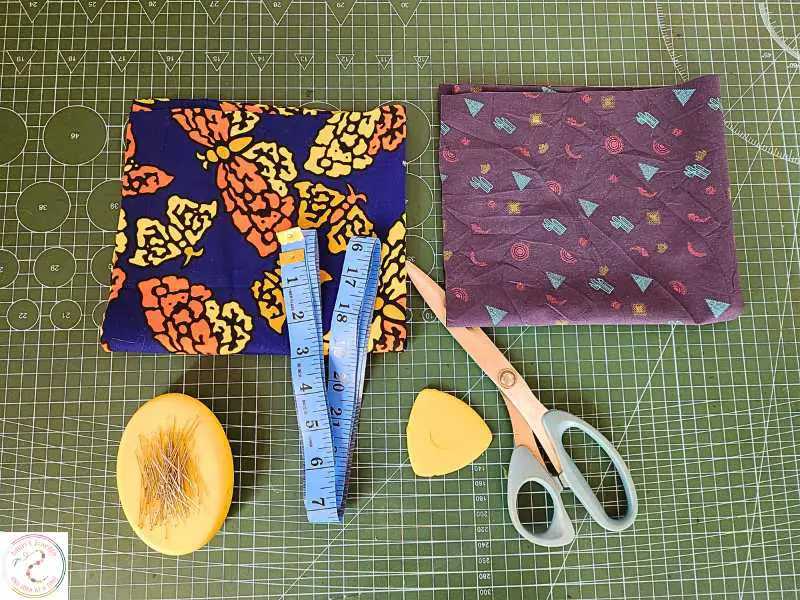
Tools & Supplies
Fabric scissors
Measuring tape
Fabric chalk or marker
Sewing pins
Sewing machine
Sewing thread
Iron
Got everything? Great! Let’s start by making our bag handles.
How to Sew a Reversible Tote Bag
Step 1: Sewing the Straps
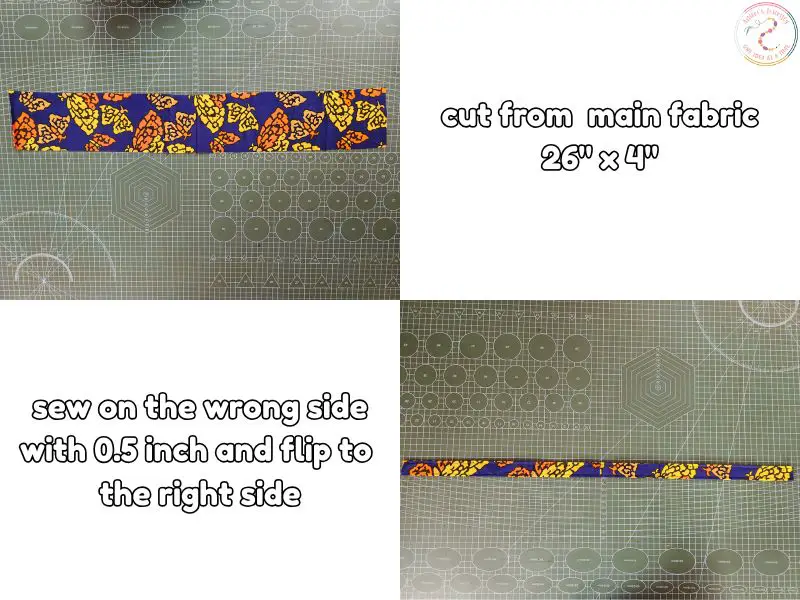
The straps are what make your tote bag easy to carry, so we want them to be strong and comfortable.
1. Cut out two straps from your main fabric measuring 26 inches x 4 inches Take your two strap pieces and fold each one in half lengthwise, right sides together.
2. Sew along the edge with a 0.5-inch seam allowance. The final width of the folded strap becomes 1.5 inches.
3. Turn them inside out (use a safety pin or loop turner if needed).
4. Press them flat with an iron for a neat finish.
Set them aside—we’ll attach them later!
Step 2: Sewing the Bag Body
Now, let’s construct the actual tote bag!
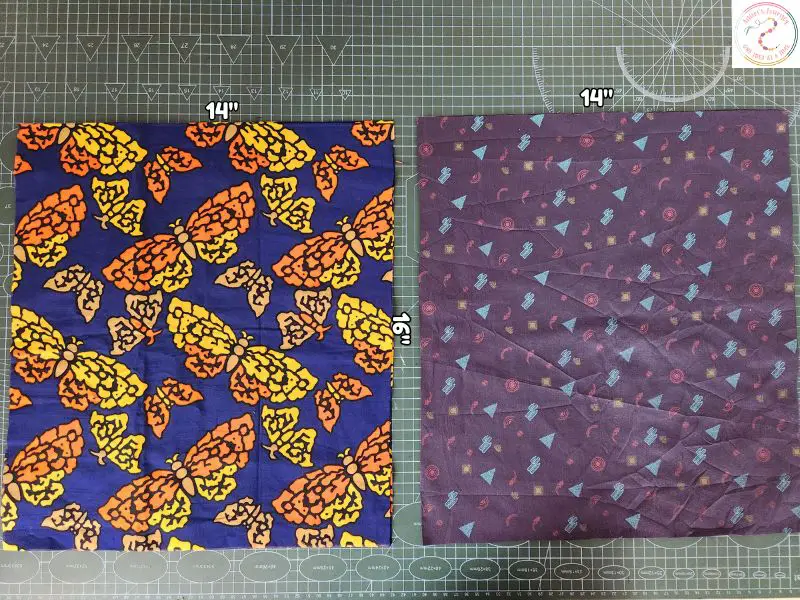
1. Cut out from the main fabric and lining fabric 14″ width and 16″ length. You will need two pieces for each.
2. Take the two main fabric pieces and place them right sides together.
3. Sew along the two sides and the bottom using a 0.5-inch seam allowance, leaving the top open.
4. Repeat this process with the lining fabric, so you have two identical bag shells.
Step 3: Creating the Boxed Corners
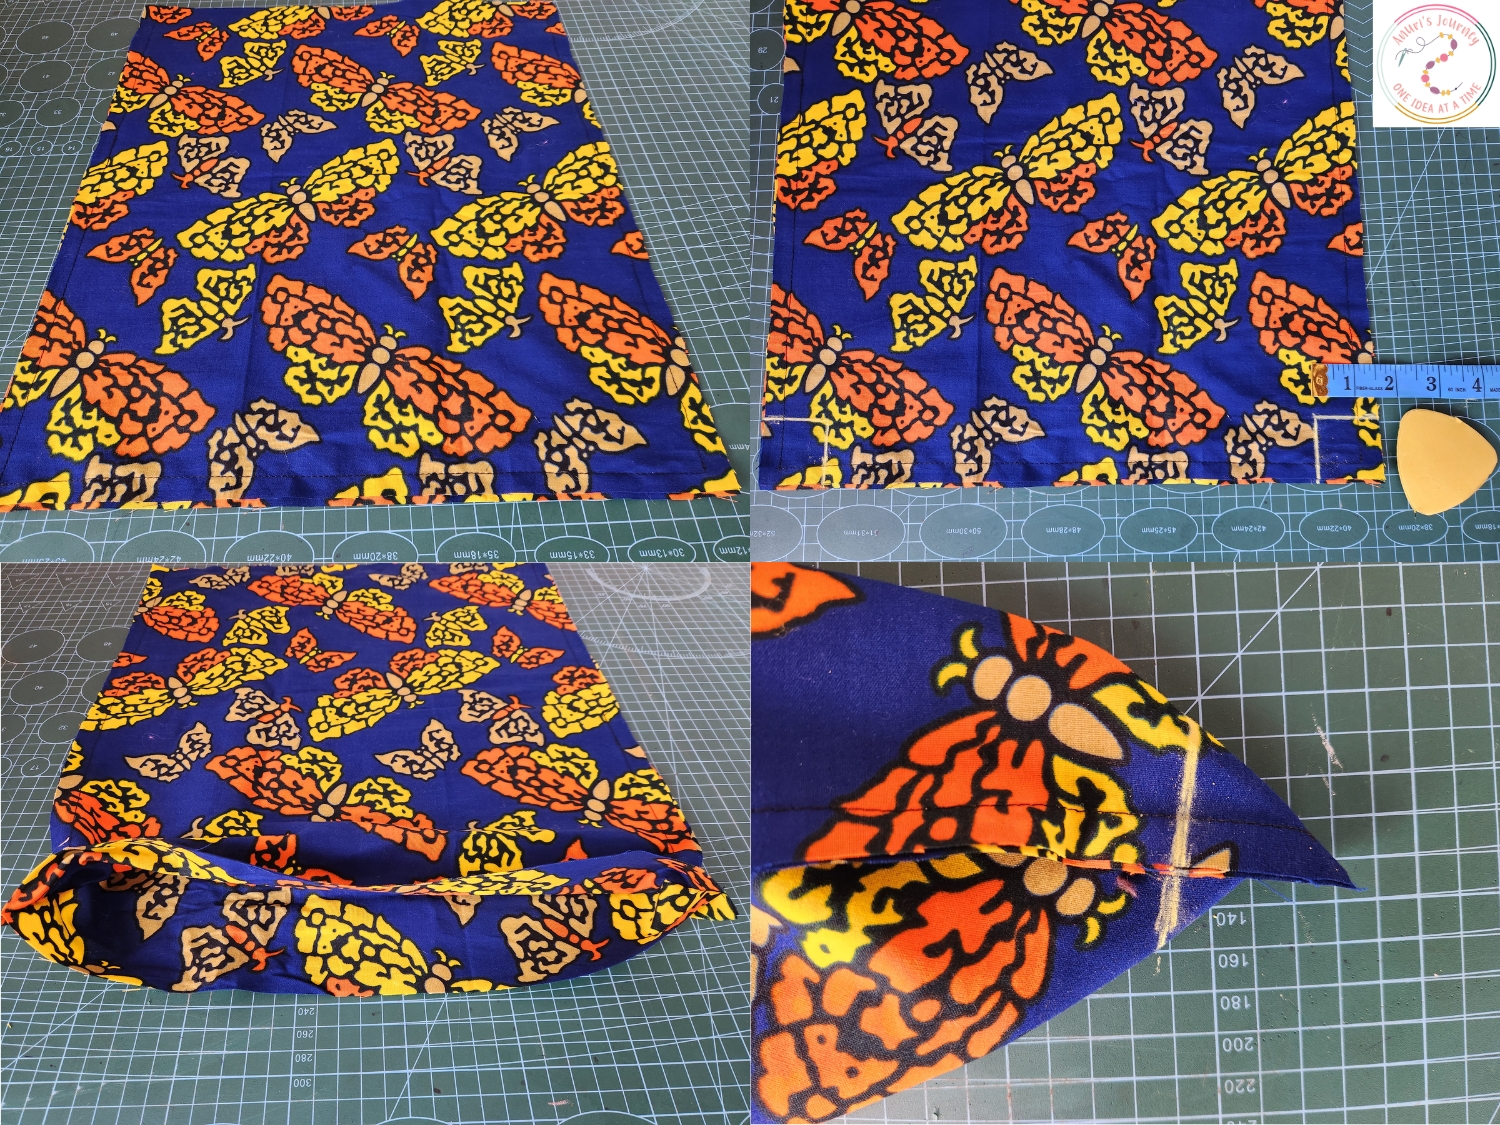
To give your tote bag a flat base (so it can stand up nicely), we’ll box the bottom corners.
1. While the fabric is still inside out, go to one bottom corner and mark 1.5 inches vertically and horizontally from the tip.
2. Pinch the corner so the marked lines match up, creating a triangle.
3. Sew across the new edge to secure the shape.
4. Cut off the excess fabric to reduce bulk.
5. Repeat for the other corner and do the same for the lining fabric.
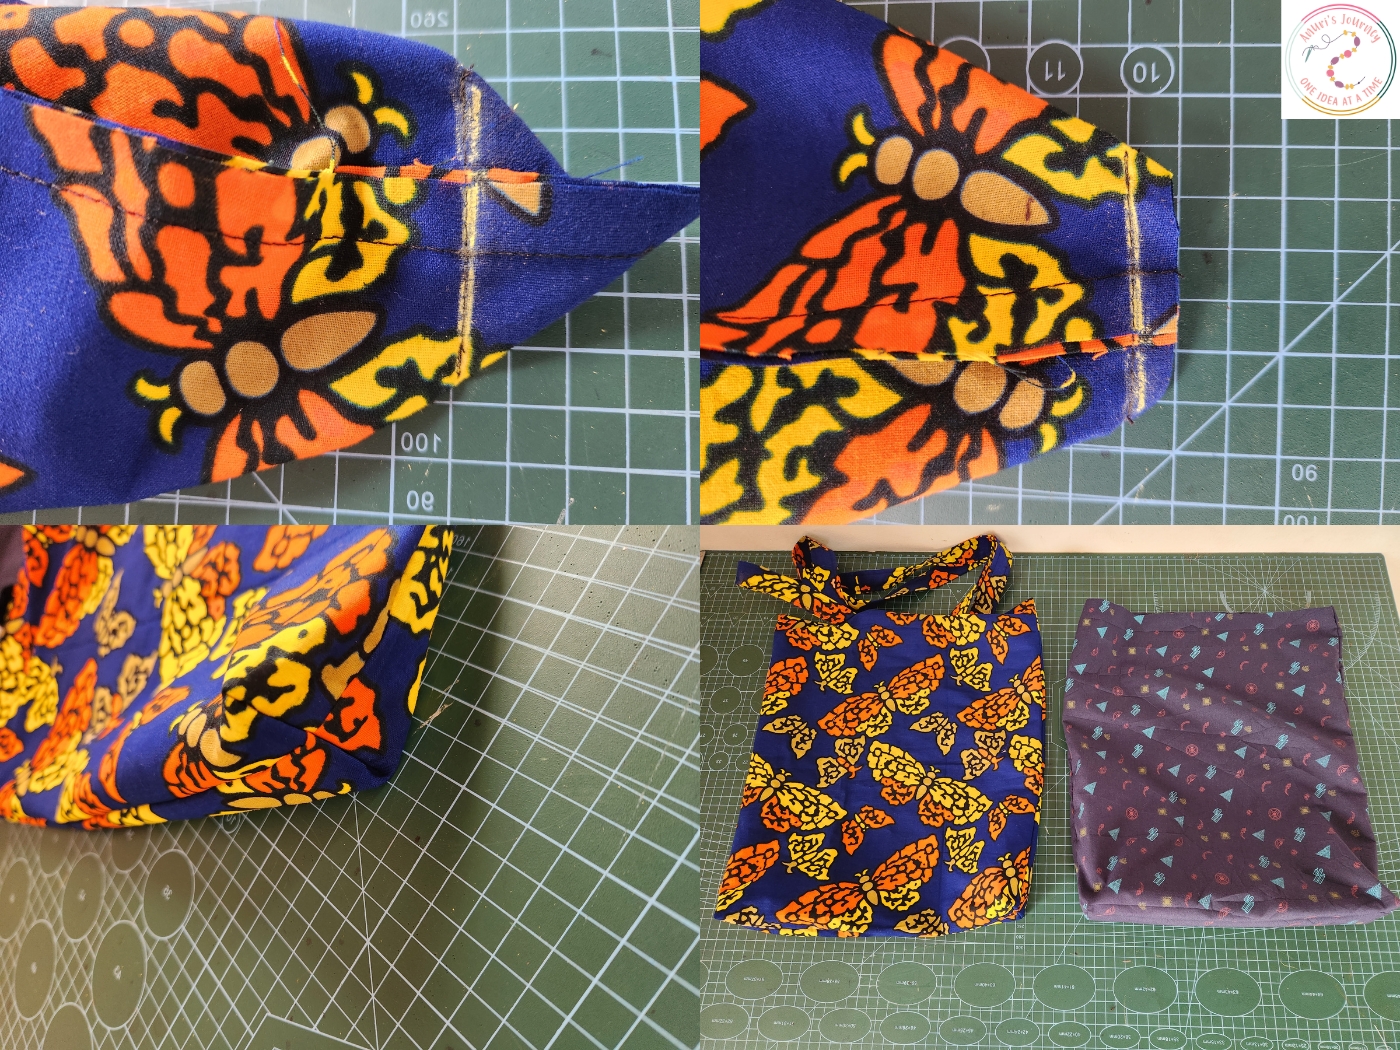
Now, when you turn the bag inside out, you’ll notice it has a flat bottom—perfect for holding more stuff!
Step 4: Attaching the Straps
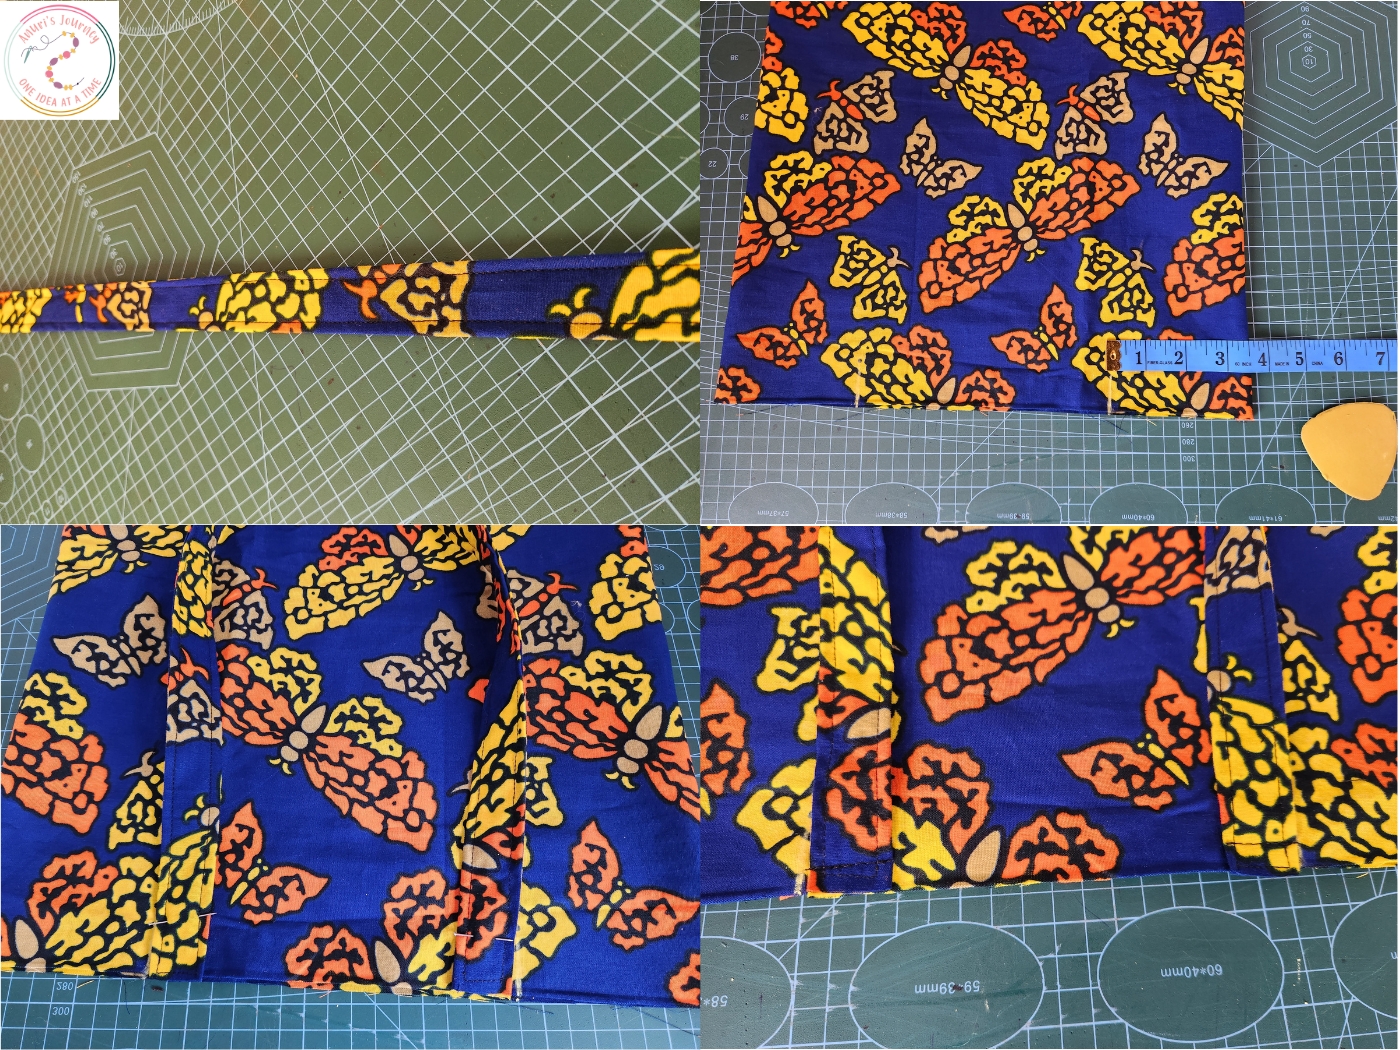
1. Turn the main fabric bag right side out.
2. Measure 3.5 inches inwards from each side of the bag opening and mark the spots.
3. Take the straps and pin each end at the marked spots, ensuring they are inside the bag and not twisted.
4. Sew them in place using a small stitch to keep them secure.
Step 5: Sewing the Lining to the Outer Bag
Now for the final step—putting everything together!

1. Place the outer bag (with straps attached) inside the lining bag, making sure right sides are facing each other.
2. Align the top edges and pin all around.
3. Sew around the entire top edge using a 0.5-inch seam allowance, leaving a 3-4 inch opening for turning.
4. Carefully turn the entire bag right side out through the opening.
5. Push the lining inside the main bag and press everything flat with an iron.
6. Topstitch around the top edge to close the opening and give the bag a neat, professional look.

Your Reversible Tote Bag is Ready!
That’s it! You’ve just made your own DIY reversible tote bag. Flip it inside out depending on your mood, outfit, or occasion. Whether you go for bold prints, minimalist neutrals, or even festive holiday fabrics, this bag will quickly become one of your favorites.
So, where will you take your new tote bag first? Let me know in the comments—or better yet, tag me in your photos!
Happy sewing!
Other fun projects to sew:
Reversible bucket hat tutorial
Reversible sun hat tutorial
Reversible baby bib