One of my favorite ways to add a little flair to my outfit—or my daughters’—is with a cute headband. And when that headband is handmade? Even better. There’s something so satisfying about crafting something beautiful from a simple piece of fabric. Whether you’re making this to match an outfit, to gift a friend, or just because you love DIY fashion, this tutorial is a fun and beginner-friendly project you can enjoy in under an hour.
This particular headband style uses a basic Alice band and a strip of fabric to create a chic knotted look. It’s the perfect blend of stylish and practical—and it stays in place beautifully.
Let’s get into the step-by-step process of making your own fabric knot headband.
Materials Needed: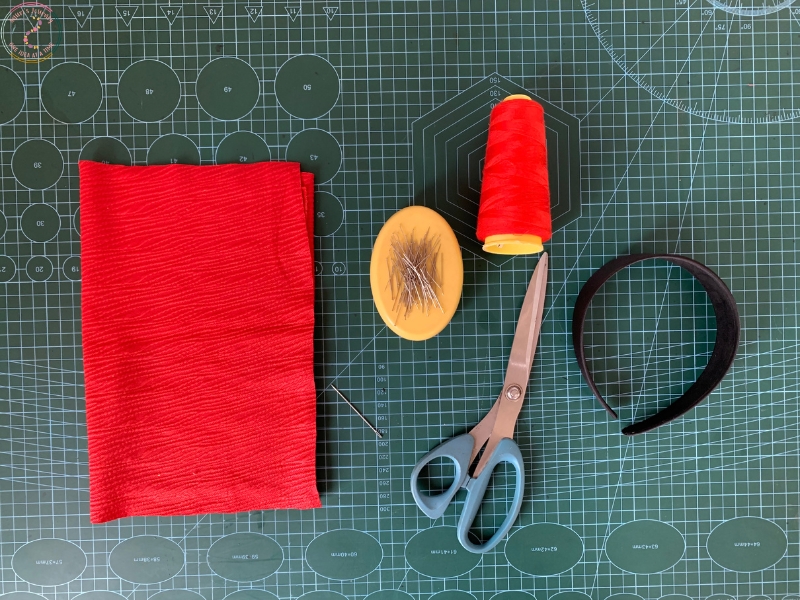
½ yard of fabric (preferably stretchy, like jersey or knit)
Sewing machine (or hand needle if you prefer hand sewing)
Sewing thread
Affix pins (or straight pins)
Scissors
Alice band (the plain plastic or metal kind)
Hand needle (for finishing touches)
Step-by-Step Instructions:
1. Cut your fabric:
Cut a piece of fabric that measures 27 inches × 10 inches. A stretchy fabric works best for this project because it creates a nice, snug fit and neat knot.
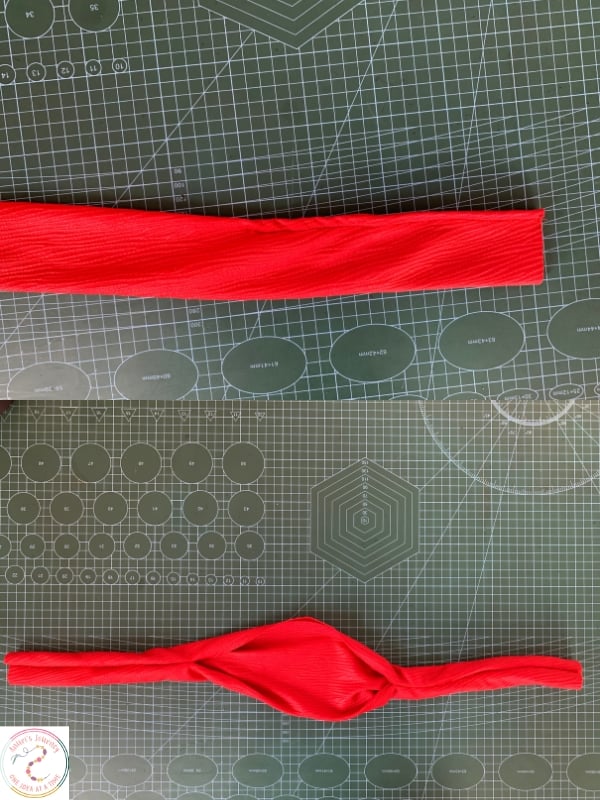
2. Prepare the knot:
Fold the fabric in half lengthwise, then in half again, creating a long rectangle with four layers.
Gently tie a knot at the center of the fabric around the Alice band. Make sure the fabric is distributed evenly on both sides of the band before you secure the knot.
3. Mark for sewing:
From the center knot, measure and mark 1.5 inches outward on both sides using pins. This section will stay open for now and is where the band will sit later.
4. Untie and sew:
Carefully untie the knot without losing your markings.
With the right sides of the fabric still together, sew from each pinned point to the end on both sides using a ½-inch seam allowance. This will create a tube-like shape on both ends.
5. Turn it right side out:
Flip both sides of the fabric right side out so the seam is now hidden on the inside. You should have a neat, smooth tube of fabric.
6. Re-tie the knot and position:
Now, re-tie the knot neatly back around the center of the Alice band.
Then, slide the two ends of the Alice band into the open ends of the stitched fabric on each side. Take your time to adjust the fabric so it sits smoothly around the band.
7. Trim and stitch closed:
Trim off any excess fabric hanging out from the ends.
Then fold the raw edges inward and use a needle and thread to hand-stitch each end closed, securing the fabric around the ends of the band.
And just like that, you’ve made your own knot headband.
Whether you’re keeping it simple or dressing it up with embellishments later on, this DIY fabric headband is both stylish and comfortable. It’s also a great way to use up fabric scraps from other projects.
You can create a whole collection in different prints—floral for spring, velvet for fall, or solids for everyday wear. And trust me, once you make one, you’ll want to make more.
You may also like: