There’s something extra special about homemade kitchen accessories—especially when they’re crafted with love and personality. If you’re like me, you know how satisfying it is to create practical items with your own hands, and an oven mitt is one of those little sewing projects that combine function and charm. Whether you’re baking up a storm or just want to protect your hands while handling hot pots, a custom-made oven mitt can add a splash of beauty to your kitchen setup.
This project is beginner-friendly and uses minimal materials, making it perfect for fabric scraps or matching with your kitchen decor. Let’s dive in.
Materials Needed
½ yard of fabric (¼ yard each for main fabric and lining)
½ yard of soft padding (like heat-resistant batting or quilt batting)
Sewing machine
Sewing thread
A pair of scissors
Measuring tape
Pattern paper
Tailor’s chalk or fabric marker
Affix pins
Pressing iron
Instructions
Step 1: Create Your Pattern
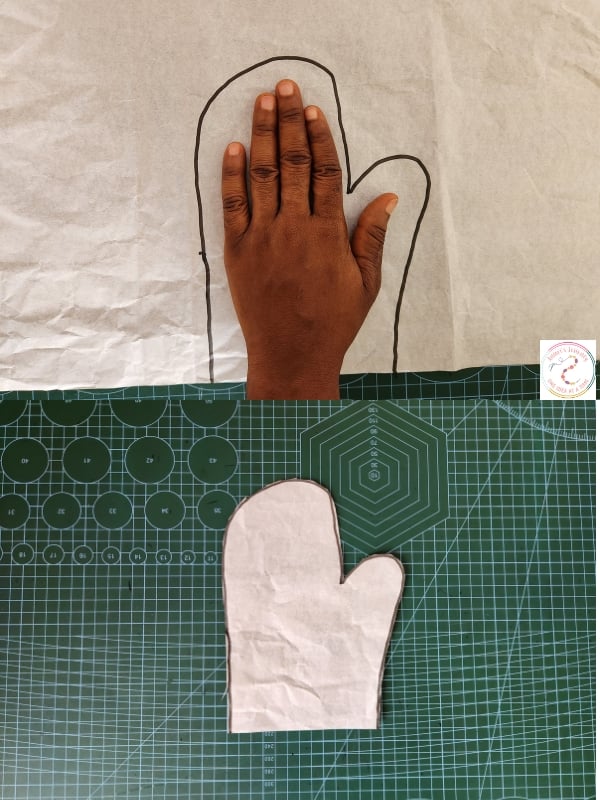
Place your hand (or the hand of the person who will use the mitt) on a piece of pattern paper.
Loosely trace around the hand and wrist, leaving enough room for seam allowance and comfort (like a mitten).
Smooth out the outline into a neat oval mitt shape.
Cut out the pattern.
Step 2: Cut Your Fabrics
Pin the pattern to your main fabric and cut out 4 pieces (2 for each mitt).
Do the same for the lining fabric, cutting out 4 pieces as well.
For the soft padding, cut 4 pieces too, but make each piece ½ inch smaller all around than your main fabric (this reduces bulk in the seams).
Step 3: Fuse the Padding
Place a piece of padding on the wrong side of each main fabric piece.
Press lightly with a pressing iron to hold it in place (or baste if your padding isn’t fusible).
Step 4: Make the Hanging Loops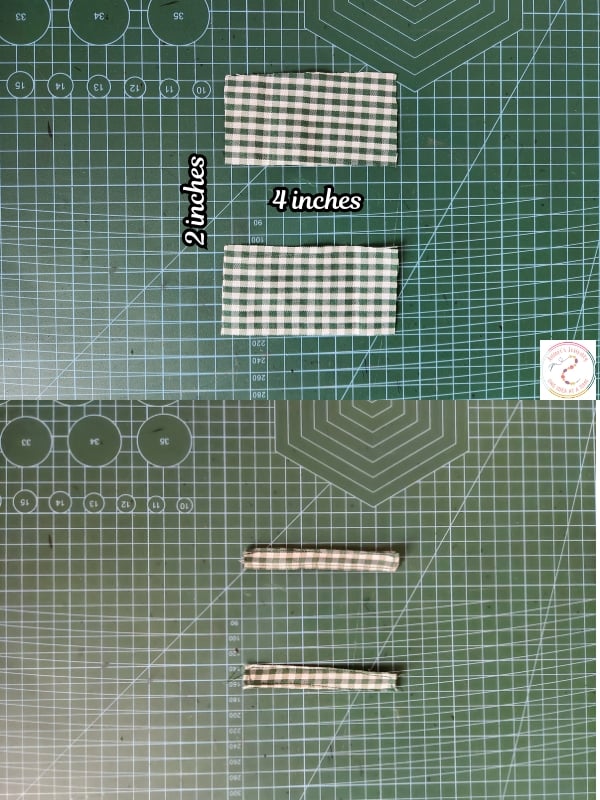
Cut two fabric strips measuring 4” × 2”.
Fold each strip in half lengthwise, right sides facing, and stitch along the edge.
Turn them right side out and press. These will become your hanging loops.
Step 5: Attach the Loops
Place one loop on the outer edge of one mitt piece, aligning the raw edge with the edge of the mitt.
Secure it in place with a few stitches or pins.
Step 6: Sew the Main Fabrics
Place two main fabric pieces right sides together, pin around the edges.
Stitch with a ¼ inch seam allowance all the way around the mitt shape.
Repeat for the second mitt.
Step 7: Sew the Lining
Place two lining pieces right sides together, pin and sew around just like the main fabric—BUT leave a 3” opening along one side. This will be used to turn the mitt inside out later.
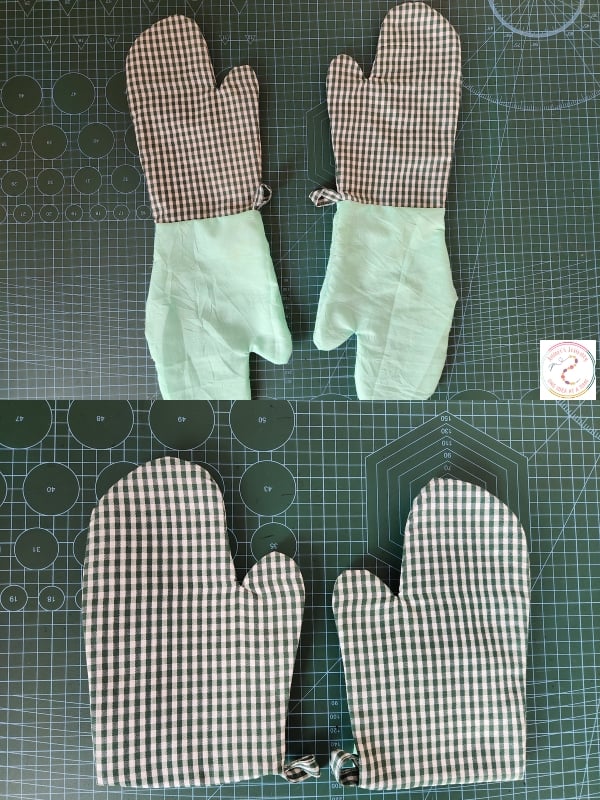
Step 8: Assemble the Mitt
Trim the seams and notch the curves gently to help the mitt turn out smoothly.
Turn the main fabric mitt right side out.
Place it inside the lining (which is still inside out), so the right sides are facing each other.
Align the edges, match up the seams, and pin around the opening.
Step 9: Join the Mitt and Lining
Sew around the mitt opening with a ¼ inch seam.
Turn the whole thing right side out through the 3” opening left in the lining.
Step 10: Finish Up
Gently shape your mitt and push out the seams with your fingers.
Press well with an iron.
Fold in the raw edges of the opening in the lining and top stitch to close it.
You can top stitch around the opening of the mitt if you’d like a cleaner, flatter edge.
And That’s It – Your Homemade Oven Mitt Is Ready.
Now you’ve got a beautiful, handcrafted oven mitt ready to serve you in the kitchen—or gift to a loved one! Don’t be surprised if you want to make several once you see how easy and satisfying it is.
You may also like: