Gift-giving is always such a joy, but the wrapping can sometimes feel like a chore. If you’re like me, you love the thought of presenting gifts beautifully but also enjoy adding a personal touch to everything you do. One of my favorite ways to make a gift extra special is by wrapping it in a handmade bag. Not only does it look lovely, but it’s also an eco-friendly and thoughtful way to give a gift. Today, I’m going to share a simple tutorial on how to make your very own drawstring gift bag.
I love how versatile these little bags are—you can use them for gifts, storage, or even to hold little trinkets or treats. Plus, they’re super easy to make, and the best part? They don’t require a lot of fabric or fancy sewing skills. Whether you’re a beginner or more experienced with a sewing machine, I think you’ll find this project both fun and rewarding. So, let’s get started.
Materials You’ll Need:
A half yard of fabric (Any fabric of your choice—cotton works beautifully for this project!)
Sewing machine
Sewing thread (Matching the fabric color)
Safety pin
A yard of ribbon (or any type of strap for the drawstring)
A pair of scissors
Step-by-Step Guide:
1. Cut the Fabric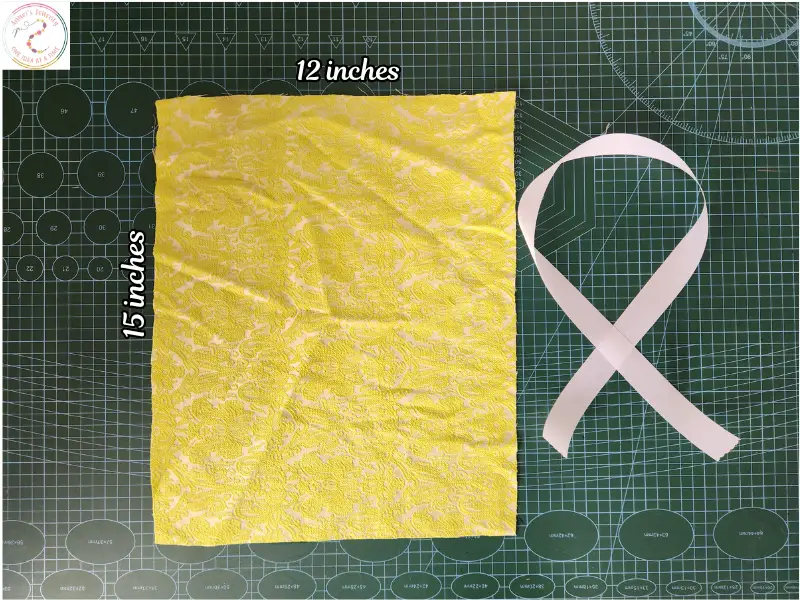
Start by cutting your fabric into a piece that measures 15” x 12”. This size will give you a nice little bag that can hold small to medium-sized gifts like jewelry, books, or candles. If you need a bigger bag, you can always adjust the measurements. You’ll also need a ribbon or strap that is 28” long to create the drawstring.
2. Prepare the Edges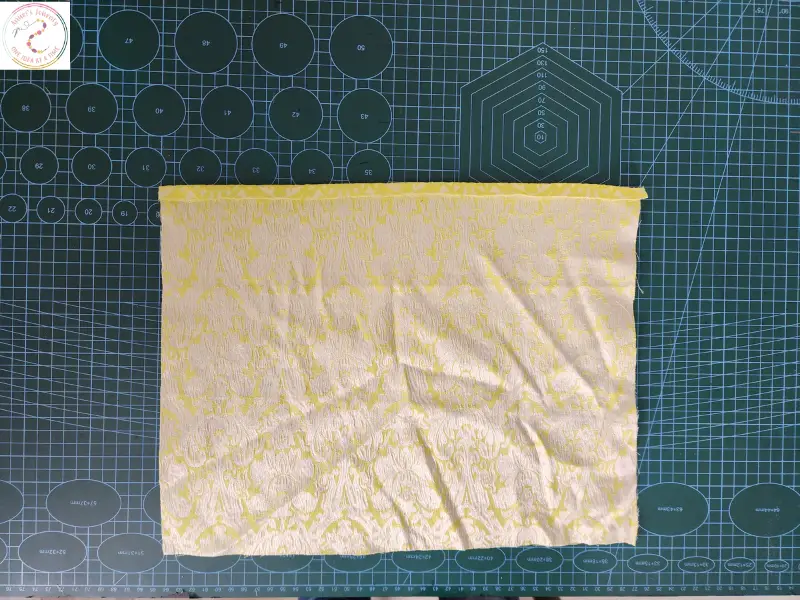
Take one of the longer sides of your fabric (the 15-inch side), and fold it over about 0.5”. This step will give the fabric a clean edge once sewn, so it doesn’t fray. Press the fold with an iron to keep it in place.
3. Create the Bag’s Shape
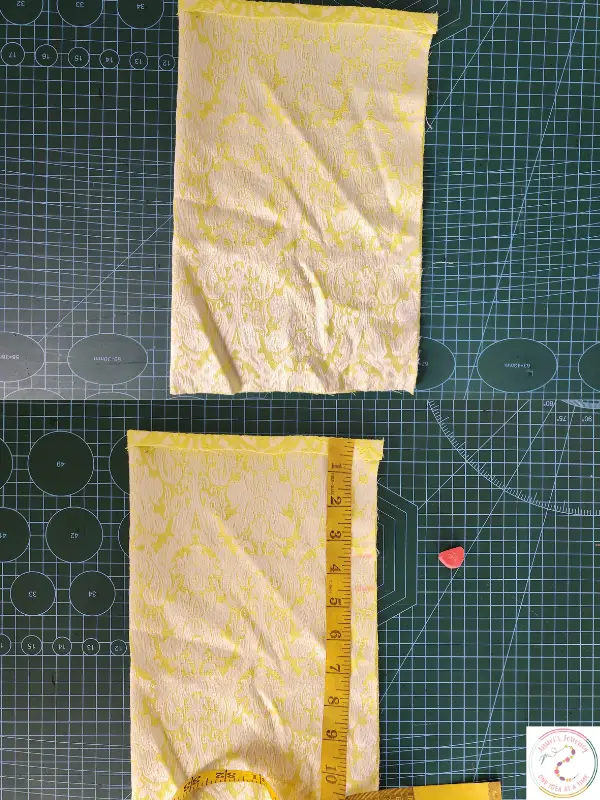
Next, fold your fabric right sides facing each other (meaning the sides of the fabric that will show on the outside of the bag should be facing each other).
Now, measure 3.5” from the top of the fabric, and mark this spot with a fabric marker or chalk. Then, from that mark, measure 1” upwards and make another mark. These marks are important because they’ll guide you on where to sew the bag to create the top opening.
4. Sew the Top Seam
Using your sewing machine, sew a line 0.5” from the top edge of the fabric, but stop sewing when you reach the first mark (3.5” from the top). Then, continue sewing from the second mark upwards to the top of the fabric. This will form a small casing for the ribbon to go through later.
5. Press the Seams Open
To make your bag look neat and professional, move the seam line to the center and press open the stitches. This helps flatten the fabric and ensures your bag will sit nicely once it’s finished.
6. Create the Drawstring Casing
Now, below the second opening mark, draw a line horizontally all the way around the fabric. This will be your guide for the next step.
7. Fold and Secure the Top
Fold the top edge of the fabric over to meet the drawn line, ensuring that the edge of the fold is flush with the line. Secure this with pins all around the top edge.
8. Sew the Drawstring Casing
Now, sew all the way around the folded edge of the fabric, making sure to leave a small gap between your stitches and the fold to create a casing. This is where your ribbon will eventually go.
9. Sew the Bottom of the Bag
Turn your fabric so that the right side is facing out. Locate the opening and draw another line just above the first opening mark—this will help guide the next round of stitching.
Stitch along this line all the way around the bag, securing the bottom in place.
10. Finish the Bottom Seam

Now, turn the bag inside out (wrong side facing out), and move the seam line to the side. Use your sewing machine to sew across the bottom of the bag, leaving a 0.5” seam allowance. This will close the bottom of the bag.
11. Turn the Bag Right-Side Out
Flip the bag back to the right side, and gently push out the corners so they’re nice and sharp.
12. Attach the Ribbon

This is where the fun part comes in, take your ribbon or strap and attach a safety pin to one end. Use this pin to help you feed the ribbon through the casing at the top of the bag. Once it’s all the way through, tie the ends of the ribbon into a cute bow or knot.
And there you have it—your very own drawstring gift bag is ready to be filled with something special.
Wrap Up

I hope you enjoyed this simple and fun sewing project! Whether you’re making bags for gifts, small storage, or just as a lovely personal touch to your handmade creations, this easy-to-follow tutorial will help you make bags that are both beautiful and functional. Plus, it’s always rewarding to give a gift that’s wrapped with care and made by hand.
Feel free to get creative with the fabrics and ribbons you use—there are endless possibilities when it comes to personalizing these bags for any occasion. And remember, practice makes perfect! So if your first few bags aren’t perfect, don’t worry—just keep sewing, and soon you’ll be making them like a pro.
Happy sewing, and I’d love to hear how your drawstring gift bags turn out.
You may also like: