One of the best gifts you can make, whether you’re a new mom, a thoughtful aunt, or sewing for a friend, it is a washable diaper changing mat. When I first became a mom, I realized how often I needed a clean surface to change my baby on the go. Disposable pads felt wasteful, and store-bought mats didn’t quite have the cozy, personal touch I wanted.
So I decided to sew my own, with materials I already had at home. No fancy waterproof fabric needed. Just soft, absorbent fabric, a bit of padding, and a smart little trick using household items as a moisture barrier.
Let’s dive into this beginner-friendly project that’s as practical as it is adorable.
Materials You’ll Need:
Top Layer: Soft, absorbent fabric (flannel, cotton, or even old T-shirts)
Bottom Layer: Durable fabric (canvas, denim, or more cotton)
Middle Layer (Optional): Absorbent padding like towel, fleece, or soft foam/gum padding
Water Barrier Substitute (Optional but helpful):
A piece of plastic bag (cut and flattened)
Shower curtain liner
Vinyl tablecloth or PUL scrap
Sewing Supplies:
Sewing machine (or hand needle and thread)
Fabric scissors
Pins or clips
Velcro strip (about 5”)
Measuring tape or ruler
Pressing iron (optional but helpful)
Step-by-Step Instructions
1. Cut Your Fabric Layers
Suggested size: 18” x 24” (or adjust based on your preference)
Cut:
1 top layer (absorbent fabric)
1 bottom layer (durable fabric)
1 or 2 pieces of gum padding or towel (same size)
1 flattened plastic or waterproof liner (same size)
Tip: If using an old shower curtain or plastic bag, make sure it’s clean and wrinkle-free.
2. Add the Absorbent Layer
Fuse or place the padding layer (like soft foam or towel) to the wrong side of both the top and bottom fabrics.
This gives the mat extra softness and absorbency for your baby’s comfort.
3. Layer the Materials (Like a Sandwich)
Stack all the pieces in this order:
1. Top fabric (right side up)
2. Plastic barrier layer (if using)
3. Bottom fabric (right side down)
Make sure all edges align neatly.
4. Pin and Sew

Pin all the layers securely.
Sew around the entire perimeter with a ½-inch seam allowance, leaving a 4–5 inch gap on one side for turning.
5. Turn It Inside Out
Carefully turn the mat right side out through the gap.
Use a blunt tool (like a pencil or chopstick) to push out the corners so they’re nice and square.
6. Topstitch for Durability
Topstitch all the way around the edge, about ⅛-inch from the edge, to close the gap and add a professional finish.
7. (Optional) Quilting for a Firm, Professional Look
Use tailor’s chalk or a washable pen to draw quilt lines or patterns (like squares, waves, or grids).
Stitch along the lines using your sewing machine. This step helps hold all the layers in place and adds structure — but it’s completely optional.
8. Add a Velcro Strap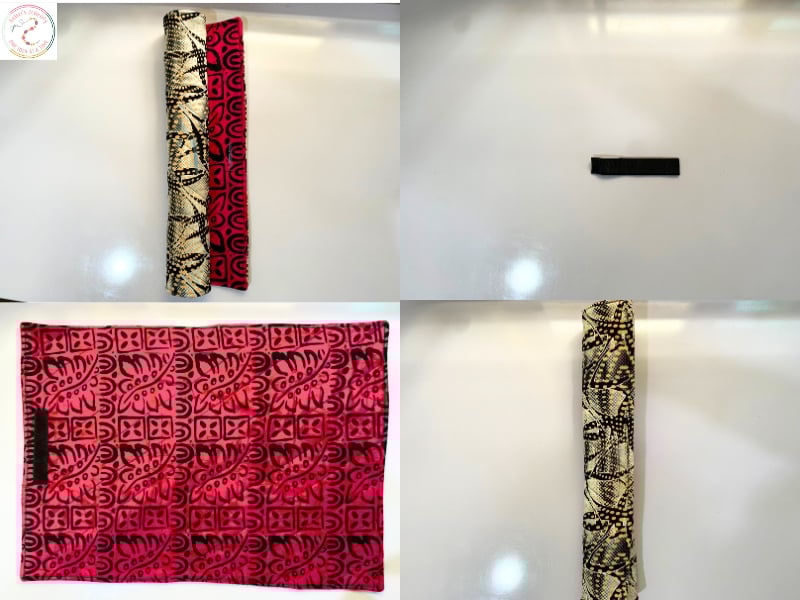
Roll up your finished mat and decide where you want to place the strap.
Cut a 5-inch Velcro piece (or two short strips — one hook, one loop).
Stitch one side of the Velcro to the outside edge of the mat, and the matching piece to the other end of the strap or body.
This makes it easy to roll and secure the mat when not in use.
Care Tips
All fabrics should be machine washable.
Avoid using plastic or vinyl that melts in the dryer.
Air-dry when possible, especially if using a plastic liner.
Why You’ll Love This DIY Changing Mat
Eco-friendly alternative to disposable mats
Fully customizable to match your nursery or diaper bag
Budget-friendly, most materials can be found around the house.
A perfect DIY baby shower gift
Easy to roll and pack on the go.
You may also like: